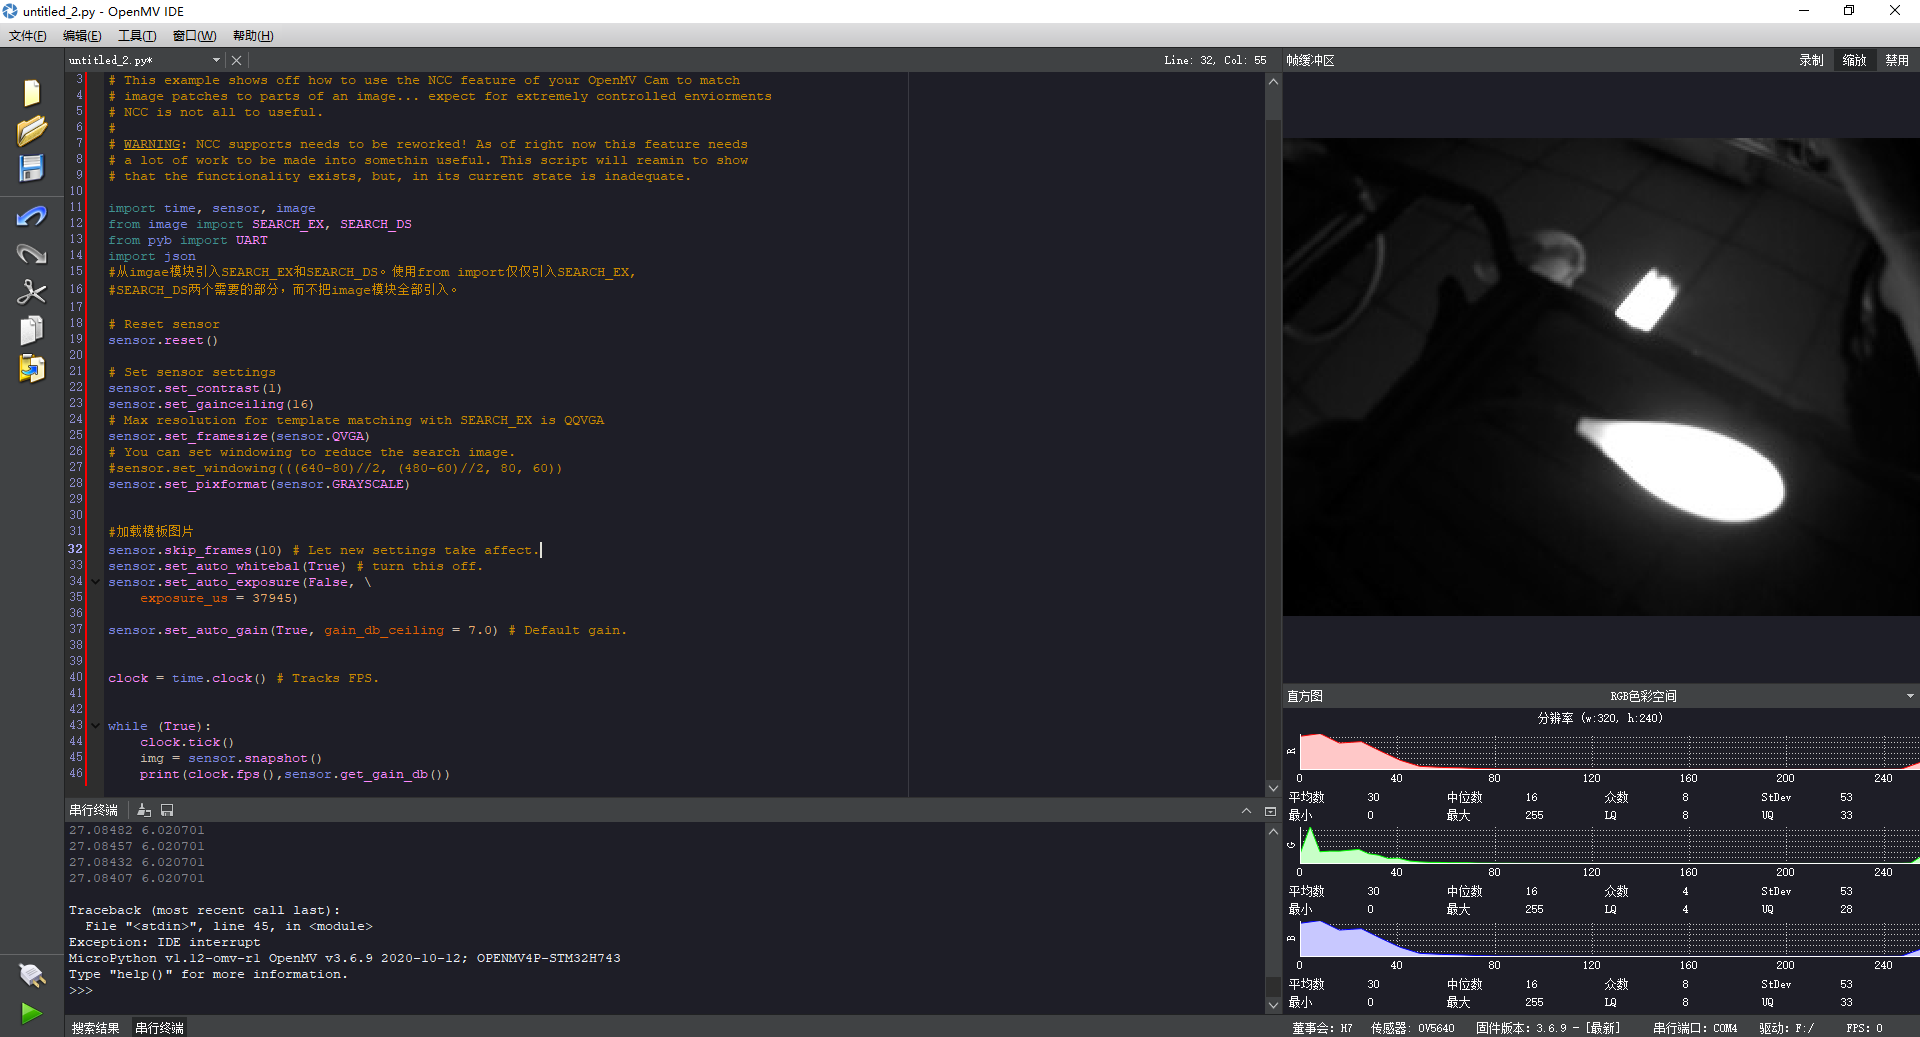
如何自动调整曝光时间 使得光源在不同的亮度条件下产生的效果都是一样的
请在这里粘贴代码
Template Matching Example - Normalized Cross Correlation (NCC)
This example shows off how to use the NCC feature of your OpenMV Cam to match
image patches to parts of an image... expect for extremely controlled enviorments
NCC is not all to useful.
WARNING: NCC supports needs to be reworked! As of right now this feature needs
a lot of work to be made into somethin useful. This script will reamin to show
that the functionality exists, but, in its current state is inadequate.
import time, sensor, image
from image import SEARCH_EX, SEARCH_DS
from pyb import UART
import json
#从imgae模块引入SEARCH_EX和SEARCH_DS。使用from import仅仅引入SEARCH_EX,
#SEARCH_DS两个需要的部分,而不把image模块全部引入。
Reset sensor
sensor.reset()
Set sensor settings
sensor.set_contrast(1)
sensor.set_gainceiling(16)
Max resolution for template matching with SEARCH_EX is QQVGA
sensor.set_framesize(sensor.QVGA)
You can set windowing to reduce the search image.
#sensor.set_windowing(((640-80)//2, (480-60)//2, 80, 60))
sensor.set_pixformat(sensor.GRAYSCALE)
#加载模板图片
sensor.skip_frames(10) # Let new settings take affect.
sensor.set_auto_whitebal(True) # turn this off.
sensor.set_auto_exposure(False,
exposure_us = 37945)
sensor.set_auto_gain(True, gain_db_ceiling = 7.0) # Default gain.
clock = time.clock() # Tracks FPS.
while (True):
clock.tick()
img = sensor.snapshot()
print(clock.fps(),sensor.get_gain_db())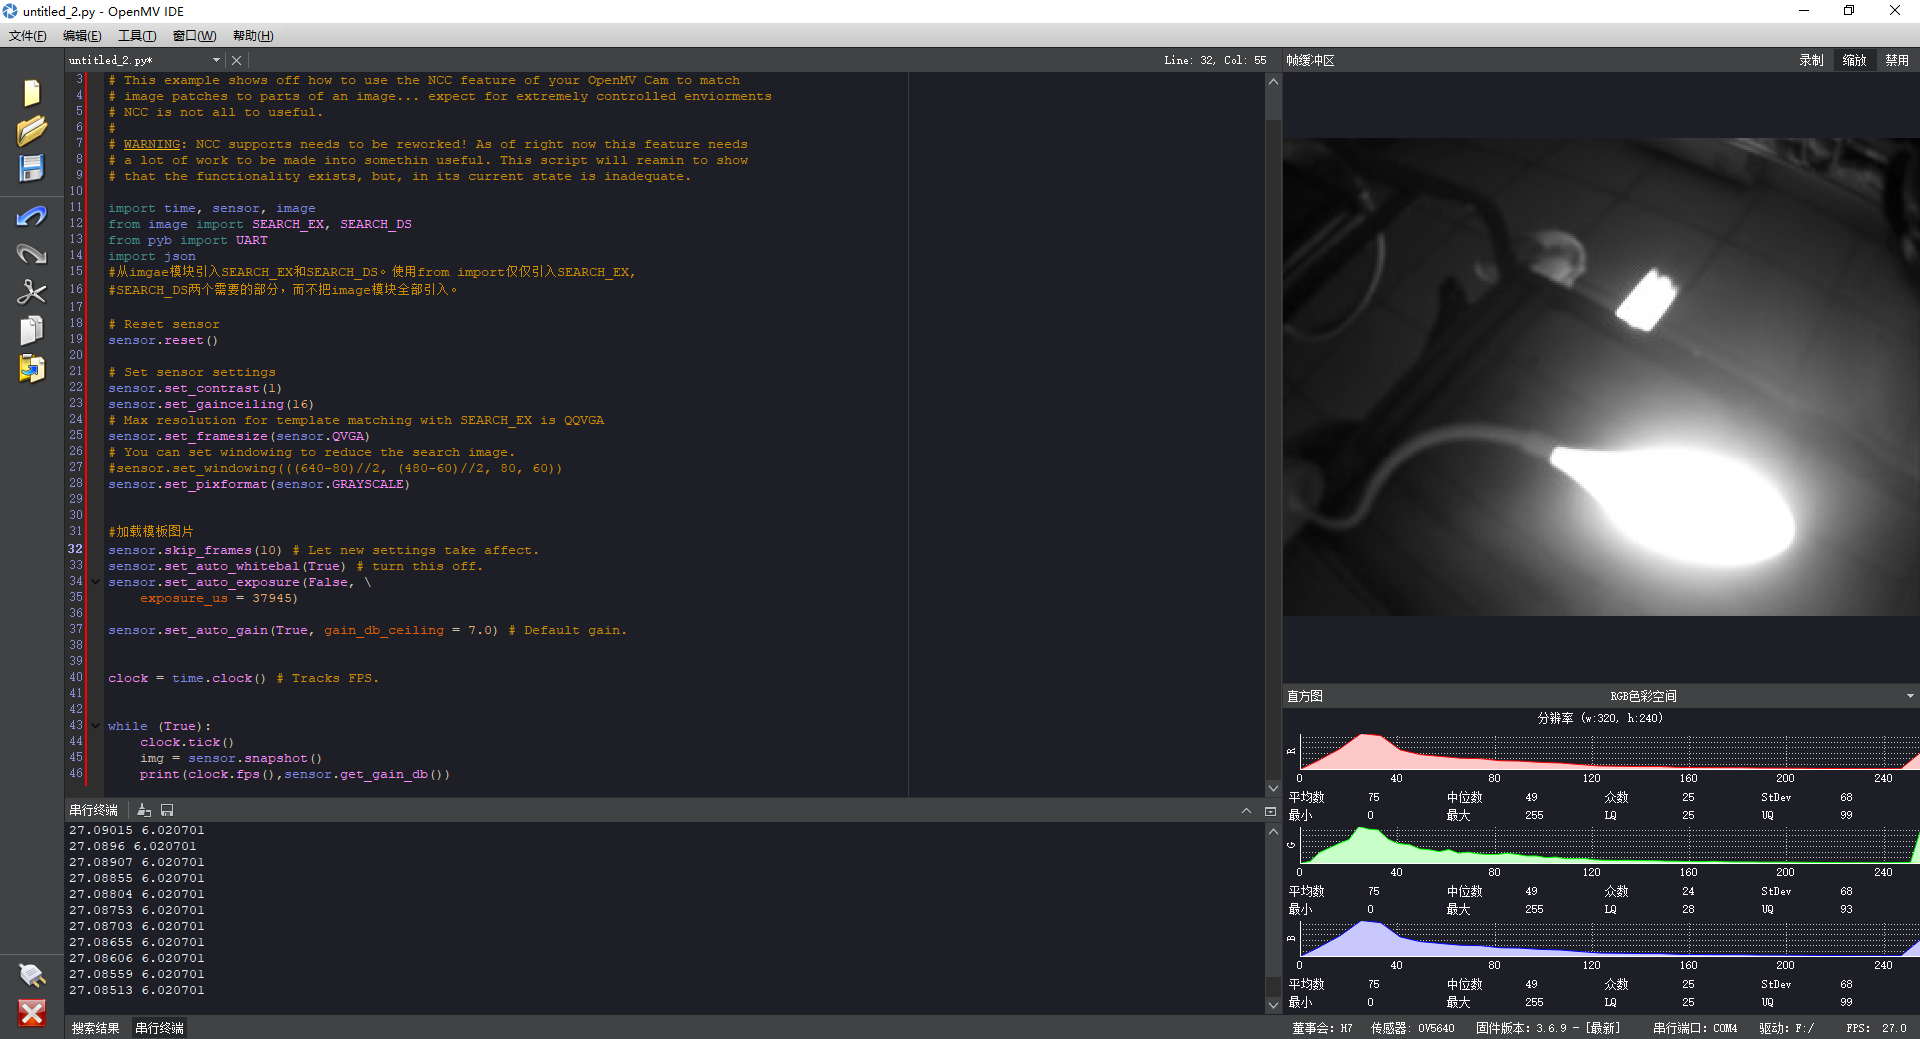
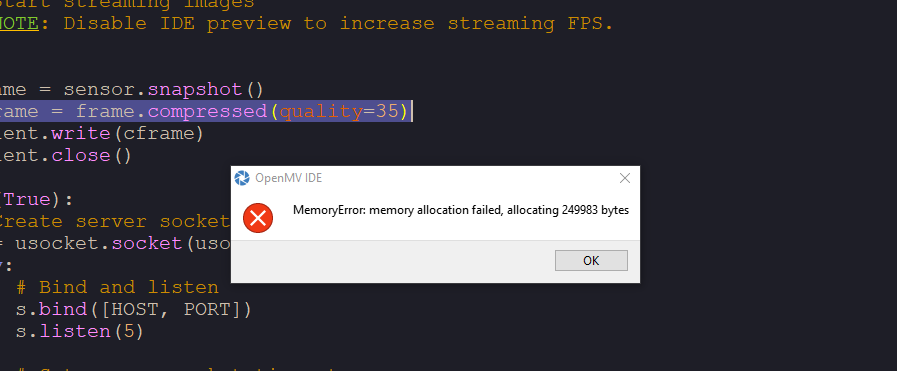
急急急Wifi 传图不支持高清图片吗?不支持的话,这个sensor.WQXGA2: 2592x1944 格式是咋用的
import sensor, image, time, network, usocket, sys

import sensor, image, time, network, usocket, sys

SSID ='HSAuto'
KEY  ='Aa123456'
HOST =' 10.119.96.163'
PORT = 8082

# Reset sensor
sensor.reset()
sensor.set_framesize(sensor.WQXGA2)
sensor.set_pixformat(sensor.RGB565)

# Init wlan module and connect to network
print("Trying to connect... (may take a while)...")
wlan = network.WINC()
wlan.connect(SSID, key=KEY, security=wlan.WPA_PSK)

# We should have a valid IP now via DHCP
print(wlan.ifconfig())

# Create server socket
s = usocket.socket(usocket.AF_INET, usocket.SOCK_STREAM)

# Bind and listen
s.bind([HOST, PORT])
s.listen(5)
print(s)
# Set server socket to blocking
s.setblocking(True)

def response(s):
    print ('Waiting for connections..')
    client, addr = s.accept()
    # set client socket timeout to 2s
    client.settimeout(2.0)
    print ('Connected to ' + addr[0] + ':' + str(addr[1]))

    # Read request from client
    #data = client.recv(8192)
    # Should parse client request here

    # Send multipart header
    client.send("HTTP/1.1 200 OK\r\n" \
                "Server: OpenMV\r\n" \
                "Content-Type: image/jpeg\r\n\r\n")

    # FPS clock
    clock = time.clock()

    # Start streaming images
    # NOTE: Disable IDE preview to increase streaming FPS.


    frame = sensor.snapshot()
    cframe = frame.compressed(quality=35)
    client.write(cframe)
    client.close()

while (True):
    # Create server socket
    s = usocket.socket(usocket.AF_INET, usocket.SOCK_STREAM)
    try:
        # Bind and listen
        s.bind([HOST, PORT])
        s.listen(5)

        # Set server socket timeout
        # NOTE: Due to a WINC FW bug, the server socket must be closed and reopened if
        # the client disconnects. Use a timeout here to close and re-create the socket.

        response(s)
        s.settimeout(60)
    except OSError as e:
        s.close()
        print("socket error: ", e)
        #sys.print_exception(e)
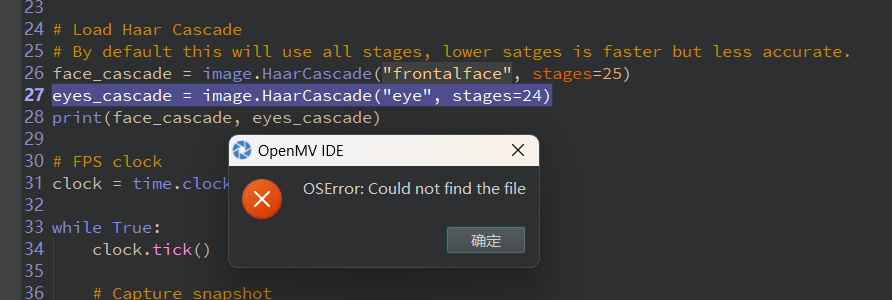
人眼识别示例代码报错 OSError: Could not find the file 如何解决?
# This work is licensed under the MIT license.
# Copyright (c) 2013-2023 OpenMV LLC. All rights reserved.
# https://github.com/openmv/openmv/blob/master/LICENSE
#
# Face Eye Detection Example
#
# This script uses the built-in frontalface detector to find a face and then
# the eyes within the face. If you want to determine the eye gaze please see the
# iris_detection script for an example on how to do that.

import sensor
import time
import image

# Reset sensor
sensor.reset()

# Sensor settings
sensor.set_contrast(1)
sensor.set_gainceiling(16)
sensor.set_framesize(sensor.HQVGA)
sensor.set_pixformat(sensor.GRAYSCALE)

# Load Haar Cascade
# By default this will use all stages, lower satges is faster but less accurate.
face_cascade = image.HaarCascade("frontalface", stages=25)
eyes_cascade = image.HaarCascade("eye", stages=24)
print(face_cascade, eyes_cascade)

# FPS clock
clock = time.clock()

while True:
    clock.tick()

    # Capture snapshot
    img = sensor.snapshot()

    # Find a face !
    # Note: Lower scale factor scales-down the image more and detects smaller objects.
    # Higher threshold results in a higher detection rate, with more false positives.
    objects = img.find_features(face_cascade, threshold=0.5, scale_factor=1.5)

    # Draw faces
    for face in objects:
        img.draw_rectangle(face)
        # Now find eyes within each face.
        # Note: Use a higher threshold here (more detections) and lower scale (to find small objects)
        eyes = img.find_features(
            eyes_cascade, threshold=0.5, scale_factor=1.2, roi=face
        )
        for e in eyes:
            img.draw_rectangle(e)

    # Print FPS.
    # Note: Actual FPS is higher, streaming the FB makes it slower.
    print(clock.fps())
图像识别中程序识别结果出现的问题
# Edge Impulse - OpenMV Image Classification Example

import sensor, image, time, os, tf

sensor.reset()                         # Reset and initialize the sensor.
sensor.set_pixformat(sensor.RGB565)    # Set pixel format to RGB565 (or GRAYSCALE)
sensor.set_framesize(sensor.QVGA)      # Set frame size to QVGA (320x240)
sensor.set_windowing((240, 240))       # Set 240x240 window.
sensor.skip_frames(time=2000)          # Let the camera adjust.
from pyb import UART
net = "trained.tflite"
labels = [line.rstrip('\n') for line in open("labels.txt")]
uart = UART(3, 115200)
uart.init(115200, bits=8, parity=None, stop=1)
clock = time.clock()
while(True):
    if uart.any():
        a=uart.readline().strip()
        clock.tick()
        time.sleep(1000)
        img = sensor.snapshot()
        for obj in tf.classify(net, img, min_scale=1.0, scale_mul=0.8, x_overlap=0.5, y_overlap=0.5):
            print("**********\nPredictions at [x=%d,y=%d,w=%d,h=%d]" % obj.rect())
            img.draw_rectangle(obj.rect())
            predictions_list = list(zip(labels, obj.output()))
            for i in range(len(predictions_list)):
                print("%s = %f" % (predictions_list[i][0], predictions_list[i][1]))
                max_size = predictions_list[0][1]
                zubie=0
                for i in range(len(predictions_list)):
                    if predictions_list[i][1] >= max_size:
                       zubie=i+1
                       max_size=predictions_list[i][1]
                    print(max_size)
                    print(zubie)
        if a==b'\x01':
           data = bytearray([zubie])
           uart.write(data)
           print(zubie)
为什么加了串口通信的语句之后,识别结果的概率和没加串口通信语句的概率差别这么大,没加的时候特别精确,但是加了之后老是出错
# Edge Impulse - OpenMV Image Classification Example

import sensor, image, time, os, tf

sensor.reset()                         # Reset and initialize the sensor.
sensor.set_pixformat(sensor.RGB565)    # Set pixel format to RGB565 (or GRAYSCALE)
sensor.set_framesize(sensor.QVGA)      # Set frame size to QVGA (320x240)
sensor.set_windowing((240, 240))       # Set 240x240 window.
sensor.skip_frames(time=2000)          # Let the camera adjust.

net = "trained.tflite"
labels = [line.rstrip('\n') for line in open("labels.txt")]

clock = time.clock()
while(True):
    clock.tick()

    img = sensor.snapshot()

    # default settings just do one detection... change them to search the image...
    for obj in tf.classify(net, img, min_scale=1.0, scale_mul=0.8, x_overlap=0.5, y_overlap=0.5):
        print("**********\nPredictions at [x=%d,y=%d,w=%d,h=%d]" % obj.rect())
        img.draw_rectangle(obj.rect())
        # This combines the labels and confidence values into a list of tuples
        predictions_list = list(zip(labels, obj.output()))

        for i in range(len(predictions_list)):
            print("%s = %f" % (predictions_list[i][0], predictions_list[i][1]))

    print(clock.fps(), "fps")
可以在边缘检测程序之后再加识别矩形程序吗 加了以后报错
# 边缘检测例子:
#
# 这个程序示范了在图像上使用morph函数来进行边缘检测。
# 然后在进行阈值和滤波

import sensor, image, time

#设置核函数滤波,核内每个数值值域为[-128,127],核需为列表或元组
kernel_size = 1 # kernel width = (size*2)+1, kernel height = (size*2)+1
kernel = [-1, -1, -1,\
          -1, +8, -1,\
          -1, -1, -1]
# 这个一个高通滤波器。见这里有更多的kernel
# http://www.fmwconcepts.com/imagemagick/digital_image_filtering.pdf
thresholds = [(100, 255)] # grayscale thresholds设置阈值

sensor.reset() # 初始化 sensor.
sensor.set_pixformat(sensor.GRAYSCALE) # or sensor.RGB565
sensor.set_framesize(sensor.QQVGA) # or sensor.QVGA (or others)
sensor.skip_frames(10) # 让新的设置生效
clock = time.clock() # 追踪FPS

# 在OV7725 sensor上, 边缘检测可以通过设置sharpness/edge寄存器来增强。
# 注意:这个会edge detection can be enhanced
# significantly by setting the sharpness/edge registers.
# Note: This will be implemented as a function later.
if (sensor.get_id() == sensor.OV7725):
    sensor.__write_reg(0xAC, 0xDF)
    sensor.__write_reg(0x8F, 0xFF)

while(True):
    clock.tick() # Track elapsed milliseconds between snapshots().
    img = sensor.snapshot() # Take a picture and return the image.

    img.morph(kernel_size, kernel)
    #morph(size, kernel, mul=Auto, add=0),morph变换,mul根据图像对比度
    #进行调整,mul使图像每个像素乘mul;add根据明暗度调整,使得每个像素值加上add值。
    #如果不设置则不对morph变换后的图像进行处理。
    img.binary(thresholds)
    #利用binary函数对图像进行分割

    # Erode pixels with less than 2 neighbors using a 3x3 image kernel
    img.erode(1, threshold = 2)
    #侵蚀函数erode(size, threshold=Auto),去除边缘相邻处多余的点。threshold
    #用来设置去除相邻点的个数,threshold数值越大,被侵蚀掉的边缘点越多,边缘旁边
    #白色杂点少;数值越小,被侵蚀掉的边缘点越少,边缘旁边的白色杂点越多。

    print(clock.fps()) # Note: Your OpenMV Cam runs about half as fast while
    # connected to your computer. The FPS should increase once disconnected.
    for r in img.find_rects(threshold = 10000):
        img.draw_rectangle(r.rect(), color = (255, 0, 0))
        for p in r.corners(): img.draw_circle(p[0], p[1], 5, color = (0, 255, 0))
        print(r)

    print("FPS %f" % clock.fps())
怎么把人脸检测的方框数提取出来,并传输给单片
import sensor, time, image, pyb,lcd
from pyb import UART
led = pyb.LED(3)
sensor.reset()
sensor.set_contrast(1)
sensor.set_gainceiling(16)
sensor.set_framesize(sensor.HQVGA)
sensor.set_pixformat(sensor.GRAYSCALE)
face_cascade = image.HaarCascade("frontalface", stages=25)
uart = UART(3,19200)
print(face_cascade)
clock = time.clock()
lcd.init() # Initialize the lcd screen.
while (True):
    clock.tick()
    img = sensor.snapshot()
    objects = img.find_features(face_cascade, threshold=0.75, scale_factor=1.25)
    for a in objects:
        img.draw_rectangle(a)
        time.sleep(2000)
              uart.write("%s",a[2])
              time.sleep(1000)请在这里粘贴代码
如何降低光线亮度对颜色识别的影响?
从代码的角度无法根本解决环境光的问题。
可能你需要从光学角度,比如用滤光片,和偏振片之类的。
还有你的sensor可能没有设置好。
你需要提供图片,比如白色,和黄色的截图。
还有代码。
这个程序为什么偶尔会报错,但有时也会运行?
# QRCode Example
#
# This example shows the power of the OpenMV Cam to detect QR Codes
# without needing lens correction.

import sensor, image, time

sensor.reset()
sensor.set_pixformat(sensor.GRAYSCALE)
sensor.set_framesize(sensor.VGA)
sensor.set_windowing((240, 240)) # look at center 240x240 pixels of the VGA resolution.
sensor.skip_frames(time = 2000)
sensor.set_auto_gain(False) # must turn this off to prevent image washout...
clock = time.clock()

while(True):
    clock.tick()
    img = sensor.snapshot()
    for code in img.find_qrcodes():
        m=code.payload()
    break
s=list(m)
print(s)
请问下为什么报错?SyntaxError:invalid syntax
Untitled - By: Administrator - 周五 十一月 9 2018
import sensor, image, time,Pin
from pyb
sensor.reset()
sensor.set_pixformat(sensor.RGB565)
sensor.set_framesize(sensor.QVGA)
sensor.skip_frames(time = 2000)
clock = time.clock()
while(True):
clock.tick()
img = sensor.snapshot()
print(clock.fps())
# 连接一个开关到Pin0,当开关闭合的时候,引脚置低。然后Pin1会点亮
pin0 = Pin('P0', Pin.IN, Pin.PULL_UP)
pin1 = Pin('P1', Pin.OUT_PP, Pin.PULL_NONE)


    pin1.value(not pin0.value())