我在uart.write(c[0].x,c[1].x等等点)时会报错,让我不要加[],
正确的代码:
import sensor, image, time, pyb

sensor.reset()
sensor.set_pixformat(sensor.RGB565) # grayscale is faster
sensor.set_framesize(sensor.QQVGA)
sensor.skip_frames(time = 2000)
clock = time.clock()

while(True):
    clock.tick()
    img = sensor.snapshot().lens_corr(1.8)

    circles = img.find_circles(threshold = 2000, x_margin = 10, y_margin = 10, r_margin = 10,
            r_min = 2, r_max = 100, r_step = 2)

    for c in circles:
        img.draw_circle(c.x(), c.y(), c.r(), color = (255, 0, 0))

    if len(circles) > 0:
        c0=circles[0].x()
        print(c0)
可以获取物体颜色参数,l例程里面是l,a,b数值,但是,我需要rgb空间的r,g,b数值,该怎么获取?
import sensor, image, time
sensor.reset() # 初始化摄像头
sensor.set_pixformat(sensor.RGB565) # 格式为 RGB565.
sensor.set_framesize(sensor.QVGA)
sensor.skip_frames(10) # 跳过10帧,使新设置生效
sensor.set_auto_whitebal(False) # Create a clock object to track the FPS.
ROI=(80,30,15,15)
while(True):
img = sensor.snapshot()         # Take a picture and return the image.
statistics=img.get_statistics(roi=ROI)
color_l=statistics.l_mode()
color_a=statistics.a_mode()
color_b=statistics.b_mode()
print(color_l,color_a,color_b)
img.draw_rectangle(ROI)为什么在没有圆的时候不打印“五”
你的代码写的有问题。改成这个:
import sensor, image, time

sensor.reset()
sensor.set_pixformat(sensor.RGB565) # 灰度更快
sensor.set_framesize(sensor.QQVGA)
sensor.skip_frames(time = 2000)
clock = time.clock()

while(True):
    clock.tick()

    #lens_corr(1.8)畸变矫正
    img = sensor.snapshot().lens_corr(1.8)
    圆 =img.find_circles(threshold = 3500, x_margin = 10, y_margin = 10, r_margin = 10,r_min = 2, r_max = 100, r_step = 2)
    if(圆):
       print("找到了",c)
    else:
       print("五")
运行例程21-感光元件手动白平衡控制后输出一直为(0,0,0)
你发送的代码,没有手动设置白平衡,要sensor.set_auto_whitebal(False, rgb_gain_db = (0.0, 0.0, 0.0))这一行注释掉,并填上需要设置的参数。
另外,OpenMV4 H7上的mt9m114芯片,无法手动设置白平衡,这个sensor芯片不支持这个功能。
请问有具体引用示例吗?
import sensor, image, time
import pyb, math

green_threshold   = (   0,   80,  -70,   -10,   -0,   30)
sensor.reset()
sensor.set_pixformat(sensor.RGB565)
sensor.set_framesize(sensor.QQVGA)
sensor.skip_frames(time = 2000)
clock = time.clock()


last_time = None
last_blob = None
while(True):
    clock.tick()
    img = sensor.snapshot()

    blobs = img.find_blobs([green_threshold])
    if blobs:
        blob = blobs[0]
        img.draw_rectangle(blob.rect())
        img.draw_cross(blob.cx(), blob.cy())
        now_time = pyb.millis()
        if last_blob:
            diff_time = now_time-last_time
            diff_position = math.sqrt((blob.cx()-last_blob.cx())**2 + (blob.cy()-last_blob.cy())**2)
            print(diff_position, diff_time)
        last_time = now_time
        last_blob = blob
参考测距例程后的语法问题
@kidswong999 那为什么测距例程里面就有这种len()用法,而且编译例程没错。到我这里编译main函数就说错了?
import sensor, image, time
Measure the distance
This example shows off how to measure the distance through the size in imgage
This example in particular looks for yellow pingpong ball.
import sensor, image, time
For color tracking to work really well you should ideally be in a very, very,
very, controlled enviroment where the lighting is constant...
yellow_threshold = ( 56, 83, 5, 57, 63, 80)
You may need to tweak the above settings for tracking green things...
Select an area in the Framebuffer to copy the color settings.
sensor.reset() # Initialize the camera sensor.
sensor.set_pixformat(sensor.RGB565) # use RGB565.
sensor.set_framesize(sensor.QQVGA) # use QQVGA for speed.
sensor.skip_frames(10) # Let new settings take affect.
sensor.set_auto_whitebal(False) # turn this off.
clock = time.clock() # Tracks FPS.
K=5000#the value should be measured
while(True):
clock.tick() # Track elapsed milliseconds between snapshots().
img = sensor.snapshot() # Take a picture and return the image.
blobs = img.find_blobs([yellow_threshold])
if len(blobs) == 1:
    # Draw a rect around the blob.
    b = blobs[0]
    img.draw_rectangle(b[0:4]) # rect
    img.draw_cross(b[5], b[6]) # cx, cy
    Lm = (b[2]+b[3])/2
    length = K/Lm
    print(length)

#print(clock.fps()) # Note: Your OpenMV Cam runs about half as fast while
# connected to your computer. The FPS should increase once disconnected.
sensor.reset()
sensor.set_pixformat(sensor.RGB565)
sensor.set_framesize(sensor.QVGA)
sensor.skip_frames(time = 2000)
clock = time.clock()
while(True):
clock.tick()
img = sensor.snapshot()
print(clock.fps())
调试人脸识别时出现问题,tuple' object has no attribute 'cx'该怎么解决?
import sensor, image, time
from pid import PID
from pyb import Servo
pan_servo=Servo(1)
tilt_servo=Servo(2)
red_threshold = (13, 49, 18, 61, 6, 47)
#pan_pid = PID(p=0.07, i=0, imax=90) #脱机运行或者禁用图像传输,使用这个PID
#tilt_pid = PID(p=0.05, i=0, imax=90) #脱机运行或者禁用图像传输,使用这个PID
pan_pid = PID(p=0.1, i=0, imax=90)#在线调试使用这个PID
tilt_pid = PID(p=0.1, i=0, imax=90)#在线调试使用这个PID
sensor.reset() # Initialize the camera sensor.
# Sensor settings
sensor.set_contrast(1)
sensor.set_gainceiling(16)
# HQVGA and GRAYSCALE are the best for face tracking.
sensor.set_framesize(sensor.HQVGA)
sensor.set_pixformat(sensor.GRAYSCALE)
#注意人脸识别只能用灰度图哦
clock = time.clock() # Tracks FPS.
face_cascade = image.HaarCascade("frontalface", stages=25)
def find_max(blobs):
max_size=0
for blob in blobs:
if blob[2]*blob[3] > max_size:
max_blob=blob
max_size = blob[2]*blob[3]
return max_blob
while(True):
clock.tick() # Track elapsed milliseconds between snapshots().
img = sensor.snapshot() # Take a picture and return the image.
objects = img.find_features(face_cascade, threshold=0.75, scale=1.35)
if objects:
max_blob = find_max(objects)
pan_error = max_blob.cx()-img.width()/2
tilt_error = max_blob.cy()-img.height()/2
print("pan_error: ", pan_error)
img.draw_rectangle(max_blob.rect()) # rect
pan_output=pan_pid.get_pid(pan_error,1)/2
tilt_output=tilt_pid.get_pid(tilt_error,1)
print("pan_output",pan_output)
pan_servo.angle(pan_servo.angle()+pan_output)
tilt_servo.angle(tilt_servo.angle()-tilt_output)
为什么识别不了输入的a来拍照呀,
from pyb import UART

uart = UART(3, 9600, timeout_char=1000)                         # i使用给定波特率初始化
uart.init(9600, bits=8, parity=None, stop=1, timeout_char=1000) # 使用给定参数初始化

# Snapshot Example
#
# Note: You will need an SD card to run this example.
#
# You can use your OpenMV Cam to save image files.

import sensor, image, pyb,sensor, gif,time,utime

RED_LED_PIN = 1
BLUE_LED_PIN = 3

sensor.reset() # Initialize the camera sensor.
sensor.set_pixformat(sensor.RGB565) # or sensor.GRAYSCALE
sensor.set_pixformat(sensor.GRAYSCALE)
sensor.set_framesize(sensor.QVGA) # or sensor.QQVGA (or others)
sensor.skip_frames(time = 2000) # Let new settings take affect.

while(True):
    if not uart.any():
        # 啥事儿不干
        sensor.snapshot()
        time.sleep(100)

    else:
        a=uart.readline()
        print(a)

        if a=='12\n':
            pyb.LED(RED_LED_PIN).on()
            sensor.skip_frames(time = 2000) # Give the user time to get ready.
            pyb.LED(RED_LED_PIN).off()
            pyb.LED(BLUE_LED_PIN).on()
            print("You're on camera!")
            sensor.snapshot().save("example_tupian.jpg") # or "example.bmp" (or others)
            pyb.LED(BLUE_LED_PIN).off()
            print("Done! Reset the camera to see the saved image.")

        else:
            pyb.LED(RED_LED_PIN).on()
            sensor.skip_frames(time = 2000) # Give the user time to get ready.
            pyb.LED(RED_LED_PIN).off()
            pyb.LED(BLUE_LED_PIN).on()

            g = gif.Gif("example.gif", loop=True)

            print("You're on camera2!")
            for i in range(300):

             # clock.avg() returns the milliseconds between frames - gif delay is in
                g.add_frame(sensor.snapshot()) # centiseconds.

            g.close()
            pyb.LED(BLUE_LED_PIN).off()
            print("Done! Reset the camera to see the saved recording.")
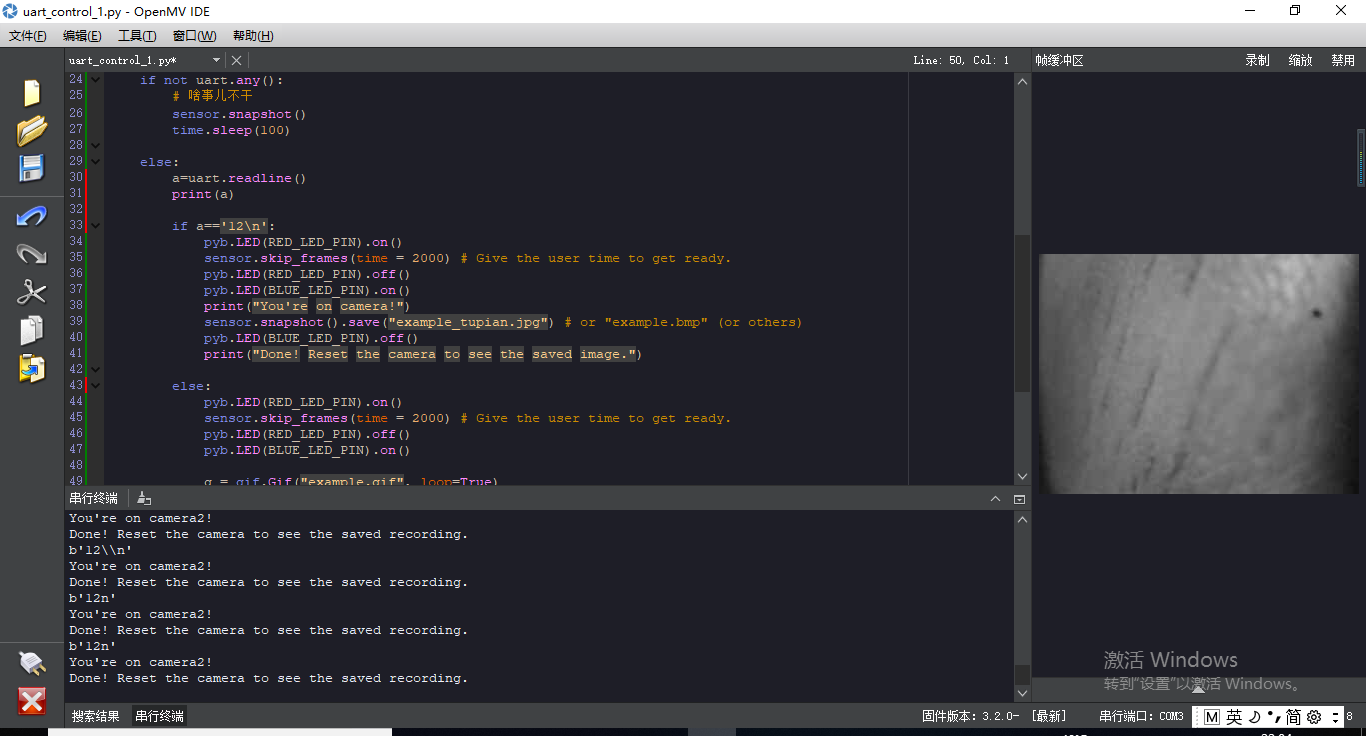
不管怎么输入a 都是选择了else
特征点检测例程一直报错咋办呢?是怎呢回事?
# Object tracking with keypoints example.
# Show the camera an object and then run the script. A set of keypoints will be extracted
# once and then tracked in the following frames. If you want a new set of keypoints re-run
# the script. NOTE: see the docs for arguments to tune find_keypoints and match_keypoints.
import sensor, time, image

# Reset sensor
sensor.reset()

# Sensor settings
sensor.set_contrast(3)
sensor.set_gainceiling(16)
sensor.set_framesize(sensor.VGA)#在这里报错  ValueError: Failed to set framesize!
sensor.set_windowing((320, 240))
sensor.set_pixformat(sensor.GRAYSCALE)

sensor.skip_frames(time = 2000)
sensor.set_auto_gain(False, value=100)

def draw_keypoints(img, kpts):
    if kpts:
        print(kpts)
        img.draw_keypoints(kpts)
        img = sensor.snapshot()
        time.sleep(1000)

kpts1 = None
# NOTE: uncomment to load a keypoints descriptor from file
#kpts1 = image.load_descriptor("/desc.orb")
#img = sensor.snapshot()
#draw_keypoints(img, kpts1)

clock = time.clock()
while (True):
    clock.tick()
    img = sensor.snapshot()
    if (kpts1 == None):
        # NOTE: By default find_keypoints returns multi-scale keypoints extracted from an image pyramid.
        kpts1 = img.find_keypoints(max_keypoints=150, threshold=10, scale_factor=1.2)
        draw_keypoints(img, kpts1)
    else:
        # NOTE: When extracting keypoints to match the first descriptor, we use normalized=True to extract
        # keypoints from the first scale only, which will match one of the scales in the first descriptor.
        kpts2 = img.find_keypoints(max_keypoints=150, threshold=10, normalized=True)
        if (kpts2):
            match = image.match_descriptor(kpts1, kpts2, threshold=85)
            if (match.count()>10):
                # If we have at least n "good matches"
                # Draw bounding rectangle and cross.
                img.draw_rectangle(match.rect())
                img.draw_cross(match.cx(), match.cy(), size=10)

            print(kpts2, "matched:%d dt:%d"%(match.count(), match.theta()))
            # NOTE: uncomment if you want to draw the keypoints
            #img.draw_keypoints(kpts2, size=KEYPOINTS_SIZE, matched=True)

    # Draw FPS
    img.draw_string(0, 0, "FPS:%.2f"%(clock.fps()))
为什么关闭了自动曝光,设置了固定曝光时间,但是曝光还是一直在变化
程序里关闭了自动曝光,设置了固定的曝光值,但是曝光不是一直按照设置的曝光时间而是有些背景下是很小的曝光很暗的画面,有些时候背景变化就会按照设置的较大曝光值显示亮的画面,请问我想一直保持固定较大的曝光值还要设置些什么吗
import time, sensor, image
from image import SEARCH_EX, SEARCH_DS
from pyb import UART
import json
#从imgae模块引入SEARCH_EX和SEARCH_DS。使用from import仅仅引入SEARCH_EX,
#SEARCH_DS两个需要的部分,而不把image模块全部引入。
# Reset sensor
sensor.reset()
# Set sensor settings
sensor.set_contrast(1)
sensor.set_gainceiling(16)
# Max resolution for template matching with SEARCH_EX is QQVGA
sensor.set_framesize(sensor.QQVGA)
# You can set windowing to reduce the search image.
#sensor.set_windowing(((640-80)//2, (480-60)//2, 80, 60))
sensor.set_pixformat(sensor.GRAYSCALE)
# Load template.
# Template should be a small (eg. 32x32 pixels) grayscale image.
template = image.Image("/6.pgm")
#加载模板图片
sensor.skip_frames(10) # Let new settings take affect.
sensor.set_auto_whitebal(False) # turn this off.
sensor.set_auto_exposure(False, \
exposure_us = 20000)
sensor.set_auto_gain(True, gain_db_ceiling = 16.0) # Default gain.