TypeError:'displacement' object is not iterable
# Optical Flow Example
#
# Your OpenMV Cam can use optical flow to determine the displacement between
# two images. This allows your OpenMV Cam to track movement like how your laser
# mouse tracks movement. By tacking the difference between successive images
# you can determine instaneous displacement with your OpenMV Cam too!

import sensor, image, time

sensor.reset() # Initialize the camera sensor.
sensor.set_pixformat(sensor.GRAYSCALE) # or sensor.GRAYSCALE
sensor.set_framesize(sensor.B64x32) # or B40x30 or B64x64
clock = time.clock() # Tracks FPS.

# NOTE: The find_displacement function works by taking the 2D FFTs of the old
# and new images and compares them using phase correlation. Your OpenMV Cam
# only has enough memory to work on two 64x64 FFTs (or 128x32, 32x128, or etc).
old = sensor.snapshot()

while(True):
    clock.tick() # Track elapsed milliseconds between snapshots().
    img = sensor.snapshot() # Take a picture and return the image.

    [delta_x, delta_y, response] = old.find_displacement(img)

    old = img.copy()

    print("%0.1f X\t%0.1f Y\t%0.2f QoR\t%0.2f FPS" % \
        (delta_x, delta_y, response, clock.fps()))
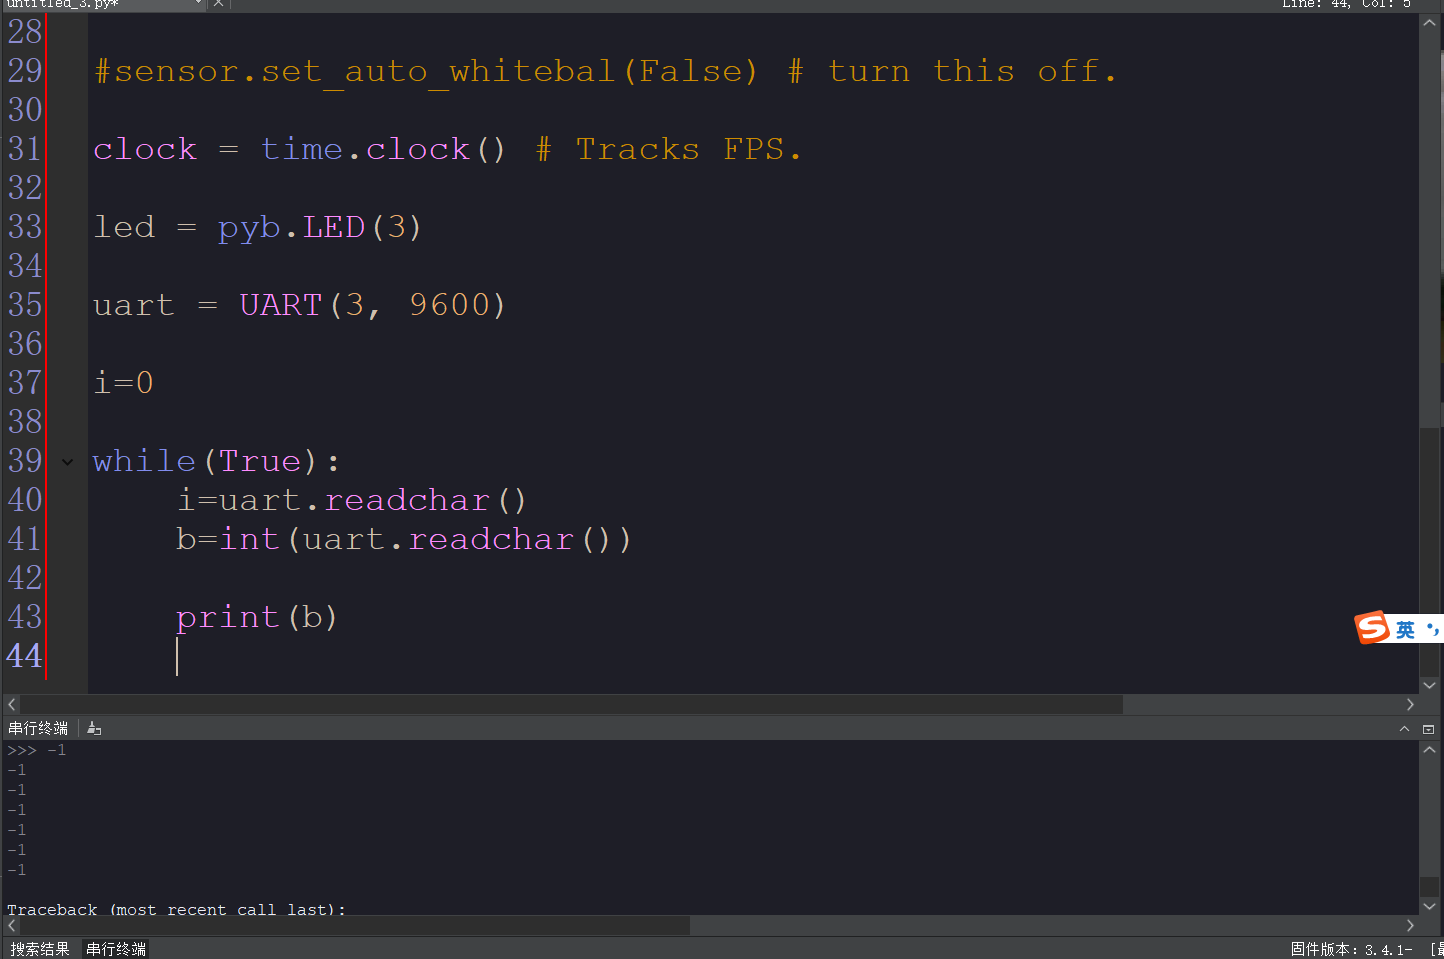
openmv收数据的问题
当openmv的串口没有收到数据时,为什么print函数一直现实的是一
# Blob Detection and uart transport

import sensor, image, time,pyb

from pyb import UART

import json

# For color tracking to work really well you should ideally be in a very, very,

# very, controlled enviroment where the lighting is constant...

yellow_threshold   = (65, 100, -10, 6, 24, 51)

# You may need to tweak the above settings for tracking green things...

# Select an area in the Framebuffer to copy the color settings.


#sensor.reset() # Initialize the camera sensor.

#sensor.set_pixformat(sensor.RGB565) # use RGB565.

#sensor.set_framesize(sensor.QQVGA) # use QQVGA for speed.

#sensor.skip_frames(10) # Let new settings take affect.

#sensor.set_auto_whitebal(False) # turn this off.

clock = time.clock() # Tracks FPS.

led = pyb.LED(3)

uart = UART(3, 9600)

i=0

while(True):
    i=uart.readchar()
    b=int(uart.readchar())

    print(b)
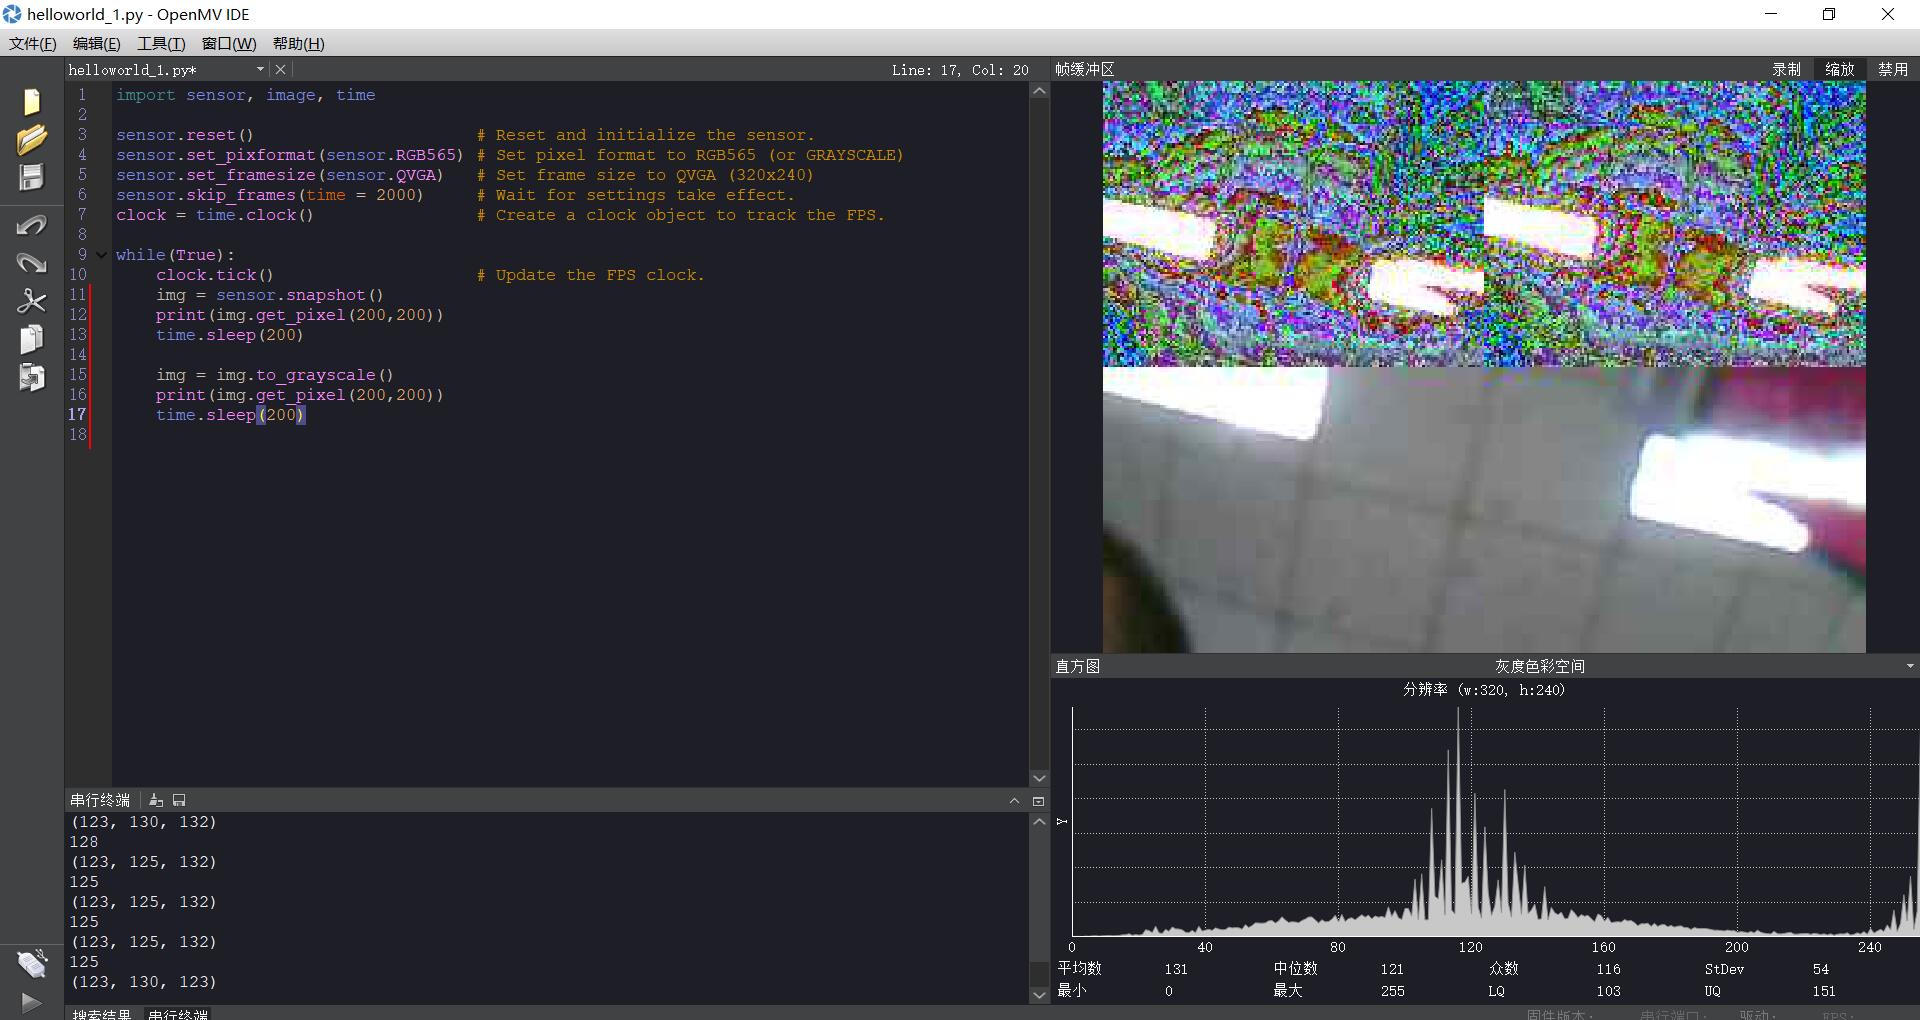
彩色图转灰度图,图像显示出现莫名错误
写程序时需要用到灰度图和彩色图,在初始化时设置RGB565,在后面需要用到灰度图时,不知道什么原因,串行端口打印的值感觉没啥问题(只是感觉),但是显示的图像出现问题。用示例代码进行测试如下:
import sensor, image, time

sensor.reset()                      # Reset and initialize the sensor.
sensor.set_pixformat(sensor.RGB565) # Set pixel format to RGB565 (or GRAYSCALE)
sensor.set_framesize(sensor.QVGA)   # Set frame size to QVGA (320x240)
sensor.skip_frames(time = 2000)     # Wait for settings take effect.
clock = time.clock()                # Create a clock object to track the FPS.

while(True):
    clock.tick()                    # Update the FPS clock.
    img = sensor.snapshot()
    print(img.get_pixel(45,180))
    time.sleep(200)

    img = img.to_grayscale()
    print(img.get_pixel(45,180))
    time.sleep(200)
颜色识别测距怎么在方框的旁边显示距离。不是通过串口打印。是直接显示在方框的旁边
# Measure the distance

#


import sensor, image, time


# For color tracking to work really well you should ideally be in a very, very,

# very, controlled enviroment where the lighting is constant...

yellow_threshold   = (12, 100, 30, 127, -39, 50)

# You may need to tweak the above settings for tracking green things...

# Select an area in the Framebuffer to copy the color settings.


sensor.reset() # Initialize the camera sensor.

sensor.set_pixformat(sensor.RGB565) # use RGB565.

sensor.set_framesize(sensor.QQVGA) # use QQVGA for speed.

sensor.skip_frames(10) # Let new settings take affect.

sensor.set_auto_whitebal(False) # turn this off.

clock = time.clock() # Tracks FPS.


K=1310#the value should be measured


while(True):

    clock.tick() # Track elapsed milliseconds between snapshots().

    img = sensor.snapshot() # Take a picture and return the image.


    blobs = img.find_blobs([yellow_threshold])

    if len(blobs) == 1:

        # Draw a rect around the blob.

        b = blobs[0]

        img.draw_rectangle(b[0:4]) # rect

        img.draw_cross(b[5], b[6]) # cx, cy

        Lm = (b[2]+b[3])/2

        length = K/Lm

        print(length)
        print(b[5], b[6])
例程18 初始参数设置的疑问
在如下四行代码中,对摄像头模块进行了初始参数设置
“lens_mm = 2.8 # Standard Lens.
lens_to_camera_mm = 22 # Standard Lens.
sensor_w_mm = 3.984 # For OV7725 sensor - see datasheet.
sensor_h_mm = 2.952 # For OV7725 sensor - see datasheet.”
第一行代码是摄像头的焦距,而我使用的是后来配的一个长焦镜头,那么请问这个参数该怎么设置。第二行的参数没有看懂,是否使用一样的,还是和第一行一样,要根据自己的摄像头来设置。
“
h_fov = 2 * math.atan((sensor_w_mm / 2) / lens_mm)
v_fov = 2 * math.atan((sensor_h_mm / 2) / lens_mm)
”
这两行代码貌似使用了一开始设置的参数对距离进行了计算。
串口通信
# Blob Detection and uart transport
import sensor, image, time
from pyb import UART
import json
# For color tracking to work really well you should ideally be in a very, very,
# very, controlled enviroment where the lighting is constant...
yellow_threshold   = (65, 100, -10, 6, 24, 51)
# You may need to tweak the above settings for tracking green things...
# Select an area in the Framebuffer to copy the color settings.

sensor.reset() # Initialize the camera sensor.
sensor.set_pixformat(sensor.RGB565) # use RGB565.
sensor.set_framesize(sensor.QQVGA) # use QQVGA for speed.
sensor.skip_frames(10) # Let new settings take affect.
sensor.set_auto_whitebal(False) # turn this off.
clock = time.clock() # Tracks FPS.

uart = UART(3, 115200)

while(True):
    img = sensor.snapshot() # Take a picture and return the image.

    blobs = img.find_blobs([yellow_threshold])
    if blobs:
        print('sum :', len(blobs))
        output_str = json.dumps(blobs)
        for b in blobs:
            # Draw a rect around the blob.
            img.draw_rectangle(b.rect()) # rect
            img.draw_cross(b.cx(), b.cy()) # cx, cy

        print('you send:',output_str)
        uart.write(output_str+'\n')
    else:
        print('not found!')
这个代码不能够显示
识别数字后的数据通过串口发送到电脑出现问题
用识别数字例程识别数字,想将输出的数据经串口传送到电脑,代码如下
import sensor, image, time
from pyb import UART

sensor.reset()                          # Reset and initialize the sensor.
sensor.set_contrast(3)
sensor.set_pixformat(sensor.GRAYSCALE)  # Set pixel format to RGB565 (or GRAYSCALE)
sensor.set_framesize(sensor.VGA)        # Set frame size to QVGA (320x240)
sensor.set_windowing((128, 128))        # Set 128x128 window.
sensor.skip_frames(time = 2000)         # Wait for settings take effect.
sensor.set_auto_gain(False)
sensor.set_auto_exposure(False)

uart = UART(3, 115200)


while(True):
    img = sensor.snapshot()
    # NOTE: Uncomment to detect dark numbers on white background
    # img.invert()
    out = img.find_number(roi=(img.width()//2-14, img.height()//2-14, 28, 28))
    img.draw_rectangle((img.width()//2-15, img.height()//2-15, 30, 30))
    if out[1] > 5: # Confidence level
        print("Number: %d Confidence: %0.2f" %(out[0], out[1]))

   uart.write(out[0]'\n')
  time.sleep(1000)
发现串口部分代码不正确,但不知道要怎么改,求大神指点一二。
sensor.snapshot() 若是拍照不成功,或者摄像头出故障,返回什么值?
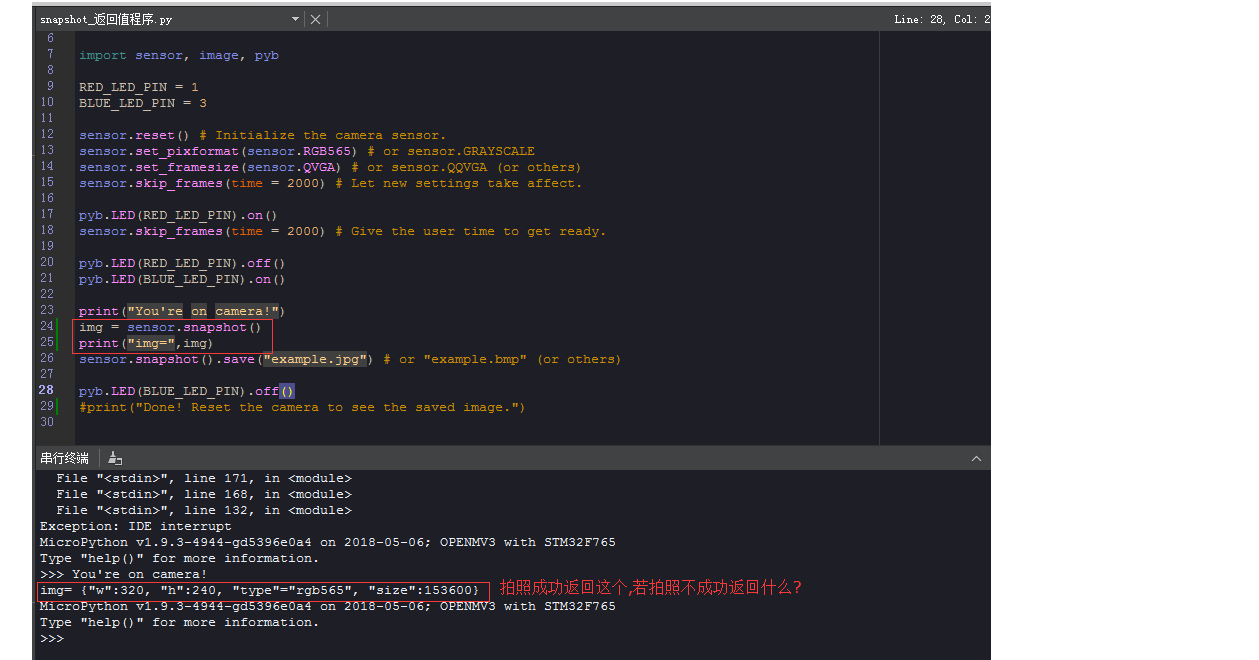
# Snapshot Example
#
# Note: You will need an SD card to run this example.
#
# You can use your OpenMV Cam to save image files.

import sensor, image, pyb

RED_LED_PIN = 1
BLUE_LED_PIN = 3

sensor.reset() # Initialize the camera sensor.
sensor.set_pixformat(sensor.RGB565) # or sensor.GRAYSCALE
sensor.set_framesize(sensor.QVGA) # or sensor.QQVGA (or others)
sensor.skip_frames(time = 2000) # Let new settings take affect.

pyb.LED(RED_LED_PIN).on()
sensor.skip_frames(time = 2000) # Give the user time to get ready.

pyb.LED(RED_LED_PIN).off()
pyb.LED(BLUE_LED_PIN).on()

print("You're on camera!")
img = sensor.snapshot()
print("img=",img)  #拍照成功返回img= {"w":320, "h":240, "type"="rgb565", #"size":153600},如果拍照不成功,或摄像头出故障,返回什么值,当摄像头出问题了我们怎么能知道?
sensor.snapshot().save("example.jpg") # or "example.bmp" (or others)

pyb.LED(BLUE_LED_PIN).off()
#print("Done! Reset the camera to see the saved image.")
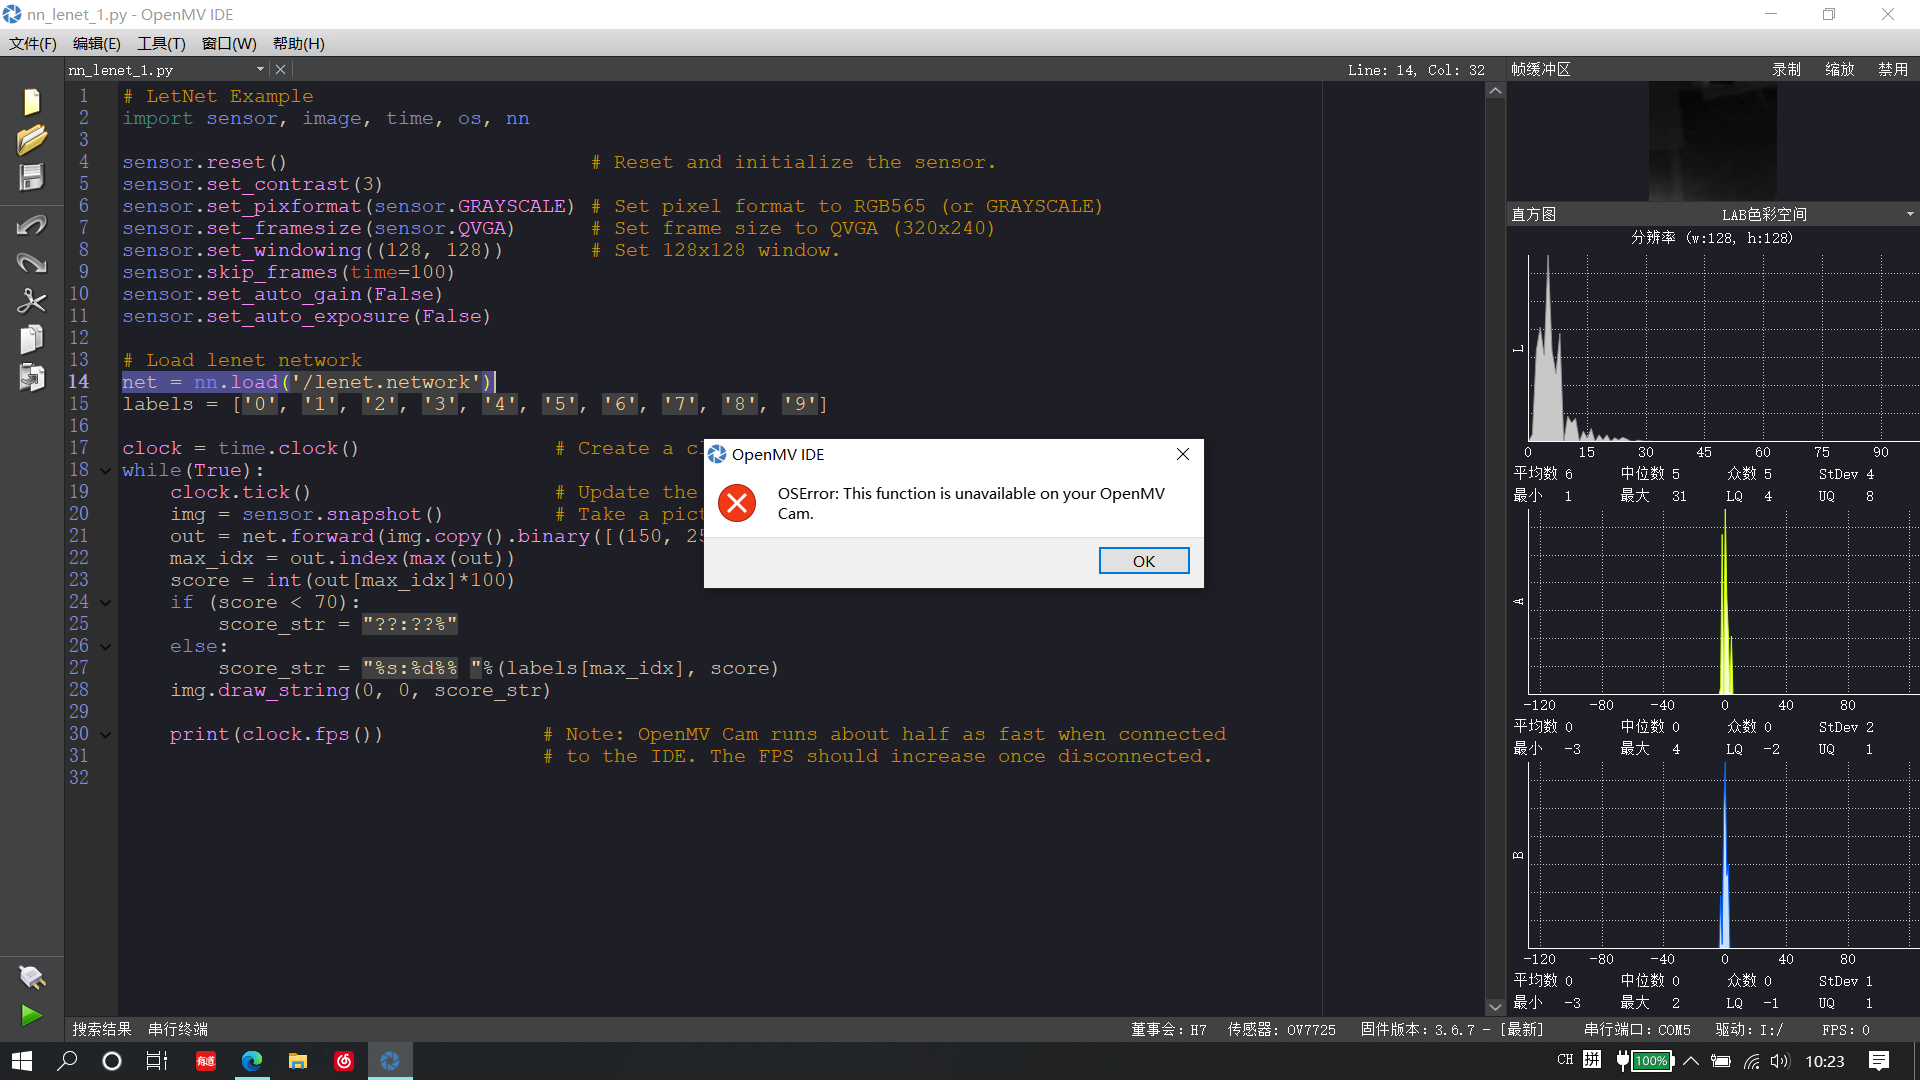
我按照lenet数字识别的视频教程一步步做的,但是总是会弹出这个错误,,我的是openmv4-H7,请问怎么解决?
LetNet Example
import sensor, image, time, os, nn
sensor.reset() # Reset and initialize the sensor.
sensor.set_contrast(3)
sensor.set_pixformat(sensor.GRAYSCALE) # Set pixel format to RGB565 (or GRAYSCALE)
sensor.set_framesize(sensor.QVGA) # Set frame size to QVGA (320x240)
sensor.set_windowing((128, 128)) # Set 128x128 window.
sensor.skip_frames(time=100)
sensor.set_auto_gain(False)
sensor.set_auto_exposure(False)
Load lenet network
net = nn.load('/lenet.network')
labels = ['0', '1', '2', '3', '4', '5', '6', '7', '8', '9']
clock = time.clock() # Create a clock object to track the FPS.
while(True):
clock.tick() # Update the FPS clock.
img = sensor.snapshot() # Take a picture and return the image.
out = net.forward(img.copy().binary([(150, 255)], invert=True))
max_idx = out.index(max(out))
score = int(out[max_idx]*100)
if (score < 70):
score_str = "??:??%"
else:
score_str = "%s:%d%% "%(labels[max_idx], score)
img.draw_string(0, 0, score_str)
print(clock.fps())             # Note: OpenMV Cam runs about half as fast when connected
                               # to the IDE. The FPS should increase once disconnected.
录制MJPEG时,结束录制时主程序就必须停止吗?否则会报错?
# MJPEG Video Recording Example
#
# Note: You will need an SD card to run this demo.
#
# You can use your OpenMV Cam to record mjpeg files. You can either feed the
# recorder object JPEG frames or RGB565/Grayscale frames. Once you've finished
# recording a Mjpeg file you can use VLC to play it. If you are on Ubuntu then
# the built-in video player will work too.

import sensor, image, time, mjpeg, pyb

RED_LED_PIN = 1
BLUE_LED_PIN = 3

sensor.reset() # Initialize the camera sensor.
sensor.set_pixformat(sensor.RGB565) # or sensor.GRAYSCALE
sensor.set_framesize(sensor.QVGA) # or sensor.QQVGA (or others)
sensor.skip_frames(time = 2000) # Let new settings take affect.
clock = time.clock() # Tracks FPS.

pyb.LED(RED_LED_PIN).on()
sensor.skip_frames(time = 2000) # Give the user time to get ready.

pyb.LED(RED_LED_PIN).off()
pyb.LED(BLUE_LED_PIN).on()

m = mjpeg.Mjpeg("example.mjpeg")

print("You're on camera!")
while(True):
    for i in range(20):
        clock.tick()
        m.add_frame(sensor.snapshot())
        print(clock.fps())

    m.close(clock.fps())
    pyb.LED(BLUE_LED_PIN).off()
    print("Done! Reset the camera to see the saved recording.")