神经网络训练(EDGE IMPULSE)的压缩包打开一直错误(但看文件好像可以用)然后用里面的模型时,一运行就断开连接
# Edge Impulse - OpenMV Image Classification Example

import sensor, image, time, os, tf

sensor.reset()                         # Reset and initialize the sensor.
sensor.set_pixformat(sensor.GRAYSCALE)    # Set pixel format to RGB565 (or GRAYSCALE)
sensor.set_framesize(sensor.QVGA)      # Set frame size to QVGA (320x240)
sensor.set_windowing((240, 240))       # Set 240x240 window.
sensor.skip_frames(time=2000)          # Let the camera adjust.

net = "trained.tflite"
labels = ["3","8"]

clock = time.clock()
while(True):
    clock.tick()

    img = sensor.snapshot()

    # default settings just do one detection... change them to search the image...
    for obj in tf.classify(net, img, min_scale=1.0, scale_mul=0.8, x_overlap=0.5, y_overlap=0.5):
        print("**********\nPredictions at [x=%d,y=%d,w=%d,h=%d]" % obj.rect())
        img.draw_rectangle(obj.rect())
        # This combines the labels and confidence values into a list of tuples
        predictions_list = list(zip(labels, obj.output()))

        for i in range(len(predictions_list)):
            print("%s = %f" % (predictions_list[i][0], predictions_list[i][1]))

    print(clock.fps(), "fps")

黑色线段如何识别,识别线段后如何判断黑色?
@kidswong999 import sensor
import image
import time
import network
import usocket
import sys
import sensor
import image
import time
import network
import usocket
import sys
import math
from pyb import UART
from pyb import LED
enable_lens_corr = True
sensor.reset()
sensor.set_pixformat(sensor.RGB565)
sensor.set_framesize(sensor.QQVGA)
sensor.skip_frames(time = 2000)
clock = time.clock()
min_degree = 60
max_degree = 120
left_roi = [0,0,160,20]
while(True):
clock.tick()
img = sensor.snapshot()
if enable_lens_corr: img.lens_corr(1.8)
for l in img.find_lines(roi=left_roi, x_stride=4, y_stride=2, threshold=1000, theta_margin=25, rho_margin=25):
if (min_degree <= l.theta()) and (l.theta() <= max_degree):
img.draw_line(l.line(), color = (255, 0, 0))
print(l.theta())
statistics = img.get_statistics(roi=left_roi)
print(statistics)
if 12<statistics.l_mode()<30 and -15<statistics.a_mode()<10 and -6<statistics.b_mode()<14:
img.draw_rectangle(0,0,160,20, color = (255, 255, 255))
print("FPS %f" % clock.fps())
我分别用了线段识别和数据统计,但是这两个是分离的没有统一起来
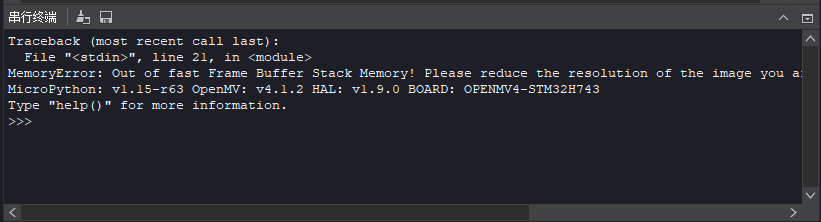
快速帧缓冲堆栈内存不足!
# Edge Impulse - OpenMV Image Classification Example

import sensor, image, time, os, tf

sensor.reset()                         # Reset and initialize the sensor.
sensor.set_pixformat(sensor.GRAYSCALE)    # Set pixel format to RGB565 (or GRAYSCALE)
sensor.set_framesize(sensor.QVGA)      # Set frame size to QVGA (320x240)
sensor.set_windowing((240, 240))       # Set 240x240 window.
sensor.skip_frames(time=2000)          # Let the camera adjust.

net = "trained.tflite"
labels = [line.rstrip('\n') for line in open("labels.txt")]

clock = time.clock()
while(True):
    clock.tick()

    img = sensor.snapshot()

    # default settings just do one detection... change them to search the image...
    for obj in tf.classify(net, img, min_scale=1.0, scale_mul=0.8, x_overlap=0.5, y_overlap=0.5):
        print("**********\nPredictions at [x=%d,y=%d,w=%d,h=%d]" % obj.rect())
        img.draw_rectangle(obj.rect())
        # This combines the labels and confidence values into a list of tuples
        predictions_list = list(zip(labels, obj.output()))

        for i in range(len(predictions_list)):
            print("%s = %f" % (predictions_list[i][0], predictions_list[i][1]))

    print(clock.fps(), "fps")
请问用openmv测距当物体与镜头的距离突然发生变化时测得的距离不准该怎么解决?(代码与教程一样)
import sensor, image, time

# For color tracking to work really well you should ideally be in a very, very,
# very, controlled enviroment where the lighting is constant...
yellow_threshold   = ( 56,   83,    5,   57,   63,   80)
# You may need to tweak the above settings for tracking green things...
# Select an area in the Framebuffer to copy the color settings.

sensor.reset() # Initialize the camera sensor.
sensor.set_pixformat(sensor.RGB565) # use RGB565.
sensor.set_framesize(sensor.QQVGA) # use QQVGA for speed.
sensor.skip_frames(10) # Let new settings take affect.
sensor.set_auto_whitebal(False) # turn this off.
clock = time.clock() # Tracks FPS.

K=5000#the value should be measured

while(True):
    clock.tick() # Track elapsed milliseconds between snapshots().
    img = sensor.snapshot() # Take a picture and return the image.

    blobs = img.find_blobs([yellow_threshold])
    if len(blobs) == 1:
        # Draw a rect around the blob.
        b = blobs[0]
        img.draw_rectangle(b[0:4]) # rect
        img.draw_cross(b[5], b[6]) # cx, cy
        Lm = (b[2]+b[3])/2
        length = K/Lm
        print(length)
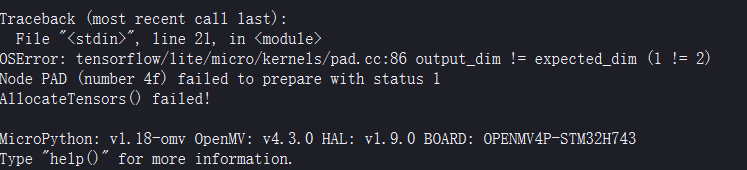
运行tflite模型时出现报错:OSError: output_dim != expected_dim(1 != 2)
# Edge Impulse - OpenMV Image Classification Example

import sensor, image, time, os, tf

sensor.reset()                         # Reset and initialize the sensor.
sensor.set_pixformat(sensor.RGB565)    # Set pixel format to RGB565 (or GRAYSCALE)
sensor.set_framesize(sensor.QVGA)      # Set frame size to QVGA (320x240)
sensor.set_windowing((240, 240))       # Set 240x240 window.
sensor.skip_frames(time=2000)          # Let the camera adjust.

net = "mobileNet_v2.tflite"
labels = [line.rstrip('\n') for line in open("labels.txt")]

clock = time.clock()
while(True):
    clock.tick()

    img = sensor.snapshot()

    # default settings just do one detection... change them to search the image...
    for obj in tf.classify(net, img, min_scale=1.0, scale_mul=0.8, x_overlap=0.5, y_overlap=0.5):
        print("**********\nPredictions at [x=%d,y=%d,w=%d,h=%d]" % obj.rect())
        img.draw_rectangle(obj.rect())
        # This combines the labels and confidence values into a list of tuples
        predictions_list = list(zip(labels, obj.output()))

        for i in range(len(predictions_list)):
            print("%s = %f" % (predictions_list[i][0], predictions_list[i][1]))

    print(clock.fps(), "fps")
低功耗模式下彻底关闭屏幕背光问题。
因为这个LCD当时设计的时候没有考虑低功耗的问题。所以需要魔改一下。
代码:
主要是设置成推挽输出,不启动芯片内部拉电阻。
import sensor, image, lcd
import time
import pyb

sensor.reset() # Initialize the camera sensor.
sensor.set_pixformat(sensor.RGB565) # or sensor.GRAYSCALE
sensor.set_framesize(sensor.QQVGA2) # Special 128x160 framesize for LCD Shield.
lcd.init() # Initialize the lcd screen.

import time
from pyb import Pin, Timer

lcd_backlight = pin=Pin("P6", Pin.OUT_PP, pull=Pin.PULL_NONE)
lcd_backlight.value(1) #light

for i in range(100):
    lcd.display(sensor.snapshot()) # Take a picture and display the image.

pyb.standby()

while(True):
    lcd.display(sensor.snapshot()) # Take a picture and display the image.
如何将识别的坐标,逐个输出?
https://book.openmv.cc/example/09-Feature-Detection/find-circles.html
打印c.x()
import sensor, image, time

sensor.reset()
sensor.set_pixformat(sensor.RGB565) # 灰度更快
sensor.set_framesize(sensor.QQVGA)
sensor.skip_frames(time = 2000)
clock = time.clock()

while(True):
    clock.tick()

    #lens_corr(1.8)畸变矫正
    img = sensor.snapshot().lens_corr(1.8)

    for c in img.find_circles(threshold = 3500, x_margin = 10, y_margin = 10, r_margin = 10,r_min = 2, r_max = 100, r_step = 2):
        img.draw_circle(c.x(), c.y(), c.r(), color = (255, 0, 0))
        print(c.x())
赋值c.x():
变量在哪里都可以,例子是全局变量。
import sensor, image, time

sensor.reset()
sensor.set_pixformat(sensor.RGB565) # 灰度更快
sensor.set_framesize(sensor.QQVGA)
sensor.skip_frames(time = 2000)
clock = time.clock()

圆 = 0

while(True):
    clock.tick()

    #lens_corr(1.8)畸变矫正
    img = sensor.snapshot().lens_corr(1.8)

    for c in img.find_circles(threshold = 3500, x_margin = 10, y_margin = 10, r_margin = 10,r_min = 2, r_max = 100, r_step = 2):
        img.draw_circle(c.x(), c.y(), c.r(), color = (255, 0, 0))
        圆 =c.x()
        print(圆)
在做人脸识别的时候,能够让电脑屏幕显示彩色的图像吗?
# Face Detection Example
#
# This example shows off the built-in face detection feature of the OpenMV Cam.
#
# Face detection works by using the Haar Cascade feature detector on an image. A
# Haar Cascade is a series of simple area contrasts checks. For the built-in
# frontalface detector there are 25 stages of checks with each stage having
# hundreds of checks a piece. Haar Cascades run fast because later stages are
# only evaluated if previous stages pass. Additionally, your OpenMV Cam uses
# a data structure called the integral image to quickly execute each area
# contrast check in constant time (the reason for feature detection being
# grayscale only is because of the space requirment for the integral image).

import sensor, time, image

# Reset sensor
sensor.reset()

# Sensor settings
sensor.set_contrast(1)
sensor.set_gainceiling(16)
# HQVGA and GRAYSCALE are the best for face tracking.
sensor.set_framesize(sensor.HQVGA)
sensor.set_pixformat(sensor.RGB565)

# Load Haar Cascade
# By default this will use all stages, lower satges is faster but less accurate.
face_cascade = image.HaarCascade("frontalface", stages=25)
print(face_cascade)

# FPS clock
clock = time.clock()

while (True):
    clock.tick()

    # Capture snapshot
    img = sensor.snapshot()

    # Find objects.
    # Note: Lower scale factor scales-down the image more and detects smaller objects.
    # Higher threshold results in a higher detection rate, with more false positives.
    objects = img.find_features(face_cascade, threshold=0.75, scale_factor=1.25)

    # Draw objects
    for r in objects:
        img.draw_rectangle(r)

    # Print FPS.
    # Note: Actual FPS is higher, streaming the FB makes it slower.
    print(clock.fps())
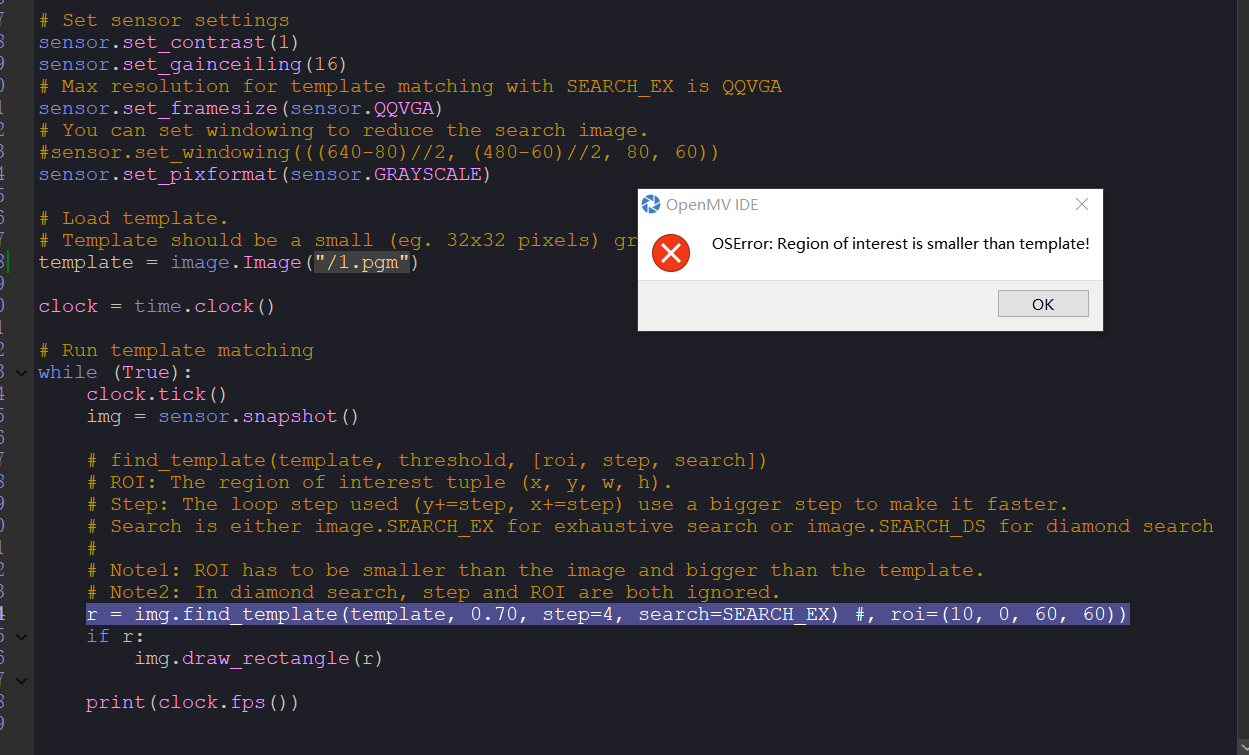
在验证模板匹配时出现这样的报错,怎么解决呢?
# image patches to parts of an image... expect for extremely controlled enviorments
# NCC is not all to useful.
#
# WARNING: NCC supports needs to be reworked! As of right now this feature needs
# a lot of work to be made into somethin useful. This script will reamin to show
# that the functionality exists, but, in its current state is inadequate.

import time, sensor, image
from image import SEARCH_EX, SEARCH_DS

# Reset sensor
sensor.reset()

# Set sensor settings
sensor.set_contrast(1)
sensor.set_gainceiling(16)
# Max resolution for template matching with SEARCH_EX is QQVGA
sensor.set_framesize(sensor.QQVGA)
# You can set windowing to reduce the search image.
#sensor.set_windowing(((640-80)//2, (480-60)//2, 80, 60))
sensor.set_pixformat(sensor.GRAYSCALE)

# Load template.
# Template should be a small (eg. 32x32 pixels) grayscale image.
template = image.Image("/1.pgm")

clock = time.clock()

# Run template matching
while (True):
    clock.tick()
    img = sensor.snapshot()

    # find_template(template, threshold, [roi, step, search])
    # ROI: The region of interest tuple (x, y, w, h).
    # Step: The loop step used (y+=step, x+=step) use a bigger step to make it faster.
    # Search is either image.SEARCH_EX for exhaustive search or image.SEARCH_DS for diamond search
    #
    # Note1: ROI has to be smaller than the image and bigger than the template.
    # Note2: In diamond search, step and ROI are both ignored.
    r = img.find_template(template, 0.70, step=4, search=SEARCH_EX) #, roi=(10, 0, 60, 60))
    if r:
        img.draw_rectangle(r)

    print(clock.fps())
WIFI传图做色块识别,手机上看不到框框怎办
import sensor, image, time, network, usocket, sys
from pyb import UART,LED

uart = UART(3, 1382400) #设置串口波特率
uart.init(1382400,timeout_char=100)

green_threshold   = ((42, 78, 34, 82, 0, 63))#目标颜色

# Reset sensor
sensor.reset()

# Set sensor settings
sensor.set_contrast(1)
sensor.set_brightness(1)
sensor.set_saturation(1)
sensor.set_gainceiling(16)
sensor.set_framesize(sensor.QQVGA)
sensor.set_pixformat(sensor.RGB565)
sensor.skip_frames(10)
sensor.set_auto_whitebal(False) # turn this off.
#sensor.set_auto_gain(False)
clock = time.clock()

def find_max(blobs):
    max_size=0
    for blob in blobs:
        if blob[2]*blob[3] > max_size:
            max_blob=blob
            max_size = blob[2]*blob[3]
    return max_blob

#等待接收客服端连接成功
while(uart.readchar()!=43):
    print("connect...")
#连接成功LED显示
LED(1).on()
time.sleep(2000)
uart.write("HTTP/1.1 200 OK!\r\n" \
            "Server: OpenMV\r\n" \
            "Content-Type: multipart/x-mixed-replace;boundary=openmv\r\n" \
            "Cache-Control: no-cache\r\n" \
            "Pragma: no-cache\r\n\r\nend")
# FPS clock
time.sleep(4000)
# Start streaming images
# NOTE: Disable IDE preview to increase streaming FPS.


while (True):
    clock.tick() # Track elapsed milliseconds between snapshots().
    img = sensor.snapshot()

    cframe = img.compressed(quality=35)

    header = "\r\n--openmv\r\n" \
             "Content-Type: image/jpeg\r\n"\
             "Content-Length:"+str(cframe.size())+"\r\n\r\n"
    blobs = img.find_blobs([green_threshold])
    if blobs:
        max_blob = find_max(blobs)
        pan_error = max_blob.cx()-img.width()/2
        tilt_error = max_blob.cy()-img.height()/2
        print("pan_error: ", pan_error)
        img.draw_rectangle(max_blob.rect()) # rect
        img.draw_cross(max_blob.cx(), max_blob.cy()) # cx, cy
    uart.write(header)
    uart.write(cframe)
    uart.write("end")