共 499 条结果匹配 "sensor",(耗时 0.06 秒)
openmv h7 r2 是openmv3吗
标准名:OpenMV Cam H7,代表芯片架构是H7;缩写OpenMV4,因为是第4代OpenMV Cam。
标准名:OpenMV Cam H7 Plus,代表芯片架构H7,并升级内存;缩写OpenMV4p。
作为对比,已经停产的OpenMV Cam M7,代表芯片架构是M7;缩写OpenMV3,因为是第3代OpenMV Cam。
r2代表的是小改款,OpenMV Cam H7 r1是用的ov7725的sensor,OpenMV Cam H7 r2用的是mt9m114的sensor。
求助: 'module' object has no attribute 'classify'
4.5.6之后把tf删除了,替换成了ml库。
# This code run in OpenMV4 H7 Plus

import sensor, image, time, os, ml

sensor.reset()                         # Reset and initialize the sensor.
sensor.set_pixformat(sensor.RGB565)    # Set pixel format to RGB565 (or GRAYSCALE)
sensor.set_framesize(sensor.QVGA)      # Set frame size to QVGA (320x240)
sensor.set_windowing((240, 240))       # Set 240x240 window.
sensor.skip_frames(time=2000)          # Let the camera adjust.

model = ml.Model("trained.tflite", load_to_fb=True)

labels = [line.rstrip() for line in open("labels.txt")]
class_num = len(labels)

clock = time.clock()
while True:
    clock.tick()

    img = sensor.snapshot()

    scores = model.predict([img])[0].flatten().tolist()
    for i in range(class_num):
        print("%s = %f" % (labels[i], scores[i]))
    print(clock.fps(), "fps")
Openmv使用星瞳AI训练出识别水果的模型后,运行时检测到水果后,卡住了,然后断开连接,该如何解决?
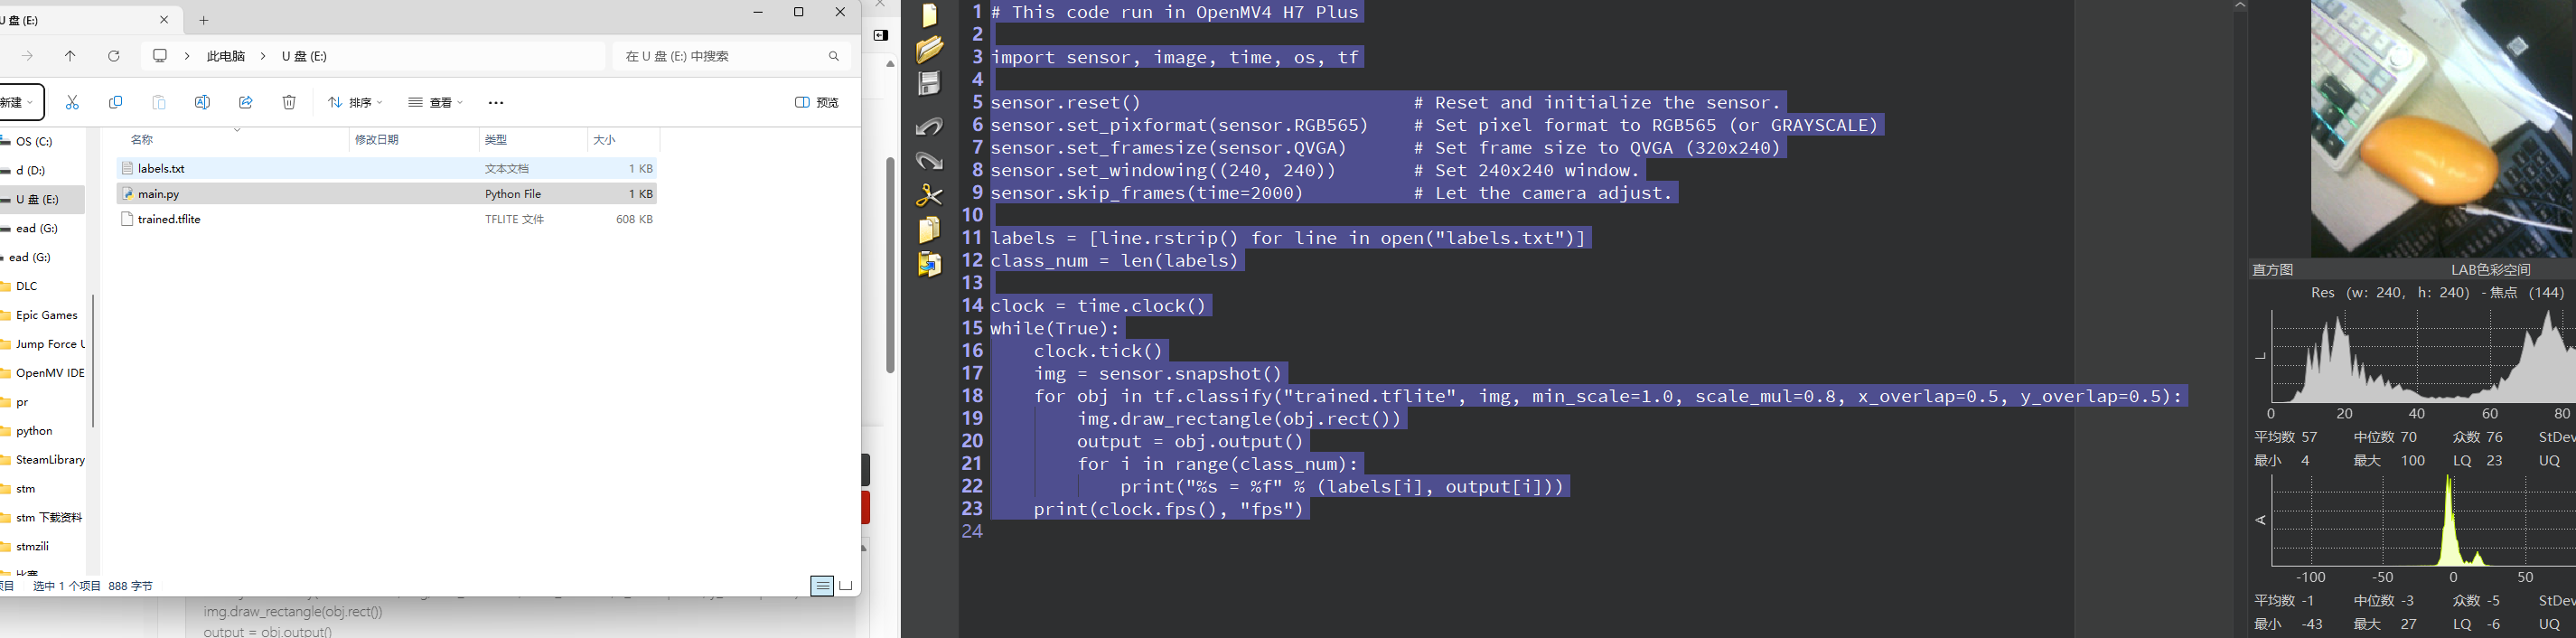
# This code run in OpenMV4 H7 Plus

import sensor, image, time, os, tf

sensor.reset()                         # Reset and initialize the sensor.
sensor.set_pixformat(sensor.RGB565)    # Set pixel format to RGB565 (or GRAYSCALE)
sensor.set_framesize(sensor.QVGA)      # Set frame size to QVGA (320x240)
sensor.set_windowing((240, 240))       # Set 240x240 window.
sensor.skip_frames(time=2000)          # Let the camera adjust.

labels = [line.rstrip() for line in open("labels.txt")]
class_num = len(labels)

clock = time.clock()
while(True):
    clock.tick()
    img = sensor.snapshot()
    for obj in tf.classify("trained.tflite", img, min_scale=1.0, scale_mul=0.8, x_overlap=0.5, y_overlap=0.5):
        img.draw_rectangle(obj.rect())
        output = obj.output()
        for i in range(class_num):
            print("%s = %f" % (labels[i], output[i]))
    print(clock.fps(), "fps")
调用difference函数问题
效果还是挺好的
import sensor, image, time

sensor.reset()
sensor.set_pixformat(sensor.GRAYSCALE)
sensor.set_framesize(sensor.QQVGA)
sensor.skip_frames(time = 2000)     # Wait for settings take effect.

sensor.snapshot().save("/template.bmp")

while(True):

    img = sensor.snapshot()

    diff = img.difference("/template.bmp")
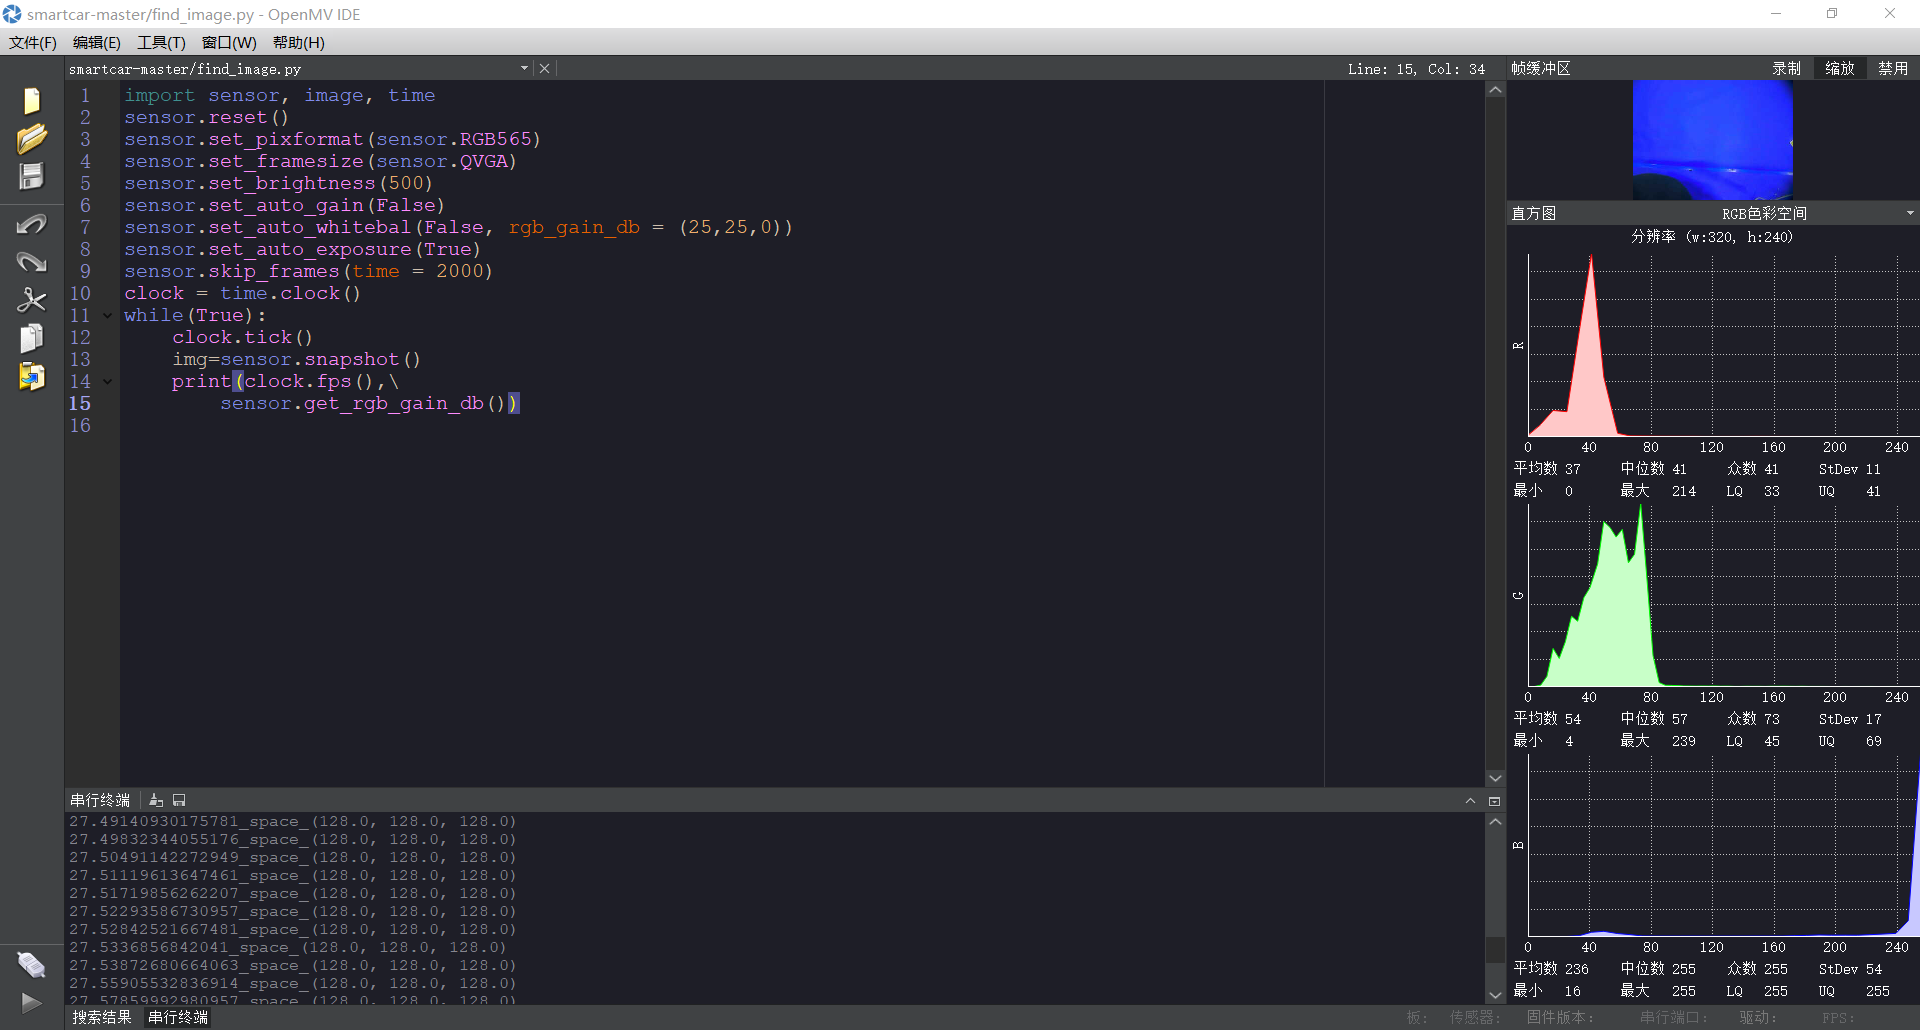
大佬们 请问为什么按照例程手动设置白平衡后 rgb的增益不变 现在在蓝布上拍图泛蓝光 请问用什么方法来显示正常的颜色
import sensor, image, time
sensor.reset()
sensor.set_pixformat(sensor.RGB565)
sensor.set_framesize(sensor.QVGA)
sensor.set_brightness(500)
sensor.set_auto_gain(False)
sensor.set_auto_whitebal(False, rgb_gain_db = (25,25,0))
sensor.set_auto_exposure(True)
sensor.skip_frames(time = 2000)
clock = time.clock()
while(True):
clock.tick()
img=sensor.snapshot()
print(clock.fps(),\
sensor.get_rgb_gain_db())
SD卡保存图片速度越来越慢,如何去解决?
import sensor, image, time,pyb

sensor.reset()
sensor.set_pixformat(sensor.RGB565)
sensor.set_framesize(sensor.QVGA)
sensor.skip_frames(time = 2000)

clock = time.clock()
jps_cnt=10000000000
while(True):
    clock.tick()
    if jps_cnt <=10000001000:
        time_start = pyb.millis()
        img = sensor.snapshot()
        img.save("./pic2/%d.jpg" % (jps_cnt))
        time_end = pyb.millis()
        jps_cnt +=1
        print("time:%d"%(time_end-time_start))
        print(clock.fps())
摄像头采集画面为长方形320*240,如何保持宽度320像素不变,让其变为正方形画面呢?大佬们,求解答??
图片缩放一下就是正方形了。
import sensor, image, time

sensor.reset()
sensor.set_pixformat(sensor.RGB565)
sensor.set_framesize(sensor.QVGA)
sensor.skip_frames(time = 2000)

clock = time.clock()

while(True):
    clock.tick()
    img = sensor.snapshot().scale(x_size=240, y_size=240, copy_to_fb=True)
    print(img.width(),img.height())
    print(clock.fps())
请问如何让find_features函数返回人脸中心区域的坐标值,而且find_features函数的rio是什么意思
import sensor, time, image, pyb
led = pyb.LED(3)
Reset sensor
sensor.reset()
Sensor settings
sensor.set_contrast(1)
sensor.set_gainceiling(16)
HQVGA and GRAYSCALE are the best for face tracking.
sensor.set_framesize(sensor.HQVGA)
sensor.set_pixformat(sensor.GRAYSCALE)
face_cascade = image.HaarCascade("frontalface", stages=25)
#stages值未传入时使用默认的stages。stages值设置的小一些可以加速匹配,但会降低准确率。
print(face_cascade)
clock = time.clock()
while (True):
clock.tick()
img = sensor.snapshot()

#注意:比例因子越低,图像越小,检测的对象越小。
#阈值越高,检测率越高,误报越多。
objects = img.find_features(face_cascade, threshold=0.75, scale=1.35, roi)

#image.find_features(cascade, threshold=0.5, scale=1.5),thresholds越大,
#匹配速度越快,错误率也会上升。scale可以缩放被匹配特征的大小。

#在找到的目标上画框,标记出来

for r in objects:
    img.draw_rectangle(r)
    a = r.x()
    print(a)
    #time.sleep(100)  #延时100ms
print(clock.fps())
关于自己训练的xml文件运行的问题
下面是我的代码:
import sensor, time, image, uio

import sys,os,uos


iiii = {0};
# Reset sensor
sensor.reset()

# Sensor settings
sensor.set_contrast(3)
sensor.set_gainceiling(16)

# Set resolution to VGA.
sensor.set_framesize(sensor.VGA)
sensor.set_brightness(-3)

# Bin/Crop image to 200x100, which gives more details with less data to process
sensor.set_windowing((220, 190, 200, 100))

sensor.set_pixformat(sensor.GRAYSCALE)

# Load Haar Cascade
# By default this will use all stages, lower satges is faster but less accurate.
#eyes_cascade = image.HaarCascade("eye", stages=24)
#eyes_cascade = image.HaarCascade("frontalface.cascade", stages=24)
eyes_cascade = image.HaarCascade("haarcascade_eye.cascade", stages=24)

print(eyes_cascade)
#print("frontalface")
print("haarcascade_eye")
# FPS clock
clock = time.clock()


while (True):
    clock.tick()
    # Capture snapshot
    img = sensor.snapshot()

    time.sleep(250)


    # Find eyes !
    # Note: Lower scale factor scales-down the image more and detects smaller objects.
    # Higher threshold results in a higher detection rate, with more false positives.

    eyes = img.find_features(eyes_cascade, threshold=0.1, scale_factor=500)
        # Find iris
    for e in eyes:

        iris = img.find_eye(e)

        img.draw_rectangle(e)


        img.draw_cross(iris[0], iris[1])


    # Print FPS.
    # Note: Actual FPS is higher, streaming the FB makes it slower.
    #print(eyes_cascade)