共 499 条结果匹配 "sensor",(耗时 0.02 秒)
在SD卡保存mipeg视频的时候怎么修改代码控制拍摄几个小时以上的视频?
import sensor, image, time, mjpeg, pyb

RED_LED_PIN = 1
BLUE_LED_PIN = 3

sensor.reset() # Initialize the camera sensor.
sensor.set_pixformat(sensor.RGB565) # or sensor.GRAYSCALE
sensor.set_framesize(sensor.QVGA) # or sensor.QQVGA (or others)
sensor.skip_frames(time = 2000) # Let new settings take affect.
clock = time.clock() # Tracks FPS.

pyb.LED(RED_LED_PIN).on()
sensor.skip_frames(time = 2000) # Give the user time to get ready.

pyb.LED(RED_LED_PIN).off()
pyb.LED(BLUE_LED_PIN).on()

m = mjpeg.Mjpeg("example.mjpeg")

print("You're on camera!")
for i in range(200):
    clock.tick()
    m.add_frame(sensor.snapshot())
    print(clock.fps())

m.close(clock.fps())
pyb.LED(BLUE_LED_PIN).off()
print("Done! Reset the camera to see the saved recording.")
这个例程怎么修改才能让它录满32G的SD卡,可以贴出详细代码吗?万分感谢!
openmv4PLUS的图像为什么这么偏暗偏绿
@kidswong999 跑例程就是这样的效果

# Hello World Example
#
# Welcome to the OpenMV IDE! Click on the green run arrow button below to run the script!

import sensor, image, time

sensor.reset()                      # Reset and initialize the sensor.
sensor.set_pixformat(sensor.RGB565) # Set pixel format to RGB565 (or GRAYSCALE)
sensor.set_framesize(sensor.QVGA)   # Set frame size to QVGA (320x240)
sensor.skip_frames(time = 2000)     # Wait for settings take effect.
clock = time.clock()                # Create a clock object to track the FPS.

while(True):
    clock.tick()                    # Update the FPS clock.
    img = sensor.snapshot()         # Take a picture and return the image.
    print(clock.fps())              # Note: OpenMV Cam runs about half as fast when connected
在OPENMV IDE 上运行示例程序报错 RuntimeError: Capture Failed: -4,如何解决?
# Hello World Example
#
# Welcome to the OpenMV IDE! Click on the green run arrow button below to run the script!

import sensor, image, time

sensor.reset()                      # Reset and initialize the sensor.
sensor.set_pixformat(sensor.RGB565) # Set pixel format to RGB565 (or GRAYSCALE)
sensor.set_framesize(sensor.QVGA)   # Set frame size to QVGA (320x240)
sensor.skip_frames(time = 2000)     # Wait for settings take effect.
clock = time.clock()                # Create a clock object to track the FPS.

while(True):
    clock.tick()                    # Update the FPS clock.
    img = sensor.snapshot()         # Take a picture and return the image.
    print(clock.fps())              # Note: OpenMV Cam runs about half as fast when connected
                                    # to the IDE. The FPS should increase once disconnected.

你好,请教一个问题,怎么给识别到的图片进行编号
如果是从左到右排序的话,可以用sorted函数,key就是中心横坐标。
import sensor, image, time

sensor.reset()                      # Reset and initialize the sensor.
sensor.set_pixformat(sensor.RGB565) # Set pixel format to RGB565 (or GRAYSCALE)
sensor.set_framesize(sensor.QVGA)   # Set frame size to QVGA (320x240)
sensor.skip_frames(time = 2000)     # Wait for settings take effect.
clock = time.clock()                # Create a clock object to track the FPS.

green_threshold = (10,100,-30,40,-50,60)#随便写的,需要重新设置阈值

while(True):
    clock.tick()
    img = sensor.snapshot()
    blobs = img.find_blobs([green_threshold])
    blobs = sorted(blobs,key=lambda b:b.cx())
    for i in range(len(blobs)):
        print(i, blobs[i])
    print(clock.fps())
有没有能获取图像的各rgb分量图像的函数
达到类似于这样的功能
# Hello World Example
#
# Welcome to the OpenMV IDE! Click on the green run arrow button below to run the script!

import sensor, image, time

sensor.reset()                      # Reset and initialize the sensor.
sensor.set_pixformat(sensor.RGB565) # Set pixel format to RGB565 (or GRAYSCALE)
sensor.set_framesize(sensor.QQVGA)   # Set frame size to QVGA (320x240)
sensor.skip_frames(time = 2000)     # Wait for settings take effect.

img = sensor.snapshot()         # Take a picture and return the image.
img.save("hah.bmp")

for j in range(120):
    for i in range(160):
        (r,g,b) = img.get_pixel(i,j)
        img.set_pixel(i,j,(0,0,b))

sensor.flush()
time.sleep_ms(100)

为什么拍摄的图像整个是绿色的?

# Hello World Example
#
# Welcome to the OpenMV IDE! Click on the green run arrow button below to run the script!

import sensor, image, time

sensor.reset()                      # Reset and initialize the sensor.
sensor.set_pixformat(sensor.RGB565) # Set pixel format to RGB565 (or GRAYSCALE)
sensor.set_framesize(sensor.QVGA)   # Set frame size to QVGA (320x240)
sensor.skip_frames(time = 2000)     # Wait for settings take effect.
clock = time.clock()                # Create a clock object to track the FPS.

while(True):
    clock.tick()                    # Update the FPS clock.
    img = sensor.snapshot()         # Take a picture and return the image.
    print(clock.fps())              # Note: OpenMV Cam runs about half as fast when connected
                                    # to the IDE. The FPS should increase once disconnected.
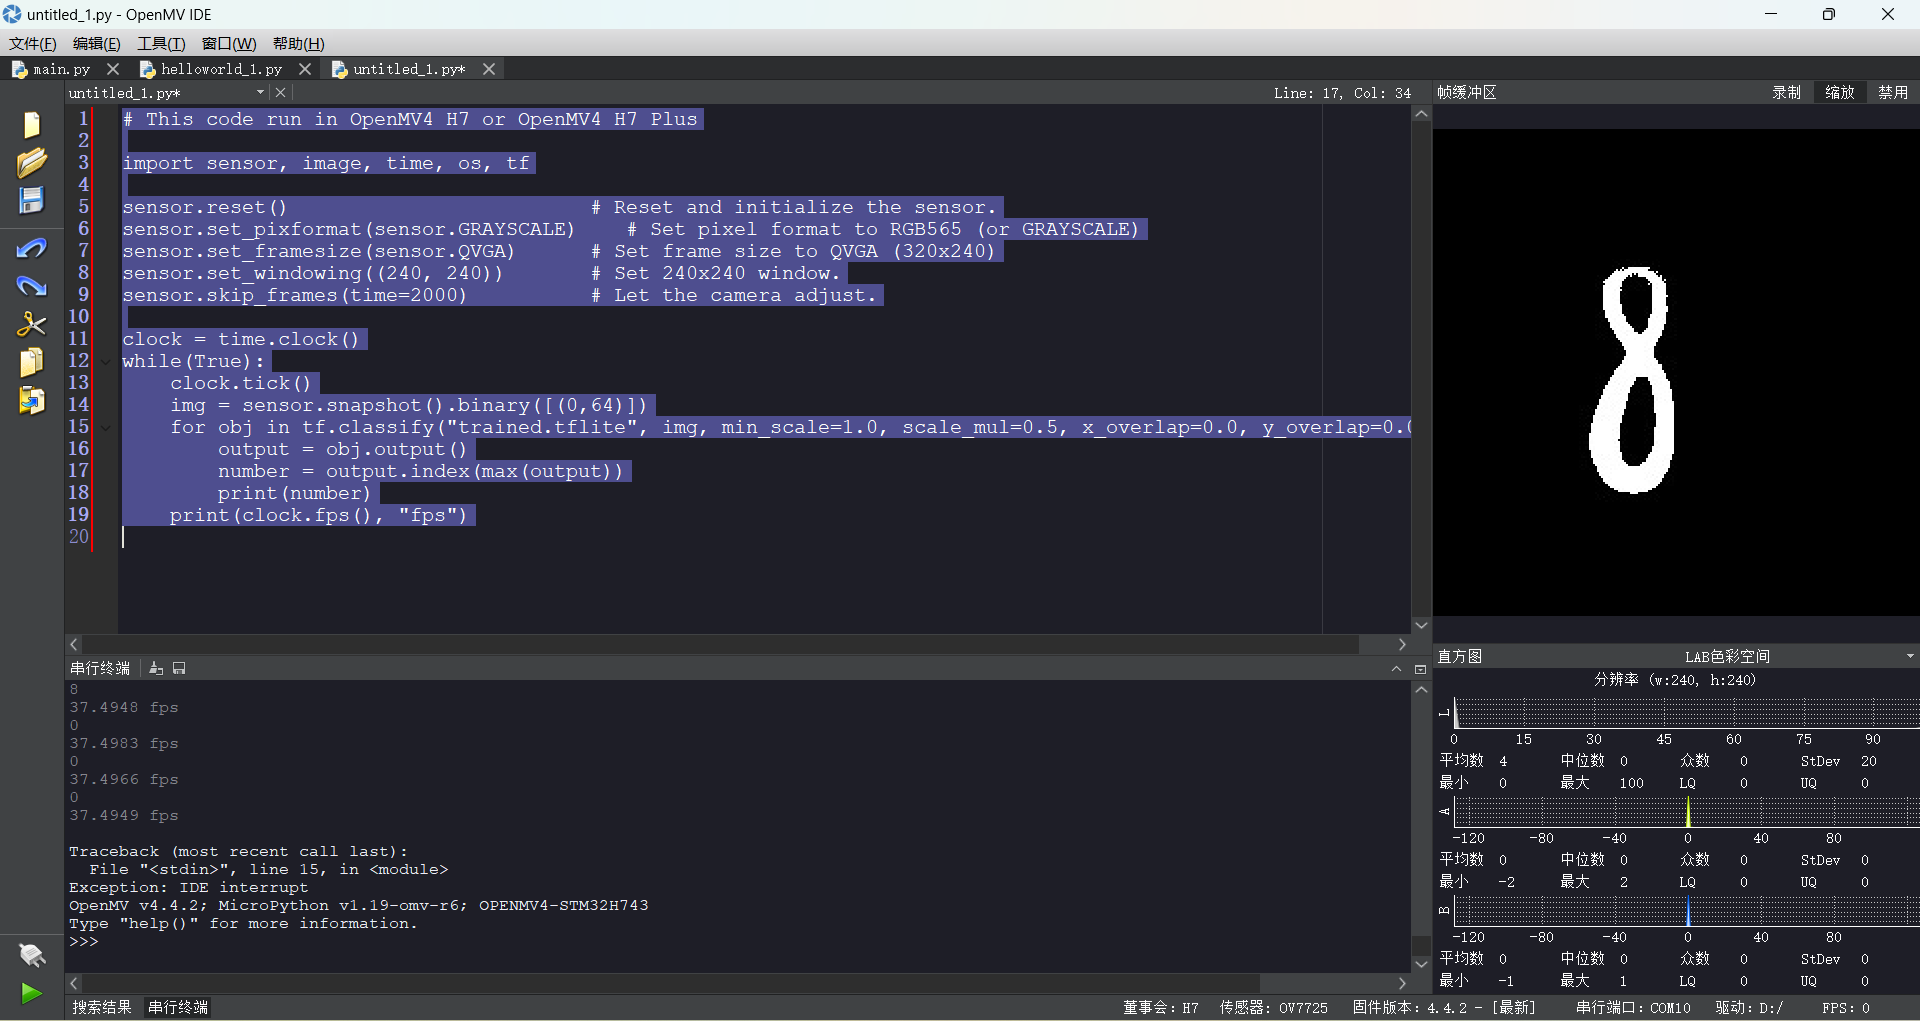
为什么我跑mnist的例程代码,识别精确度这么低?我已经把trained.tflite拷贝好了
# This code run in OpenMV4 H7 or OpenMV4 H7 Plus

import sensor, image, time, os, tf

sensor.reset()                         # Reset and initialize the sensor.
sensor.set_pixformat(sensor.GRAYSCALE)    # Set pixel format to RGB565 (or GRAYSCALE)
sensor.set_framesize(sensor.QVGA)      # Set frame size to QVGA (320x240)
sensor.set_windowing((240, 240))       # Set 240x240 window.
sensor.skip_frames(time=2000)          # Let the camera adjust.

clock = time.clock()
while(True):
    clock.tick()
    img = sensor.snapshot().binary([(0,64)])
    for obj in tf.classify("trained.tflite", img, min_scale=1.0, scale_mul=0.5, x_overlap=0.0, y_overlap=0.0):
        output = obj.output()
        number = output.index(max(output))
        print(number)
    print(clock.fps(), "fps")
加入距离传感器 和 串口通信传感器,串口可以通信,但是获取距离的时候,距离传感器报错,
# Blob Detection and uart transport
import sensor, image, time
from pyb import UART
import json
import sys
from machine import I2C
from vl53l1x import VL53L1X
import time
i2c = I2C(2)
distance = VL53L1X(i2c)
print("range: mm ", distance.read())
sensor.reset()                      # Reset and initialize the sensor.
sensor.set_pixformat(sensor.RGB565) # Set pixel format to RGB565 (or GRAYSCALE)
sensor.set_framesize(sensor.VGA)    # Set frame size to QVGA (320x240)
sensor.skip_frames(time = 2000)
sensor.set_auto_whitebal(True)
sensor.set_auto_gain(True)
#srnsor.set_
sensor.set_hmirror(True) #水平方向翻转
sensor.set_vflip(True) #垂直方向翻转
uart = UART(3, 115200)
while (True):
    try:
       if uart.any():
            recv_data = uart.read().decode()
            print("range: mm ", distance.read())
            uart.write(distance.read())
    except OSError as e:
        print("Uart error: ", e)
        sys.print_exception(e)
为什么IDE上有图像,LCD上只显示白色。
请在这里粘贴代码
(IDE版本openMV3.03 exe,LCD版本:openMV4 plus 3 CamM7 H7)
LCD Example
Note: To run this example you will need a LCD Shield for your OpenMV Cam.
The LCD Shield allows you to view your OpenMV Cam's frame buffer on the go.
import sensor, image
import lcd
sensor.reset() # Initialize the camera sensor.
sensor.set_pixformat(sensor.RGB565) # or sensor.GRAYSCALE
sensor.set_framesize(sensor.QQVGA2) # Special 128x160 framesize for LCD Shield.
lcd.init() # Initialize the lcd screen.
#lcd初始化
while(True):
lcd.display(sensor.snapshot()) # Take a picture and display the image.
#将图像显示在lcd中

输入代码报错后出现image object has no attribute find,但固件是最新版本,是什么原因?
# Hello World Example
#
# Welcome to the OpenMV IDE! Click on the green run arrow button below to run the script!

import sensor, image, time

thresholds=(100, 0, 127, 30, -87, 104) # generic_red_thresholds


sensor.reset()                      # Reset and initialize the sensor.
sensor.set_pixformat(sensor.RGB565) # Set pixel format to RGB565 (or GRAYSCALE)
sensor.set_framesize(sensor.QVGA)   # Set frame size to QVGA (320x240)
sensor.skip_frames(time = 2000)     # Wait for settings take effect.
sensor.set_auto_gain(False)
sensor.set_auto_whitebal(False)
clock = time.clock()                # Create a clock object to track the FPS.

while(True):
    clock.tick()                    # Update the FPS clock.
    img = sensor.snapshot()         # Take a picture and return the image.
    for blob in img.find.blobs([thresholds[threshold_index]], pixels_threshold=200, area_threshold=200, merge=True):
        img.draw_rectangle(blob.rect())
        img.draw_cross(blob.cx(),bolb.cy())
    print(clock.fps())