LCD库释放引脚SPIDisplay.deinit()函数不存在的问题
在openmv官网上,显示了SPIDisplay库的用法,其中有.deinit()、.width()、.height()等等函数用法,其中测试过.width()和.height()等其他函数是没有问题的,能正常使用,但调用.deinit()就报错不存在。

固件4.5.6
代码:
import sensor
import display

sensor.reset()  # Initialize the camera sensor.
sensor.set_pixformat(sensor.RGB565)  # or sensor.GRAYSCALE
sensor.set_framesize(sensor.QQVGA2)  # Special 128x160 framesize for LCD Shield.
lcd = display.SPIDisplay()
lcd.deinit()  #加上这句会报错

while True:
    lcd.write(sensor.snapshot())  # Take a picture and display the image.
    print(lcd.width())  #可以打印出显示屏宽度
参考教程官网https://docs.openmv.io/library/omv.display.spidisplay.html
用串口向32发信息,32代码都没问题,但是串口一直发不出去,一点反应没有,波特率都是对的,代码有问题吗?
import sensor, image, time
from machine import UART
import json
red_threshold = (100, 34, 11, 127, -28, 54)
sensor.reset() # Initialize the camera sensor.
sensor.set_pixformat(sensor.RGB565) # use RGB565.
sensor.set_framesize(sensor.QQVGA) # use QQVGA for speed.
sensor.skip_frames(10) # Let new settings take affect.
sensor.set_auto_whitebal(False) # turn this off.
clock = time.clock() # Tracks FPS.
uart = UART(1,115200)
uart.init(115200, bits=8, parity=None, stop=1)
def find_max(blobs):
max_size=0
for blob in blobs:
if blob[2]*blob[3] > max_size:
max_blob=blob
max_size = blob[2]*blob[3]
return max_blob
while(True):
img = sensor.snapshot() # Take a picture and return the image.
blobs = img.find_blobs([red_threshold])
if blobs:
max_blob = find_max(blobs)
x_error = max_blob[5]-img.width()/2
y_error = max_blob[6]-img.height()/2
img.draw_rectangle(max_blob[0:4]) # rect
img.draw_cross(max_blob[5], max_blob[6]) # cx, cy
output_str="%d,%d"% (x_error,y_error) #方式1
uart.write(output_str+'\r\n')
print('you send:',output_str)
官方提供的WIFI例程,while循环的意义是什么呀?

import sensor, image, time, network, usocket, sys

SSID ='OPENMV_AP'    # Network SSID
KEY  ='1234567890'    # Network key (must be 10 chars)
HOST = ''           # Use first available interface
PORT = 8080         # Arbitrary non-privileged port

# Reset sensor
sensor.reset()
# Set sensor settings
sensor.set_contrast(1)
sensor.set_brightness(1)
sensor.set_saturation(1)
sensor.set_gainceiling(16)
sensor.set_framesize(sensor.QQVGA)
sensor.set_pixformat(sensor.GRAYSCALE)

# Init wlan module in AP mode.
wlan = network.WINC(mode=network.WINC.MODE_AP)
wlan.start_ap(SSID, key=KEY, security=wlan.WEP, channel=2)

# You can block waiting for client to connect
#print(wlan.wait_for_sta(10000))

def response(s):
    print ('Waiting for connections..')
    client, addr = s.accept()
    # set client socket timeout to 2s
    client.settimeout(2.0)
    print ('Connected to ' + addr[0] + ':' + str(addr[1]))

    # Read request from client
    data = client.recv(1024)
    # Should parse client request here

    # Send multipart header
    client.send("HTTP/1.1 200 OK\r\n" \
                "Server: OpenMV\r\n" \
                "Content-Type: image/jpeg\r\n\r\n")

    # FPS clock
    clock = time.clock()

    # Start streaming images
    # NOTE: Disable IDE preview to increase streaming FPS.


    frame = sensor.snapshot()
    cframe = frame.compressed(quality=35)
    client.send(cframe)
    client.close()

while (True):
    # Create server socket
    s = usocket.socket(usocket.AF_INET, usocket.SOCK_STREAM)
    try:
        # Bind and listen
        s.bind([HOST, PORT])
        s.listen(5)

        # Set server socket timeout
        # NOTE: Due to a WINC FW bug, the server socket must be closed and reopened if
        # the client disconnects. Use a timeout here to close and re-create the socket.
        s.settimeout(3)
        response(s)
    except OSError as e:
        s.close()
        print("socket error: ", e)
        #sys.print_exception(e)
例子中的瞳孔识别不准确,有时识别不出来有时识别出来的只有一个眼睛
# Iris Detection 2 Example
#
# This example shows how to find the eye gaze (pupil detection) after finding
# the eyes in an image. This script uses the find_eyes function which determines
# the center point of roi that should contain a pupil. It does this by basically
# finding the center of the darkest area in the eye roi which is the pupil center.
#
# Note: This script does not detect a face first, use it with the telephoto lens.

import sensor, time, image

# Reset sensor
sensor.reset()

# Sensor settings
sensor.set_contrast(3)
sensor.set_gainceiling(16)

# Set resolution to VGA.
sensor.set_framesize(sensor.VGA)

# Bin/Crop image to 200x100, which gives more details with less data to process
sensor.set_windowing((220, 190, 200, 100))

sensor.set_pixformat(sensor.GRAYSCALE)

# Load Haar Cascade
# By default this will use all stages, lower satges is faster but less accurate.
eyes_cascade = image.HaarCascade("eye", stages=24)
print(eyes_cascade)

# FPS clock
clock = time.clock()

while (True):
    clock.tick()
    # Capture snapshot
    img = sensor.snapshot()
    # Find eyes !
    # Note: Lower scale factor scales-down the image more and detects smaller objects.
    # Higher threshold results in a higher detection rate, with more false positives.
    eyes = img.find_features(eyes_cascade, threshold=0.5, scale_factor=1.5)

    # Find iris
    for e in eyes:
        iris = img.find_eye(e)
        img.draw_rectangle(e)
        img.draw_cross(iris[0], iris[1])

    # Print FPS.
    # Note: Actual FPS is higher, streaming the FB makes it slower.
    print(clock.fps())
边缘检测的不兼容性问题
想对经过【边缘检测】处理后得到的图片进行【特征点保存】,但是运行代码时,【边缘检测】只能进行一次,无法循环,而【特征点保存】可以一直循环检测下去。想让【边缘检测】和【特征点保存】一起循环运行,
import sensor, time, image

sensor.reset()

sensor.set_contrast(3)
sensor.set_gainceiling(16)
sensor.set_framesize(sensor.VGA)
sensor.set_windowing((320, 240))
sensor.set_pixformat(sensor.GRAYSCALE)

sensor.skip_frames(time = 2000)
sensor.set_auto_gain(False, value=100)

FILE_NAME = "666"
img = sensor.snapshot()
kernel_size = 1 # kernel width = (size*2)+1, kernel height = (size*2)+1
kernel = [-1, -1, -1,\
          -1, +8, -1,\
          -1, -1, -1]
thresholds = [(100, 255)] # grayscale thresholds设置阈值

clock = time.clock() # 追踪FPS

if (sensor.get_id() == sensor.OV7725):
    sensor.__write_reg(0xAC, 0xDF)
    sensor.__write_reg(0x8F, 0xFF)

while(True):
    clock.tick() # Track elapsed milliseconds between snapshots().
    img = sensor.snapshot() # Take a picture and return the image.

    img.morph(kernel_size, kernel)
    img.binary(thresholds)
    img.erode(1, threshold = 2)
    print(clock.fps()) # Note: Your OpenMV Cam runs about half as fast while
    time.sleep(100)

    kpts = img.find_keypoints(max_keypoints=150, threshold=10, scale_factor=1.2)
    if (kpts == None):
        raise(Exception("Couldn't find any keypoints!"))

    image.save_descriptor(kpts, "/%s.orb"%(FILE_NAME))

    img.draw_keypoints(kpts)
    sensor.snapshot()
代码该怎么改?谢谢
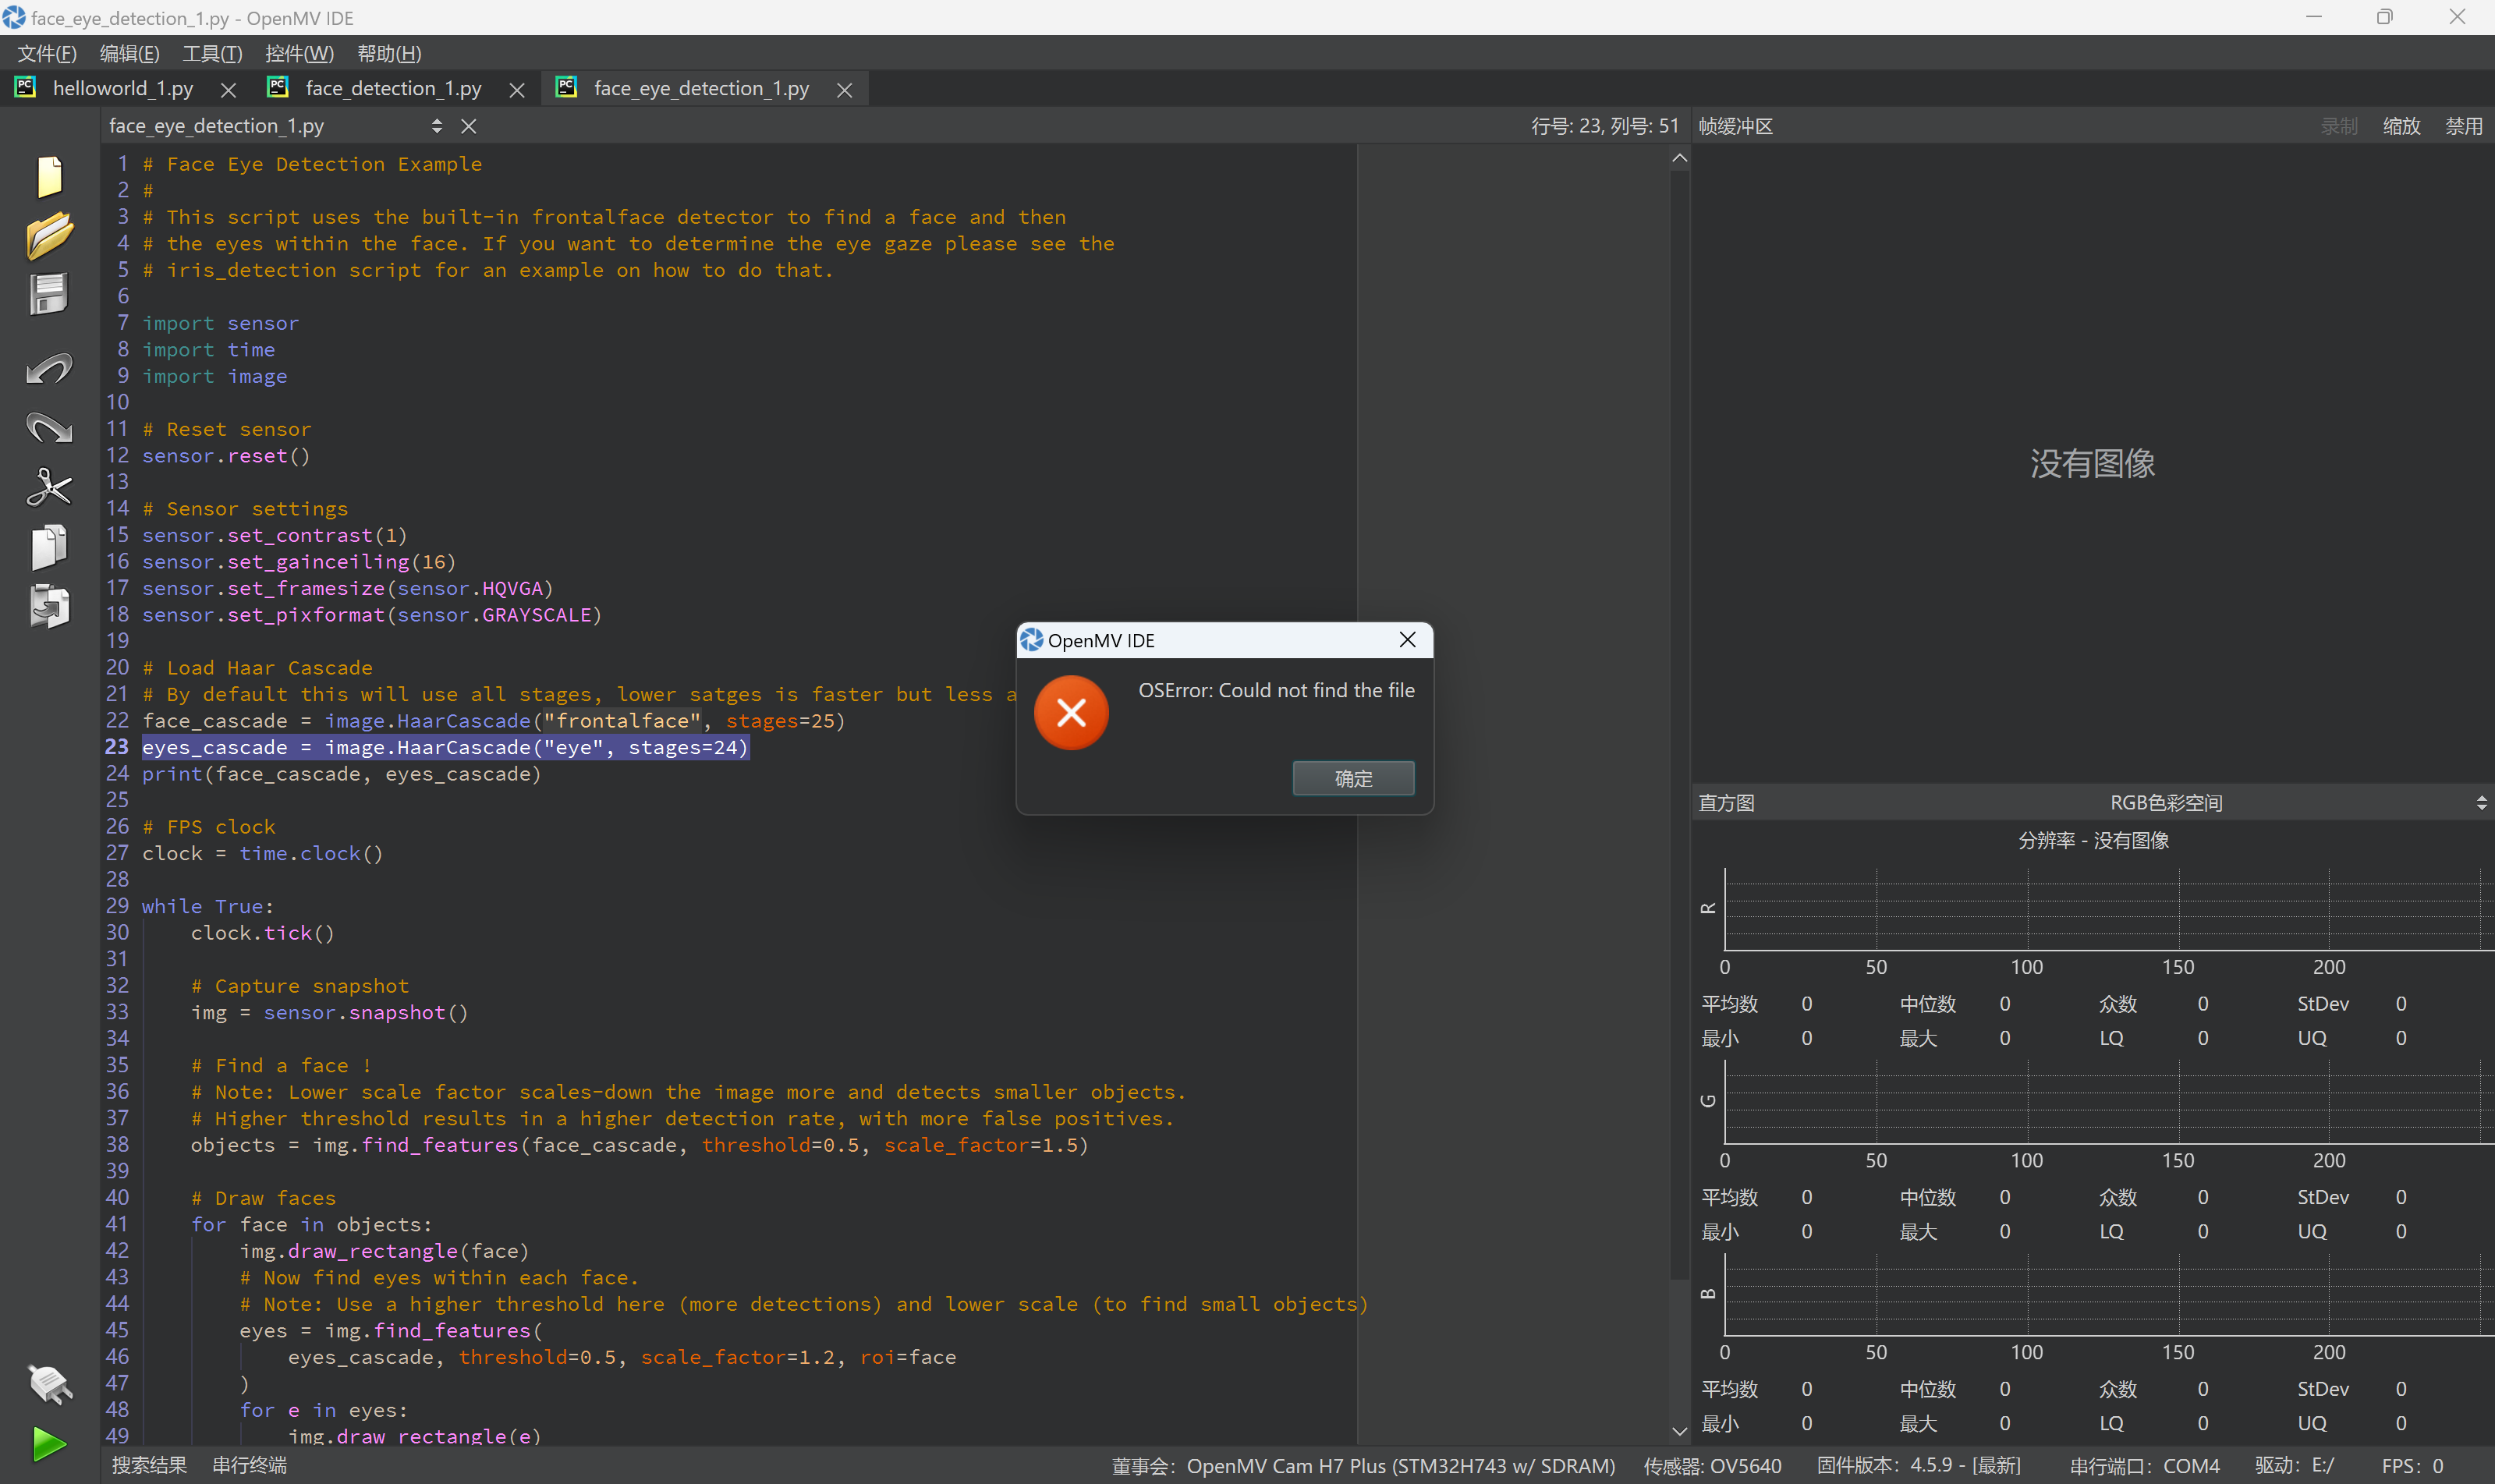
示例文档中人眼检测第二十三行报错OSError: Could not find the file
# Face Eye Detection Example
#
# This script uses the built-in frontalface detector to find a face and then
# the eyes within the face. If you want to determine the eye gaze please see the
# iris_detection script for an example on how to do that.
import sensor
import time
import image
# Reset sensor
sensor.reset()
# Sensor settings
sensor.set_contrast(1)
sensor.set_gainceiling(16)
sensor.set_framesize(sensor.HQVGA)
sensor.set_pixformat(sensor.GRAYSCALE)
# Load Haar Cascade
# By default this will use all stages, lower satges is faster but less accurate.
face_cascade = image.HaarCascade("frontalface", stages=25)
 eyes_cascade = image.HaarCascade("eye", stages=24)
print(face_cascade, eyes_cascade)
# FPS clock
clock = time.clock()
while True:
clock.tick()
# Capture snapshot
img = sensor.snapshot()
# Find a face !
# Note: Lower scale factor scales-down the image more and detects smaller objects.
# Higher threshold results in a higher detection rate, with more false positives.
objects = img.find_features(face_cascade, threshold=0.5, scale_factor=1.5)
# Draw faces
for face in objects:
img.draw_rectangle(face)
# Now find eyes within each face.
# Note: Use a higher threshold here (more detections) and lower scale (to find small objects)
eyes = img.find_features(
eyes_cascade, threshold=0.5, scale_factor=1.2, roi=face
)
for e in eyes:
img.draw_rectangle(e)
# Print FPS.
# Note: Actual FPS is higher, streaming the FB makes it slower.
print(clock.fps())
在眼睛识别实例中会有 OSError: Could not find the file报错如何解决?
# This work is licensed under the MIT license.
# Copyright (c) 2013-2023 OpenMV LLC. All rights reserved.
# https://github.com/openmv/openmv/blob/master/LICENSE
#
# Face Eye Detection Example
#
# This script uses the built-in frontalface detector to find a face and then
# the eyes within the face. If you want to determine the eye gaze please see the
# iris_detection script for an example on how to do that.

import sensor
import time
import image

# Reset sensor
sensor.reset()

# Sensor settings
sensor.set_contrast(1)
sensor.set_gainceiling(16)
sensor.set_framesize(sensor.HQVGA)
sensor.set_pixformat(sensor.GRAYSCALE)

# Load Haar Cascade
# By default this will use all stages, lower satges is faster but less accurate.
face_cascade = image.HaarCascade("frontalface", stages=25)
eyes_cascade = image.HaarCascade("eye", stages=24) #是这一行报错
print(face_cascade, eyes_cascade)

# FPS clock
clock = time.clock()

while True:
    clock.tick()

    # Capture snapshot
    img = sensor.snapshot()

    # Find a face !
    # Note: Lower scale factor scales-down the image more and detects smaller objects.
    # Higher threshold results in a higher detection rate, with more false positives.
    objects = img.find_features(face_cascade, threshold=0.5, scale_factor=1.5)

    # Draw faces
    for face in objects:
        img.draw_rectangle(face)
        # Now find eyes within each face.
        # Note: Use a higher threshold here (more detections) and lower scale (to find small objects)
        eyes = img.find_features(
            eyes_cascade, threshold=0.5, scale_factor=1.2, roi=face
        )
        for e in eyes:
            img.draw_rectangle(e)

    # Print FPS.
    # Note: Actual FPS is higher, streaming the FB makes it slower.
    print(clock.fps())
openmv调用外部中断为什么没有反应?
import sensor, image, time,pyb
from pyb import Pin, ExtInt
import micropython
micropython.alloc_emergency_exception_buf(100)

sensor.reset()
sensor.set_pixformat(sensor.RGB565)
sensor.set_framesize(sensor.QVGA)
sensor.skip_frames(time = 2000)

blue = pyb.LED(3)
green = pyb.LED(2)
stop_flag = 1
def start():
    stop_flag = 0
    blue.off()
    green.on()
    print('start')

def stop():
    blue.on()
    green.off()
    print('stop')

sta = ExtInt(Pin('P0'),ExtInt.IRQ_RISING,Pin.PULL_NONE, start())
sto = ExtInt(Pin('P1'),ExtInt.IRQ_RISING,Pin.PULL_NONE, stop())

while(True):
    clock.tick()
    img = sensor.snapshot()
在lcd上显示识别的二维码信息,要怎么修改
import sensor, image, time,lcd

sensor.reset()
sensor.set_pixformat(sensor.RGB565)
sensor.set_framesize(sensor.QVGA)
sensor.skip_frames(time = 2000)
sensor.set_auto_gain(False) # must turn this off to prevent image washout...
clock = time.clock()

while(True):
    clock.tick()
    img = sensor.snapshot()
    img.lens_corr(1.8) # strength of 1.8 is good for the 2.8mm lens.
    for code in img.find_qrcodes():
        img.draw_rectangle(code.rect(), color = (255, 0, 0))
        message = code.payload()
        img.draw_string(message)
        lcd.display(img)
        print(code)
    print(clock.fps())
请问怎么显示JPEG图片 是我哪里没有设置吗
sensor.reset() # Reset and initialize the sensor.
sensor.set_pixformat(sensor.JPEG) # Set pixel format to RGB565 (or GRAYSCALE)
sensor.set_framesize(sensor.UXGA) # Set frame size to QVGA (320x240)
sensor.set_quality(50)
sensor.skip_frames(time = 3000) # Wait for settings take effect.
clock = time.clock() # Create a clock object to track the FPS.
while(True):
clock.tick() # Update the FPS clock.
img = sensor.snapshot() # Take a picture and return the image.
print(clock.fps())