升级固件后openmv不好用,没升级前收到命令直接识别出来,升级后发送命令,需要多次才能实现扫码
Untitled - By: STM32 - 周四 四月 19 2018
import sensor, image,time,lcd
from pyb import UART,Timer,LED
sensor.reset()
sensor.set_pixformat(sensor.RGB565)
sensor.set_framesize(sensor.QVGA)#320*240
sensor.skip_frames()
sensor.set_auto_whitebal(False) #关闭白平衡
sensor.set_auto_gain(False) #关闭自动增益
clock = time.clock()
lcd.init() #Initialize the lcd screen.
uart = UART(3,115200,8,None,1) #创建串口对象
data = []
LED_Red = LED(1)
LED_Green = LED(2)
LED_Blue = LED(3)
tim = Timer(4,freq=1) # create a timer object using timer 4
#tim.callback(tick)
tim.deinit()
FlagOK = 0
show_numTab = ["0","1","2","3","4","5","6","7","8","9"]
num = 0
returnData = [0x55,0x02,0x92,0x02,0x02,0x00,0x00,0xBB] #识别失败
runData = [0x55,0x02,0x92,0x03,0x02,0x00,0x00,0xBB] #正在识别
#定时器回调函数
def tick(timer): # we will receive the timer object when being called
global FlagOK,num,returnData
print("Timer callback")
num = num-1
if(num == 0):
num = 9
FlagOK = 2
tim.deinit()
#串口发送函数
def USART_Send(src,length):
for i in range(length):
uart.writechar(src[i])
二维码识别,并返回识别结果
def Color_Check(srcbuf):
global FlagOK,num
if(FlagOK == 1):
img.draw_string(100, 180,"open"+show_numTab[num],color=[255,0,0])
for code in img.find_qrcodes():
FlagOK = 0
tim.deinit()
print(code)
qr_Tab = code.payload()
uart.writechar(0x55)
uart.writechar(0x02)
uart.writechar(0x92)
uart.writechar(0x01)
uart.writechar(len(qr_Tab))
for qrdata in qr_Tab:
uart.writechar(ord(qrdata))
uart.writechar(0xBB)
if(FlagOK == 2):
    for rdata in returnData:
        uart.writechar(rdata)
    FlagOK = 0
while(True):
img = sensor.snapshot()

if(uart.any()):
    data = uart.read(8)
    if( len(data) >= 8):
        if((data[0] == 0x55)&(data[1] == 0x02)&(data[7] == 0xBB)):
            if(data[2] == 0x91):
                print("识别小球")
            if(data[2] == 0x92):
                print("识别二维码")
                if(data[3] == 0x01):    #启动识别
                    if(FlagOK == 0):
                        FlagOK = 1
                        num = 9
                        print("开始识别")
                        tim.callback(tick)
                    else:
                        print("正在识别")
                        for rdata in runData:
                            print(rdata)
                            uart.writechar(rdata)
                if(data[3] == 0x02):
                    print("停止识别")
                    FlagOK = 2
                    tim.deinit()       #定时器停止

Color_Check(data)

img.draw_string(110, 40,"qr_CodeV1.0",color=[0,0,255])
lcd.display(img)
请在这里粘贴代码
二维码识别
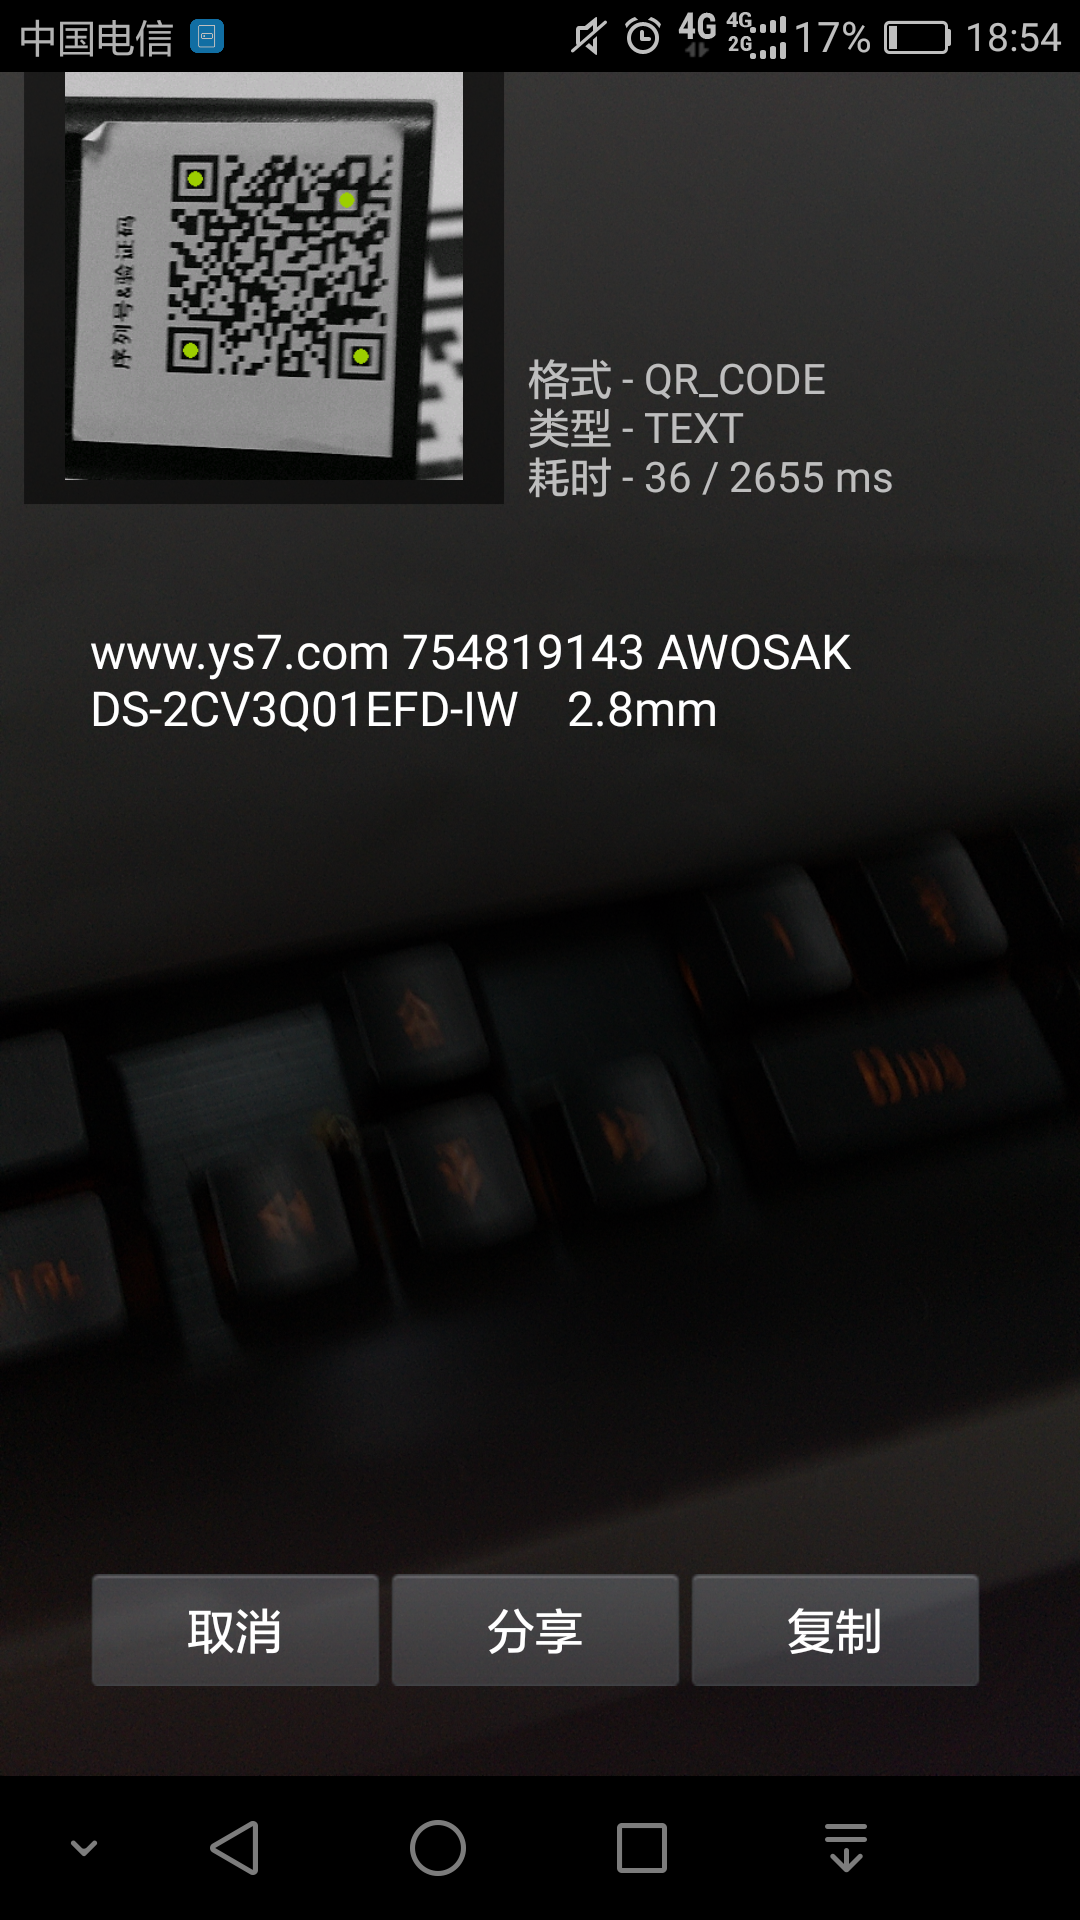
@kidswong999 您好,我还有一个问题,比如像我用手机扫描一个二维码,很快就显示出结果了,但使用openmv却似乎得不到结果,这是为什么呢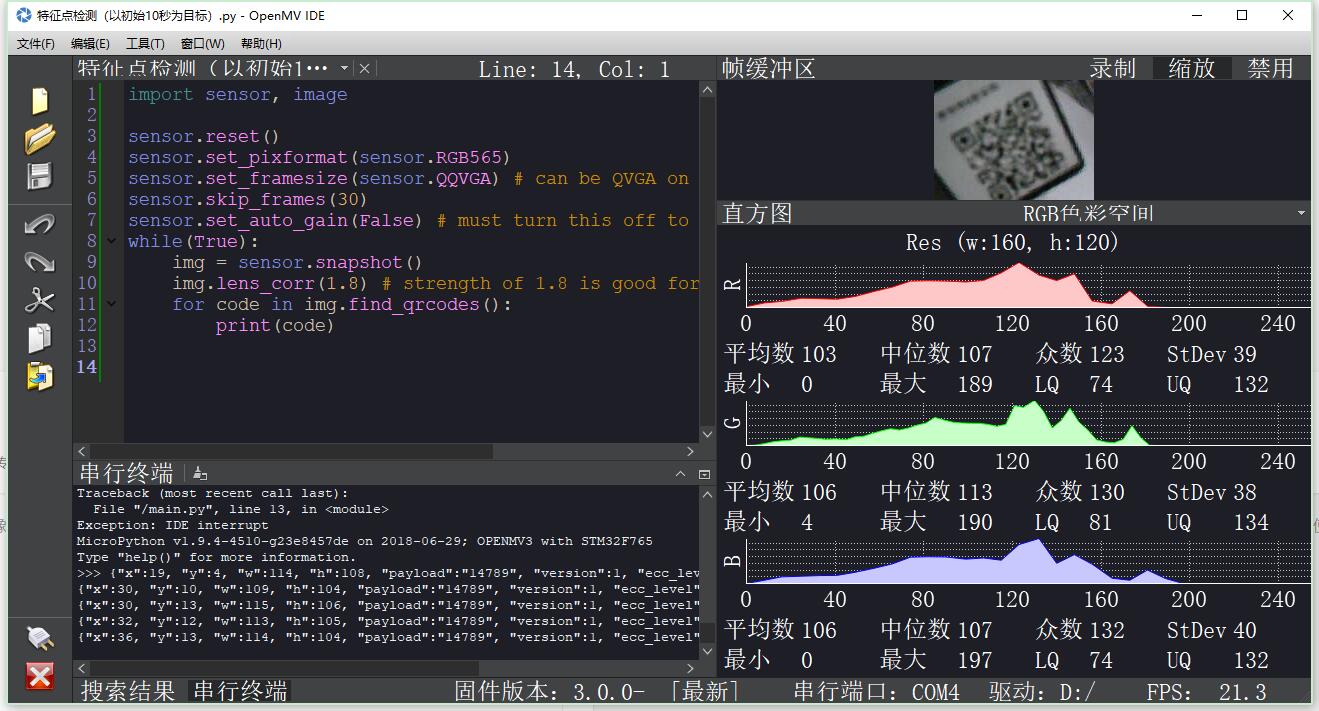
怎么讲sd卡里的图片显示在LCD上呢?
我运行下面的代码很正常,我看到你的尺寸可能不对,应该是QQVGA2保存成bmp
import sensor, image, lcd

sensor.reset() # Initialize the camera sensor.
sensor.set_pixformat(sensor.RGB565) # or sensor.GRAYSCALE
sensor.set_framesize(sensor.QQVGA2) # Special 128x160 framesize for LCD Shield.
lcd.init() # Initialize the lcd screen.

sensor.snapshot().save("test.bmp")
img = image.Image("test.bmp",copy_to_fb=True)
lcd.display(img) # Take a picture and display the image.
程序运行一半出现以下问题:
我的程序运行一半,突然崩了,是咋回事,代码如下:
#小车扫码测试3
#拍一张图先找圆,将其中某个区域复制出来,识别二维码
# 2021-1-25  -AGV小车测试扫码
#识别圆和二维码--2.3MM镜头,先识别圆的位置,截取小块图像,再找二维码,解决二维码在图像边缘无法识别问题
#发送数据格式:2byte帧头,1byte帧序号,1byte帧耗时,4byte码值,2byte左右偏移,2byte上下偏移,2byte角度,1byte校验和,共15byte
import sensor, image, time, math
from pyb import UART
uart = UART(3, 19200)
uart.init(19200, bits=8, parity=None, stop=1)
sensor.reset()
sensor.set_pixformat(sensor.GRAYSCALE)
sensor.set_framesize(sensor.QVGA) # can be QVGA on M7...
sensor.skip_frames(30)
sensor.set_auto_gain(False) # must turn this off to prevent image washout...
clock = time.clock()

while(True):

    #sensor.set_windowing((0,0,320, 240))
    #sensor.skip_frames(time=1)
    img = sensor.snapshot()
    clock.tick() #必须放在img = sensor.snapshot()下面

    for c in img.find_circles(threshold = 8000, x_margin = 10, y_margin = 10, r_margin = 10,
        r_min = 37, r_max = 41, r_step = 1):
        img.draw_circle(c.x(), c.y(), c.r(), color = (200))#找到的圆画出来
        print(c)
        img.draw_cross(160, 120, color = (250), size = 160, thickness = 1)#中心画个十字架

    img2 = img.copy((c.x()-c.r(),c.y()-c.r(),2*c.r(),2*c.r()),1,1,copy_to_fb=False)
    matrices = img2.find_datamatrices(effort = 500)
    print(matrices)
    for code in matrices:
        data=bytearray([0xaa,0x4d,0,0,#帧头
        int(code.payload()),int(code.payload())>>8,int(code.payload())>>16,int(code.payload())>>24,#])  #格式正确
        int(c.x()-160),int(c.x()-160)>>8,int(c.y()-120),int(c.y()-120)>>8,#])#,  #xy偏移量,可以发送
        #int(100*(int(180*code.rotation())/math.pi-180)%36000),int(100*(int(180*code.rotation())/math.pi-180)%36000)>>8])#       #角度,可发送
        int(100*((int(180*code.rotation())/math.pi-180)%360)),int(100*((int(180*code.rotation())/math.pi-180)%360))>>8])#

        num=bytearray([ data[(0)]+data[(1)]+data[(2)]+data[(3)]+data[(4)]+data[(5)]+data[(6)]+data[(7)]+data[(8)]+data[(9)]
            +data[(10)]+data[(11)]+data[(12)]+data[(13)]   ])#data校验和
        uart.write(data)
        uart.write(num)
    #if not matrices:
    print("FPS %f" % clock.fps())
报错如下:Traceback (most recent call last):
File "
ValueError: invalid syntax for integer with base 10
MicroPython v1.12-omv-r1 OpenMV v3.6.9 2020-10-12; OPENMV4P-STM32H743
Type "help()" for more information.
openmv3不能处理外来的数据吗?请教大神指教!!
#这是我写的一个二维码模块数据处理的小测试,不知道为什么用不了,很多人说法都不一样,所以来请教大神们
while(True)
   if uart.any():
   # 判断是否有数据, 有的话就读入
    EWM_data = uart.read()
    print(EWM_data)
    if  EWM_data == '123':
        print('Yes')
    else:
        print('No data')


    #uart.write(tmp_data)
   # 休眠1s
# time.sleep(1000)uncaught exception in Timer(4) interrupt handler 这定时器多少有点叛逆。
好了,给串口删了删,189行跟190行放了注释,因为不是从串口读了,会一直执行,所以直接给定了一个协议,不过切换功能需要手动改192行这个debug'的数组,救救娃qwq
import sensor, image,time,lcd
from pyb import UART,Timer,LED


sensor.reset()
print("初始化摄像头成功")
sensor.set_pixformat(sensor.RGB565)
print("设置彩图成功")
sensor.set_framesize(sensor.QVGA)
print("设置图像像素为QVGA")
sensor.skip_frames(1)#里面如果是数字就是跳过几帧,如果是time=1000就是跳过1s的帧数
print("设置跳帧成功,如果卡摄像头将这句话注释")
sensor.set_auto_whitebal(False)
print("关闭白平衡成功")
sensor.set_auto_gain(False)
print("关闭自动增益成功")
clock = time.clock()
print("记录帧率")
lcd.init()
print("初始化LCE屏幕成功")
uart = UART(3,115200,8,None,1)#初始化串口
print("初始化串口成功")
                                                                                  #进行初始化
#===================================================================================================
data = []#一个列表

LED_Red = LED(1)
LED_Green = LED(2)
LED_Blue = LED(3)

#设置了一个感兴趣区,如果框不住请调整 160宽度是最小的,但是不建议
left_roi= [0,0,240,120]

#第一个模糊阈值
red_color0	= (0, 100, -26, 65, -25, 59)
green_color0  = (0, 100, -73, 21, -40, 65)
yellow_color0 = (43, 100, -37, 58, -22, 72)

#第二个模糊阈值
red_color1	= (55, 98, 35, 59, 0, 19)
green_color1  = (0, 100, -128, -35, -128, 127)
yellow_color1 = (94, 100, -18, 5, 2, 40)

#交通灯的阈值(经过曝光处理)主要使用这个阈值
red_threshold_01 = (29, 100, 38, 96, 20, 63)
green_threshold_01 = (29, 91, -96, -18, 19, 67)
yellow_threshold_01 = (34, 100, -31, 42, 48, 84)

                                                                                   #阈值
#===================================================================================================

Flaglight = 0 #标志灯
tim = Timer(4,freq=1)
tim.deinit()

tim1=Timer(3,freq=1)
tim1.deinit()


QR_flag = 0
light_flag = 0
show_numTab = ["0","1","2","3","4","5","6","7","8","9"]
qr_number = 0
traffic_number = 0
                                                                                   #设置标志位
#===================================================================================================


#摄像头识别停止或者识别失败的的协议?
returnData = [0x55,0x02,0x92,0x02,0x02,0x00,0x00,0xBB]
#摄像头正在识别的协议
runData	=    [0x55,0x02,0x92,0x03,0x02,0x00,0x00,0xBB]
#俩控制摄像头循迹和舵机上下调节的协议
returnData2 = [0x55,0x02,0x91,0x02,0x02,0x00,0x00,0xBB]
runData2	= [0x55,0x02,0x91,0x03,0x02,0x00,0x00,0xBB]

                                                                                   #返回协议
#===================================================================================================

#二维码定时器
def QR_timer(timer):
    global QR_flag,qr_number,returnData
    print("Timer Delaying")
    qr_number = qr_number-1
    if(qr_number == 0):
        qr_number = 2
        QR_flag = 2
        tim1.deinit()

#交通灯定时器
def traffic_light_timer(timer):
    global light_flag,traffic_number,returnData2
    print("Timer Delaying")
    traffic_number = traffic_number-1
    if(traffic_number == 0):
        traffic_number = 9
        light_flag = 2
        tim.deinit()
                                                                                    #定时器延时10s
#===================================================================================================

#发送函数
def USART_Send(src,length):
    for i in range(length):
        uart.writechar(src[i])
                                                                                    #发送函数
#===================================================================================================

#二维码 #协议是回传数据 #QR_flag等于1回传,等于2回传识别失败
def Color_Check(srcbuf):
    global QR_flag,qr_number
    if(QR_flag == 1):

        for code in img.find_qrcodes():

            QR_flag = 0
            tim1.deinit()#停止定时器
            print(code)
            qr_Tab = code.payload()

    if(QR_flag == 2):

        QR_flag = 0
                                                                                    #二维码识别函数
#===================================================================================================

#交通灯的核对
def traffic_Check(srcbuf):
    global light_flag,traffic_number
    if(light_flag == 1):

        LED_Red.on()
        LED_Green.on()
        LED_Blue.on()


        LED_Red.off()
        LED_Green.off()
        LED_Blue.off()


        #看参数根据距离更改
        #,x_stride =5,y_stride=5  增加识别的速度
        # pixels_threshold=30  最小的色块
        # area_threshold=30  最小边界框区域
        # merge=True 合并色块
        # margin=2 合并的时候边界距离
        yellow = img.find_blobs([yellow_threshold_01],roi=left_roi,x_stride =5,y_stride=5, pixels_threshold=30, area_threshold=30, merge=True, margin=2)
        green  = img.find_blobs([green_threshold_01] ,roi=left_roi,x_stride =5,y_stride=5, pixels_threshold=30, area_threshold=30, merge=True, margin=2)
        red    = img.find_blobs([red_threshold_01],  roi=left_roi, x_stride =5,y_stride=5, pixels_threshold=30, area_threshold=30, merge=True, margin=2)

        if green:
            LED_Red.off()
            LED_Green.on()
            LED_Blue.off()

            print("绿色")
            tim.deinit()
            light_flag = 0

        elif yellow:
            LED_Red.on()
            LED_Green.on()
            LED_Blue.off()

            print("黄色")
            tim.deinit()
            light_flag = 0

        elif red:
            LED_Red.on()
            LED_Green.off()
            LED_Blue.off()
            print("红色")

            tim.deinit()
            light_flag = 0


    if(light_flag == 2):

        light_flag = 0

                                                     #交通灯识别函数(注释的是 识别阈值更低级别 的识别)
                                                     #可以连用,但是要在串口发送之前关闭定时器跟标志位
#===================================================================================================
print("准备进入主循环")

#Debug 第1位02是交通灯 01是二维码
#        第2位01是开始 02是关闭识别

Debug = [0x55,0x01,0x01,0x00,0x00,0x00,0x00,0xBB]

while(True):
    img = sensor.snapshot()#.lens_corr(1.8)#如果二维码识别不到把注释去掉
    img.draw_rectangle( left_roi, color=(255,0,0))

    if(len(Debug) >= 5):

        if((Debug[0] == 0x55)):

            if( (Debug[1] == 0x02) ):
                Debug[1]=0x99 #debug用(只执行一便),如果要切换交通灯跟二维码需要重启设备
                print("识别交通灯")
                if((Debug[2] == 0x01)):
                    if(light_flag == 0):
                        light_flag = 1
                        traffic_number = 9
                        print("开始识别")
                        sensor.set_auto_exposure(False, 1000)#这里设置曝光时间
                        print(sensor.get_exposure_us())
                        tim.callback(traffic_light_timer)
                    else:
                        print("正在识别")

                if((Debug[2] == 0x02)):
                     print("停止识别")
                     light_flag = 2
                     tim.deinit()


            if( (Debug[1] == 0x01) ):
                Debug[1]=0x99 #debug用(只执行一便),如果要切换交通灯跟二维码需要重启设备
                print("识别二维码")
                if((Debug[2] == 0x01)):

                    if(QR_flag == 0):
                        QR_flag = 1
                        qr_number = 9
                        print("开始识别")
                        #这里设置自动曝光
                        sensor.set_auto_exposure(True)
                        print("二维码的曝光参数%d"%sensor.get_exposure_us())

                        tim1.callback(QR_timer)
                    else:
                        print("正在识别")

                if((Debug[2] == 0x02)):
                    print("停止识别")
                    QR_flag = 2
                    tim1.deinit()
                                                                                 #主循环函数
#===================================================================================================
    traffic_Check(data)
    Color_Check(data)
    lcd.display(img)
                                                                                 #重点循环
#===================================================================================================
数据类型有点不懂要怎么
就中间的那段取方差的最大值这一块,数据类型有点不知道要怎么转,好像是做运算要变成float,然后阈值又要是int,但是我强制类型转换了也还是不行,有点懵![0_1557035080630_LBZU8[ZH{{O@BWDWZ]7_TGC.png](https://fcdn.singtown.com/b164363d-9f97-4f0e-bab7-65310bd1a1e3.png)
import sensor, image, time

sensor.reset()
sensor.set_pixformat(sensor.GRAYSCALE)
sensor.set_framesize(sensor.VGA)
sensor.set_windowing((240, 240)) # look at center 240x240 pixels of the VGA resolution.
sensor.skip_frames(time = 2000)
sensor.set_auto_gain(False) # must turn this off to prevent image washout...
clock = time.clock()


sum = 0
max = 0
while(True):
    clock.tick()

    img = sensor.snapshot()  #得到图像
    for i in range(40, 180, 3):

        for x in range(0, 640, 10):
            for y in range(0, 480, 10):
                color = img.get_pixel(x, y)  #获取图像二值化的像素值
                value = abs(color - i)
                square = pow (value ,2)
                sum += square     #计算取到什么阈值时方差值相差最大
                if(sum > max):
                    max = sum       #保留最大方差
                    j = i           #保留阈值

    img.median(1, percentile=0.5)  #中值滤波
    img.laplacian(1, sharpen=True)  #锐化图像

    high_threshold = (j, 255)  #二维码阈值
    img.binary([high_threshold])   #二值化
    print(j)  #打印阈值

    for code in img.find_qrcodes():    #识别二维码
        img.draw_rectangle(code.rect(), color = 127)
        print(code)  #打印数据

    print(clock.fps())
如何让mlx90640使用p7、p8的iic通讯,怎么初始化mlx90640
mlx90640的引脚改不了,代码里写死的。
而且LCD 也占用P7,P8引脚,你也用不了。