换了浏览器就这样
1gvc 发布的帖子
-
舵机小白,想要学习openmv2控制舵机,应该怎么看啊发布在 OpenMV Cam
我在视频教程里看了好久,中文教程也翻,论坛也搜了好多,并没有什么实际帮助,我该怎么学习舵机控制啊,不用控制三个舵机,一个就够了


-
下载3.3版固件,总是显示没有权限发布在 OpenMV Cam
是这样,openmv2之前升级固件,最新的固件用不了,所以我联系淘宝客服,她建议我下载3.3左右的固件,我下载了很多次,都会在一半时候自动暂停,显示没有权限![0_1627955775685_2_[XYGK5VNZA]BU0U9I$N1.png](正在上传 100%)
-
RE: 忙碌中...请稍等...发布在 OpenMV Cam
@kidswong999 @kidswong999数据线是正常的,最开始用的时候,因为设备处理器不显示端口,所以买的线,可以连接了,这次是固件升级后突然不好使了,之前用是正常的
-
忙碌中...请稍等...发布在 OpenMV Cam
本来用的好好的,我升级固件之后,突然就不能用了,IDE连接很不稳定,插上USB口,无法正常开始运行代码,每次都显示忙碌中,几次点击开始小绿后,IDE自动登退,重新连接显示变砖,需要重新插USB口才好使
我该怎么办啊,眼泪落下来运行的代码是最简单的主机代码:
Hello World Example Welcome to the OpenMV IDE! Click on the green run arrow button below to run the script! import sensor, image, time sensor.reset() # Reset and initialize the sensor. sensor.set_pixformat(sensor.RGB565) # Set pixel format to RGB565 (or GRAYSCALE) sensor.set_framesize(sensor.QVGA) # Set frame size to QVGA (320x240) sensor.skip_frames(time = 2000) # Wait for settings take effect. clock = time.clock() # Create a clock object to track the FPS. while(True): clock.tick() # Update the FPS clock. img = sensor.snapshot() # Take a picture and return the image. print(clock.fps()) # Note: OpenMV Cam runs about half as fast when connected # to the IDE. The FPS should increase once disconnected. -
SOS:忙碌中...请稍等...发布在 OpenMV Cam
本来用的好好的,我升级固件之后,突然就不能用了,IDE连接很不稳定,插上USB口,无法正常开始运行代码,每次都显示忙碌中,几次点击开始小绿后,IDE自动登退,重新连接显示变砖,需要重新插USB口才好使
我该怎么办啊,眼泪落下来运行的代码是最简单的主机代码:
Hello World Example
Welcome to the OpenMV IDE! Click on the green run arrow button below to run the script!
import sensor, image, time
sensor.reset() # Reset and initialize the sensor.
sensor.set_pixformat(sensor.RGB565) # Set pixel format to RGB565 (or GRAYSCALE)
sensor.set_framesize(sensor.QVGA) # Set frame size to QVGA (320x240)
sensor.skip_frames(time = 2000) # Wait for settings take effect.
clock = time.clock() # Create a clock object to track the FPS.while(True):
clock.tick() # Update the FPS clock.
img = sensor.snapshot() # Take a picture and return the image.
print(clock.fps()) # Note: OpenMV Cam runs about half as fast when connected
# to the IDE. The FPS should increase once disconnected. -
RE: 人脸识别可以,瞳孔识别报错RuntimeError: Capture Failed: -3发布在 OpenMV Cam
@kidswong999 用的是OPENMV2
固件是最新的
代码是官方的,见下# 人眼追踪例程 # # 该脚本使用内置的前脸检测器来查找脸部,然后查找脸部的眼睛。如果你想确定 # 眼睛的瞳孔,请参阅iris_detection脚本,了解如何做到这一点。 import sensor, time, image #重置传感器 sensor.reset() #传感器设置 sensor.set_contrast(1) sensor.set_gainceiling(16) sensor.set_framesize(sensor.HQVGA) sensor.set_pixformat(sensor.GRAYSCALE) # 加载Haar算子 # 默认情况下,这将使用所有阶段,较低的阶段更快但不太准确。 face_cascade = image.HaarCascade("frontalface", stages=25)#人脸识别的haar算子 eyes_cascade = image.HaarCascade("eye", stages=24)#眼睛的haar算子 #image.HaarCascade(path, stages=Auto)加载一个haar模型。haar模型是二进制文件, #这个模型如果是自定义的,则引号内为模型文件的路径;也可以使用内置的haar模型, #比如“frontalface” 人脸模型或者“eye”人眼模型。 #stages值未传入时使用默认的stages。stages值设置的小一些可以加速匹配,但会降低准确率。 print(face_cascade, eyes_cascade) # FPS clock clock = time.clock() while (True): clock.tick() # Capture snapshot #捕获快照 img = sensor.snapshot() # Find a face ! # Note: Lower scale factor scales-down the image more and detects smaller objects. # Higher threshold results in a higher detection rate, with more false positives. objects = img.find_features(face_cascade, threshold=0.5, scale=1.5) # 先利用haar算子找到视野中的人脸。image.find_features(cascade, threshold=0.5, scale=1.5),thresholds越大, # 匹配速度越快,错误率也会上升。scale可以缩放被匹配特征的大小。 # Draw faces #将找到的人脸用矩形标记出来 for face in objects: img.draw_rectangle(face) # Now find eyes within each face. # 现在找出每一张脸的眼睛。 # Note: Use a higher threshold here (more detections) and lower scale (to find small objects) # 注意:这里使用更高的阈值(更多的检测)和更低的尺度(寻找小物体) eyes = img.find_features(eyes_cascade, threshold=0.5, scale=1.2, roi=face) #在人脸中识别眼睛。roi参数设置特征寻找的范围,roi=face即在找到的人脸中识别眼睛。 #将找到的眼睛标记出来 for e in eyes: img.draw_rectangle(e) # 打印FPS。 # 注意:实际FPS更高,流FB使它更慢。 print(clock.fps()) -
延时函数time库不好使,一用就报错发布在 OpenMV Cam
import time
from pyb import LEDfor i in range(1,5): #i = 1,2,3,4
print("LED {0} blink!".format(i))
LED(i).on() #第i个LED亮
time.sleep_ms(500) #延时500ms
LED(i).off() #第i个LED灭
time.sleep_ms(500) #延时500ms报错:AttributeError:'module'object has no attribute 'sleep_ms'
-
串口输出COM3神秘消失发布在 OpenMV Cam
UART Control
This example shows how to use the serial port on your OpenMV Cam. Attach pin
P4 to the serial input of a serial LCD screen to see "Hello World!" printed
on the serial LCD display.
import time
from pyb import UARTAlways pass UART 3 for the UART number for your OpenMV Cam.
The second argument is the UART baud rate. For a more advanced UART control
example see the BLE-Shield driver.
uart = UART(3, 19200)
import sensor, image, time, maththreshold_index = 0 # 0 for red, 1 for green, 2 for blue
Color Tracking Thresholds (L Min, L Max, A Min, A Max, B Min, B Max)
The below thresholds track in general red/green/blue things. You may wish to tune them...
thresholds = [(30, 100, 15, 127, 15, 127), # generic_red_thresholds
(30, 100, -64, -8, -32, 32), # generic_green_thresholds
(0, 30, 0, 64, -128, 0)] # generic_blue_thresholdssensor.reset()
sensor.set_pixformat(sensor.RGB565)
sensor.set_framesize(sensor.QVGA)
sensor.skip_frames(time = 2000)
sensor.set_auto_gain(False) # must be turned off for color tracking
sensor.set_auto_whitebal(False) # must be turned off for color tracking
clock = time.clock()Only blobs that with more pixels than "pixel_threshold" and more area than "area_threshold" are
returned by "find_blobs" below. Change "pixels_threshold" and "area_threshold" if you change the
camera resolution. "merge=True" merges all overlapping blobs in the image.
while(True):
clock.tick()
img = sensor.snapshot()
for blob in img.find_blobs([thresholds[threshold_index]], pixels_threshold=200, area_threshold=200, merge=True):
# These values depend on the blob not being circular - otherwise they will be shaky.
if blob.elongation() > 0.5:
img.draw_edges(blob.min_corners(), color=(255,0,0))
img.draw_line(blob.major_axis_line(), color=(0,255,0))
img.draw_line(blob.minor_axis_line(), color=(0,0,255))
# These values are stable all the time.
img.draw_rectangle(blob.rect())
img.draw_cross(blob.cx(), blob.cy())
# Note - the blob rotation is unique to 0-180 only.
img.draw_keypoints([(blob.cx(), blob.cy(), int(math.degrees(blob.rotation())))], size=20)
uart.write("1")
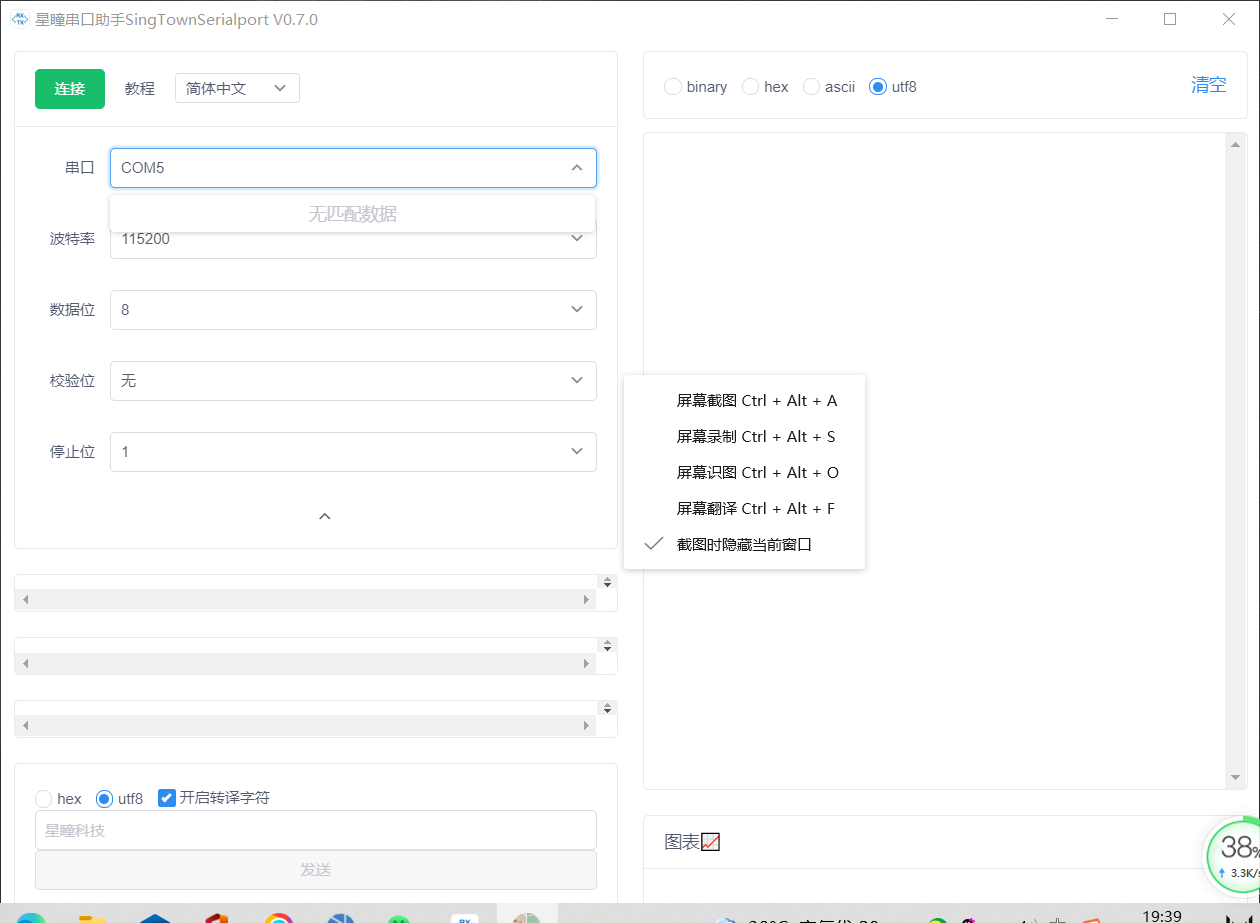
#print("none")原本是有COM3 和COM5,突然就剩下COM5了,代码把串口改为5,会报错ValueError:UART(5)doesn't exist
串口助手显示如图

-
AprilTag 标记追踪代码问题发布在 OpenMV Cam
AprilTags Example
This example shows the power of the OpenMV Cam to detect April Tags
on the OpenMV Cam M7. The M4 versions cannot detect April Tags.
import sensor, image, time, math
sensor.reset()
sensor.set_pixformat(sensor.RGB565)
sensor.set_framesize(sensor.QQVGA) # we run out of memory if the resolution is much bigger...
sensor.skip_frames(30)
sensor.set_auto_gain(False) # must turn this off to prevent image washout...
sensor.set_auto_whitebal(False) # must turn this off to prevent image washout...
clock = time.clock()while(True):
clock.tick()
img = sensor.snapshot()
for tag in img.find_apriltags(): # defaults to TAG36H11 without "families".
img.draw_rectangle(tag.rect(), color = (255, 0, 0))
img.draw_cross(tag.cx(), tag.cy(), color = (0, 255, 0))
degress = 180 * tag.rotation() / math.pi
print(tag.id(),degress)报错:
OSError:This function is unavailable on your OpenMV Cam -
舵机初学者,下载main.py文件,一应用就报错 麻烦了发布在 OpenMV Cam
import sensor, image, time
from pid import PID
from pyb import Servopan_servo=Servo(1)
tilt_servo=Servo(2)pan_servo.calibration(500,2500,500)
tilt_servo.calibration(500,2500,500)red_threshold = (13, 49, 18, 61, 6, 47)
pan_pid = PID(p=0.07, i=0, imax=90) #脱机运行或者禁用图像传输,使用这个PID
tilt_pid = PID(p=0.05, i=0, imax=90) #脱机运行或者禁用图像传输,使用这个PID
#pan_pid = PID(p=0.1, i=0, imax=90)#在线调试使用这个PID
#tilt_pid = PID(p=0.1, i=0, imax=90)#在线调试使用这个PIDsensor.reset() # Initialize the camera sensor.
sensor.set_pixformat(sensor.RGB565) # use RGB565.
sensor.set_framesize(sensor.QQVGA) # use QQVGA for speed.
sensor.skip_frames(10) # Let new settings take affect.
sensor.set_auto_whitebal(False) # turn this off.
clock = time.clock() # Tracks FPS.def find_max(blobs):
max_size=0
for blob in blobs:
if blob[2]*blob[3] > max_size:
max_blob=blob
max_size = blob[2]*blob[3]
return max_blobwhile(True):
clock.tick() # Track elapsed milliseconds between snapshots().
img = sensor.snapshot() # Take a picture and return the image.blobs = img.find_blobs([red_threshold]) if blobs: max_blob = find_max(blobs) pan_error = max_blob.cx()-img.width()/2 tilt_error = max_blob.cy()-img.height()/2 print("pan_error: ", pan_error) img.draw_rectangle(max_blob.rect()) # rect img.draw_cross(max_blob.cx(), max_blob.cy()) # cx, cy pan_output=pan_pid.get_pid(pan_error,1)/2 tilt_output=tilt_pid.get_pid(tilt_error,1) print("pan_output",pan_output) pan_servo.angle(pan_servo.angle()+pan_output) tilt_servo.angle(tilt_servo.angle()-tilt_output)IndentationError:unexpected indent
报错为: