'module' object has no attribute 'load'报错
-
'module' object has no attribute 'load'报错,或AttributeError: 'module' object has no attribute 'load_builtin_model'报错
本质上应该是impot了tf模块并使用了tf.load方法,但是不知道为什么提示没有这个方法
之前运行例程讲解25-FOMO人检测时也出现了类似的问题,只要引用tf模块就会出现这个问题,ide(4.5.0)和固件(4.6.20)是最新版本
时间紧张,希望尽快答复,十分感谢技术支持人员
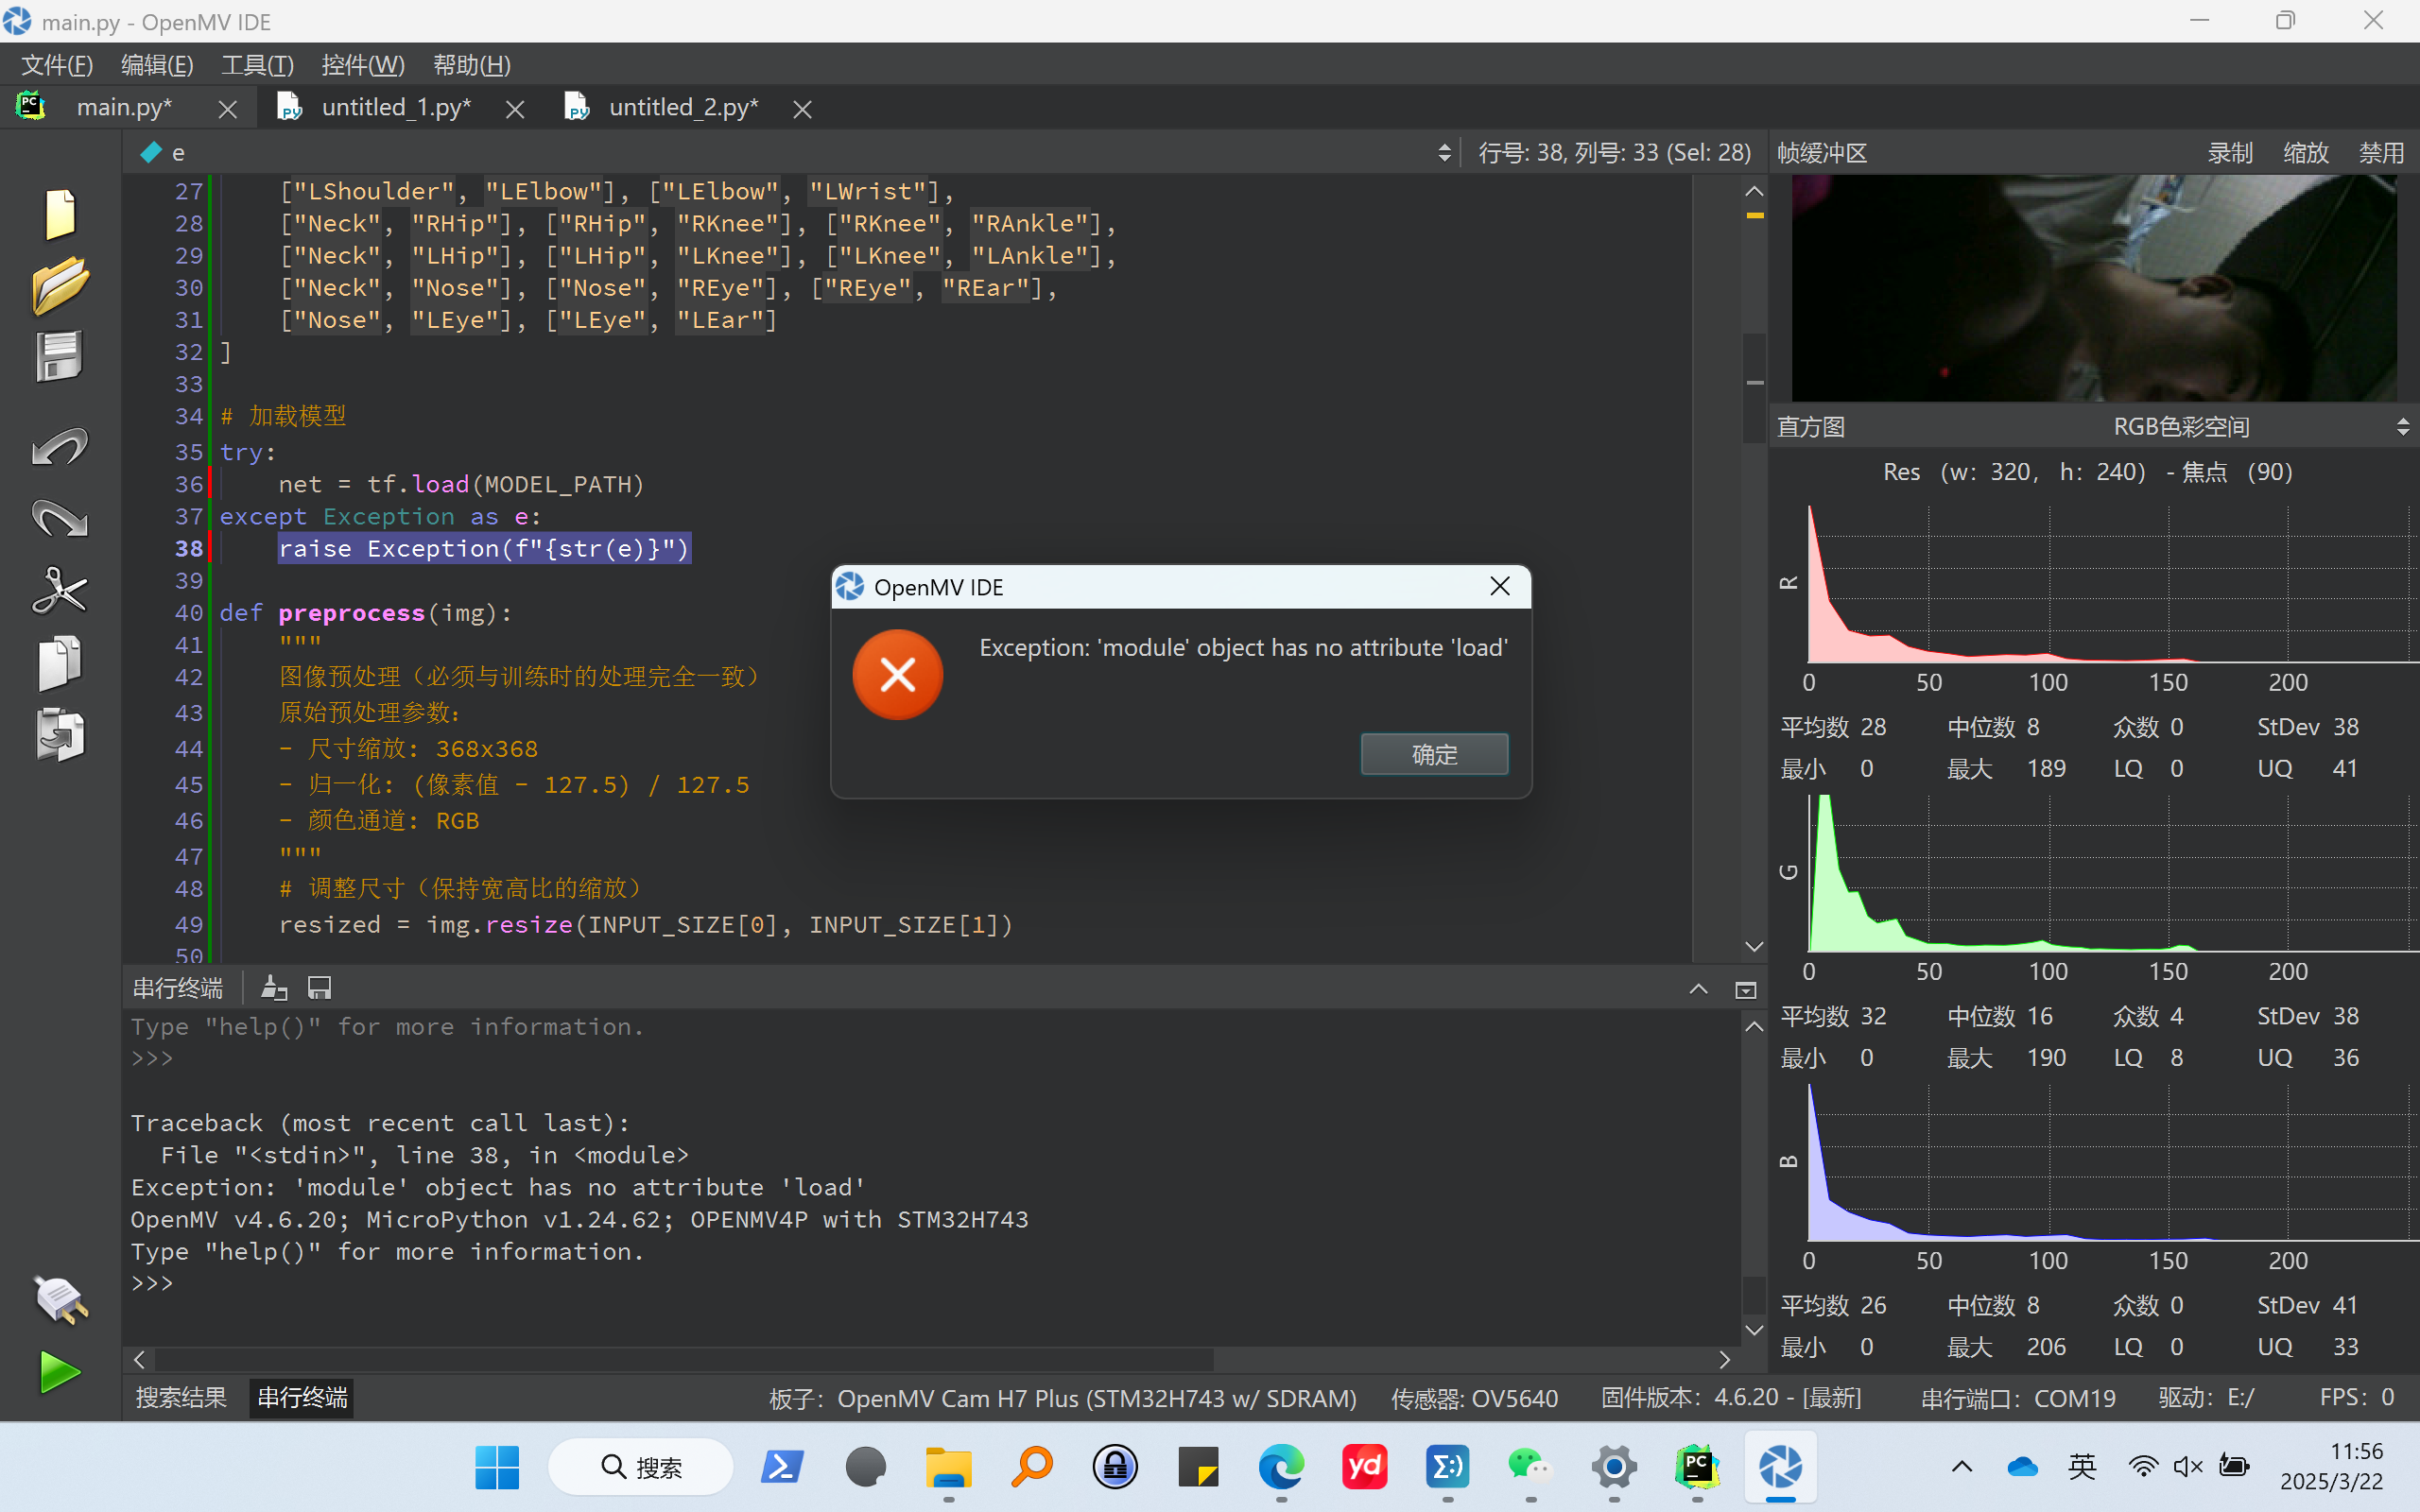
# 人体姿态识别部署代码 (保存为main.py)
import sensor, image, time, tf, os

# 硬件初始化
sensor.reset()
sensor.set_pixformat(sensor.RGB565)  # 必须使用RGB模式
sensor.set_framesize(sensor.QVGA)    # 320x240 (根据摄像头调整)
sensor.skip_frames(time=2000)
clock = time.clock()

# 模型配置
MODEL_PATH = "model.tflite"
INPUT_SIZE = (368, 368)  # 根据模型实际输入尺寸调整
HEATMAP_THRESHOLD = 0.3  # 关键点置信度阈值

# 关键点定义(与训练时一致)
BODY_PARTS = {
    0: "Nose", 1: "Neck", 2: "RShoulder", 3: "RElbow", 4: "RWrist",
    5: "LShoulder", 6: "LElbow", 7: "LWrist", 8: "RHip", 9: "RKnee",
    10: "RAnkle", 11: "LHip", 12: "LKnee", 13: "LAnkle", 14: "REye",
    15: "LEye", 16: "REar", 17: "LEar"
}

POSE_PAIRS = [
    ["Neck", "RShoulder"], ["Neck", "LShoulder"],  # 修正原始代码的拼写错误
    ["RShoulder", "RElbow"], ["RElbow", "RWrist"],
    ["LShoulder", "LElbow"], ["LElbow", "LWrist"],
    ["Neck", "RHip"], ["RHip", "RKnee"], ["RKnee", "RAnkle"],
    ["Neck", "LHip"], ["LHip", "LKnee"], ["LKnee", "LAnkle"],
    ["Neck", "Nose"], ["Nose", "REye"], ["REye", "REar"],
    ["Nose", "LEye"], ["LEye", "LEar"]
]

# 加载模型
try:
    net = tf.load(MODEL_PATH)
except Exception as e:
    raise Exception(f"{str(e)}")

def preprocess(img):
    """
    图像预处理(必须与训练时的处理完全一致)
    原始预处理参数:
    - 尺寸缩放: 368x368
    - 归一化: (像素值 - 127.5) / 127.5
    - 颜色通道: RGB
    """
    # 调整尺寸(保持宽高比的缩放)
    resized = img.resize(INPUT_SIZE[0], INPUT_SIZE[1])

    # 转换为RGB888格式(需要先转换为RGB565再转换回来)
    rgb_img = resized.to_rgb565().to_grayscale(color_copy=True)

    # 分配Tensor内存(根据模型输入形状)
    input_tensor = tf.allocate(INPUT_SIZE + (3,), dtype=tf.float32)

    # 数据归一化
    for y in range(INPUT_SIZE[1]):
        for x in range(INPUT_SIZE[0]):
            r, g, b = rgb_img.get_pixel(x, y)
            # 归一化到[-1,1]范围
            input_tensor[0, y, x, 0] = (r - 127.5) / 127.5
            input_tensor[0, y, x, 1] = (g - 127.5) / 127.5
            input_tensor[0, y, x, 2] = (b - 127.5) / 127.5
    return input_tensor

def postprocess(output_tensor, original_w, original_h):
    """
    解析模型输出
    输出形状应为 [1, num_points, height, width]
    """
    points = []

    # 获取热力图维度
    _, num_points, heat_h, heat_w = output_tensor.shape

    # 遍历所有关键点
    for i in range(num_points):
        heatmap = output_tensor[0][i]

        # 寻找最大值位置
        max_val = 0
        max_x, max_y = 0, 0
        for y in range(heat_h):
            for x in range(heat_w):
                val = heatmap[y][x]
                if val > max_val:
                    max_val = val
                    max_x, max_y = x, y

        # 转换到原图坐标
        if max_val > HEATMAP_THRESHOLD:
            x = int((max_x / heat_w) * original_w)
            y = int((max_y / heat_h) * original_h)
            points.append((x, y))
        else:
            points.append(None)

    return points

# 主循环
while True:
    clock.tick()

    # 捕获图像
    img = sensor.snapshot()

    try:
        # 预处理
        tensor = preprocess(img)

        # 执行推理
        start = time.ticks_ms()
        output = net.predict(tensor)
        inference_time = time.ticks_ms() - start

        # 后处理
        points = postprocess(output, img.width(), img.height())

        # 绘制骨架
        for pair in POSE_PAIRS:
            part_a = BODY_PARTS.get(pair[0], None)
            part_b = BODY_PARTS.get(pair[1], None)

            if part_a is not None and part_b is not None:
                id_a = int(part_a.split("_")[-1]) if isinstance(part_a, str) else part_a
                id_b = int(part_b.split("_")[-1]) if isinstance(part_b, str) else part_b

                if points[id_a] and points[id_b]:
                    img.draw_line(points[id_a][0], points[id_a][1],
                                 points[id_b][0], points[id_b][1],
                                 color=(0, 255, 0), thickness=2)

                    # 绘制关节点
                    img.draw_circle(points[id_a][0], points[id_a][1], 3,
                                   color=(255, 0, 0), thickness=2)
                    img.draw_circle(points[id_b][0], points[id_b][1], 3,
                                   color=(255, 0, 0), thickness=2)

        # 显示性能
        fps = clock.fps()
        img.draw_string(10, 10, f"FPS: {fps:.1f}\nInference: {inference_time}ms",
                       color=(255, 0, 0), scale=1.5)

    except Exception as e:
        print("处理出错:", str(e))

    # 显示图像
    img.flush()
以及例程25:
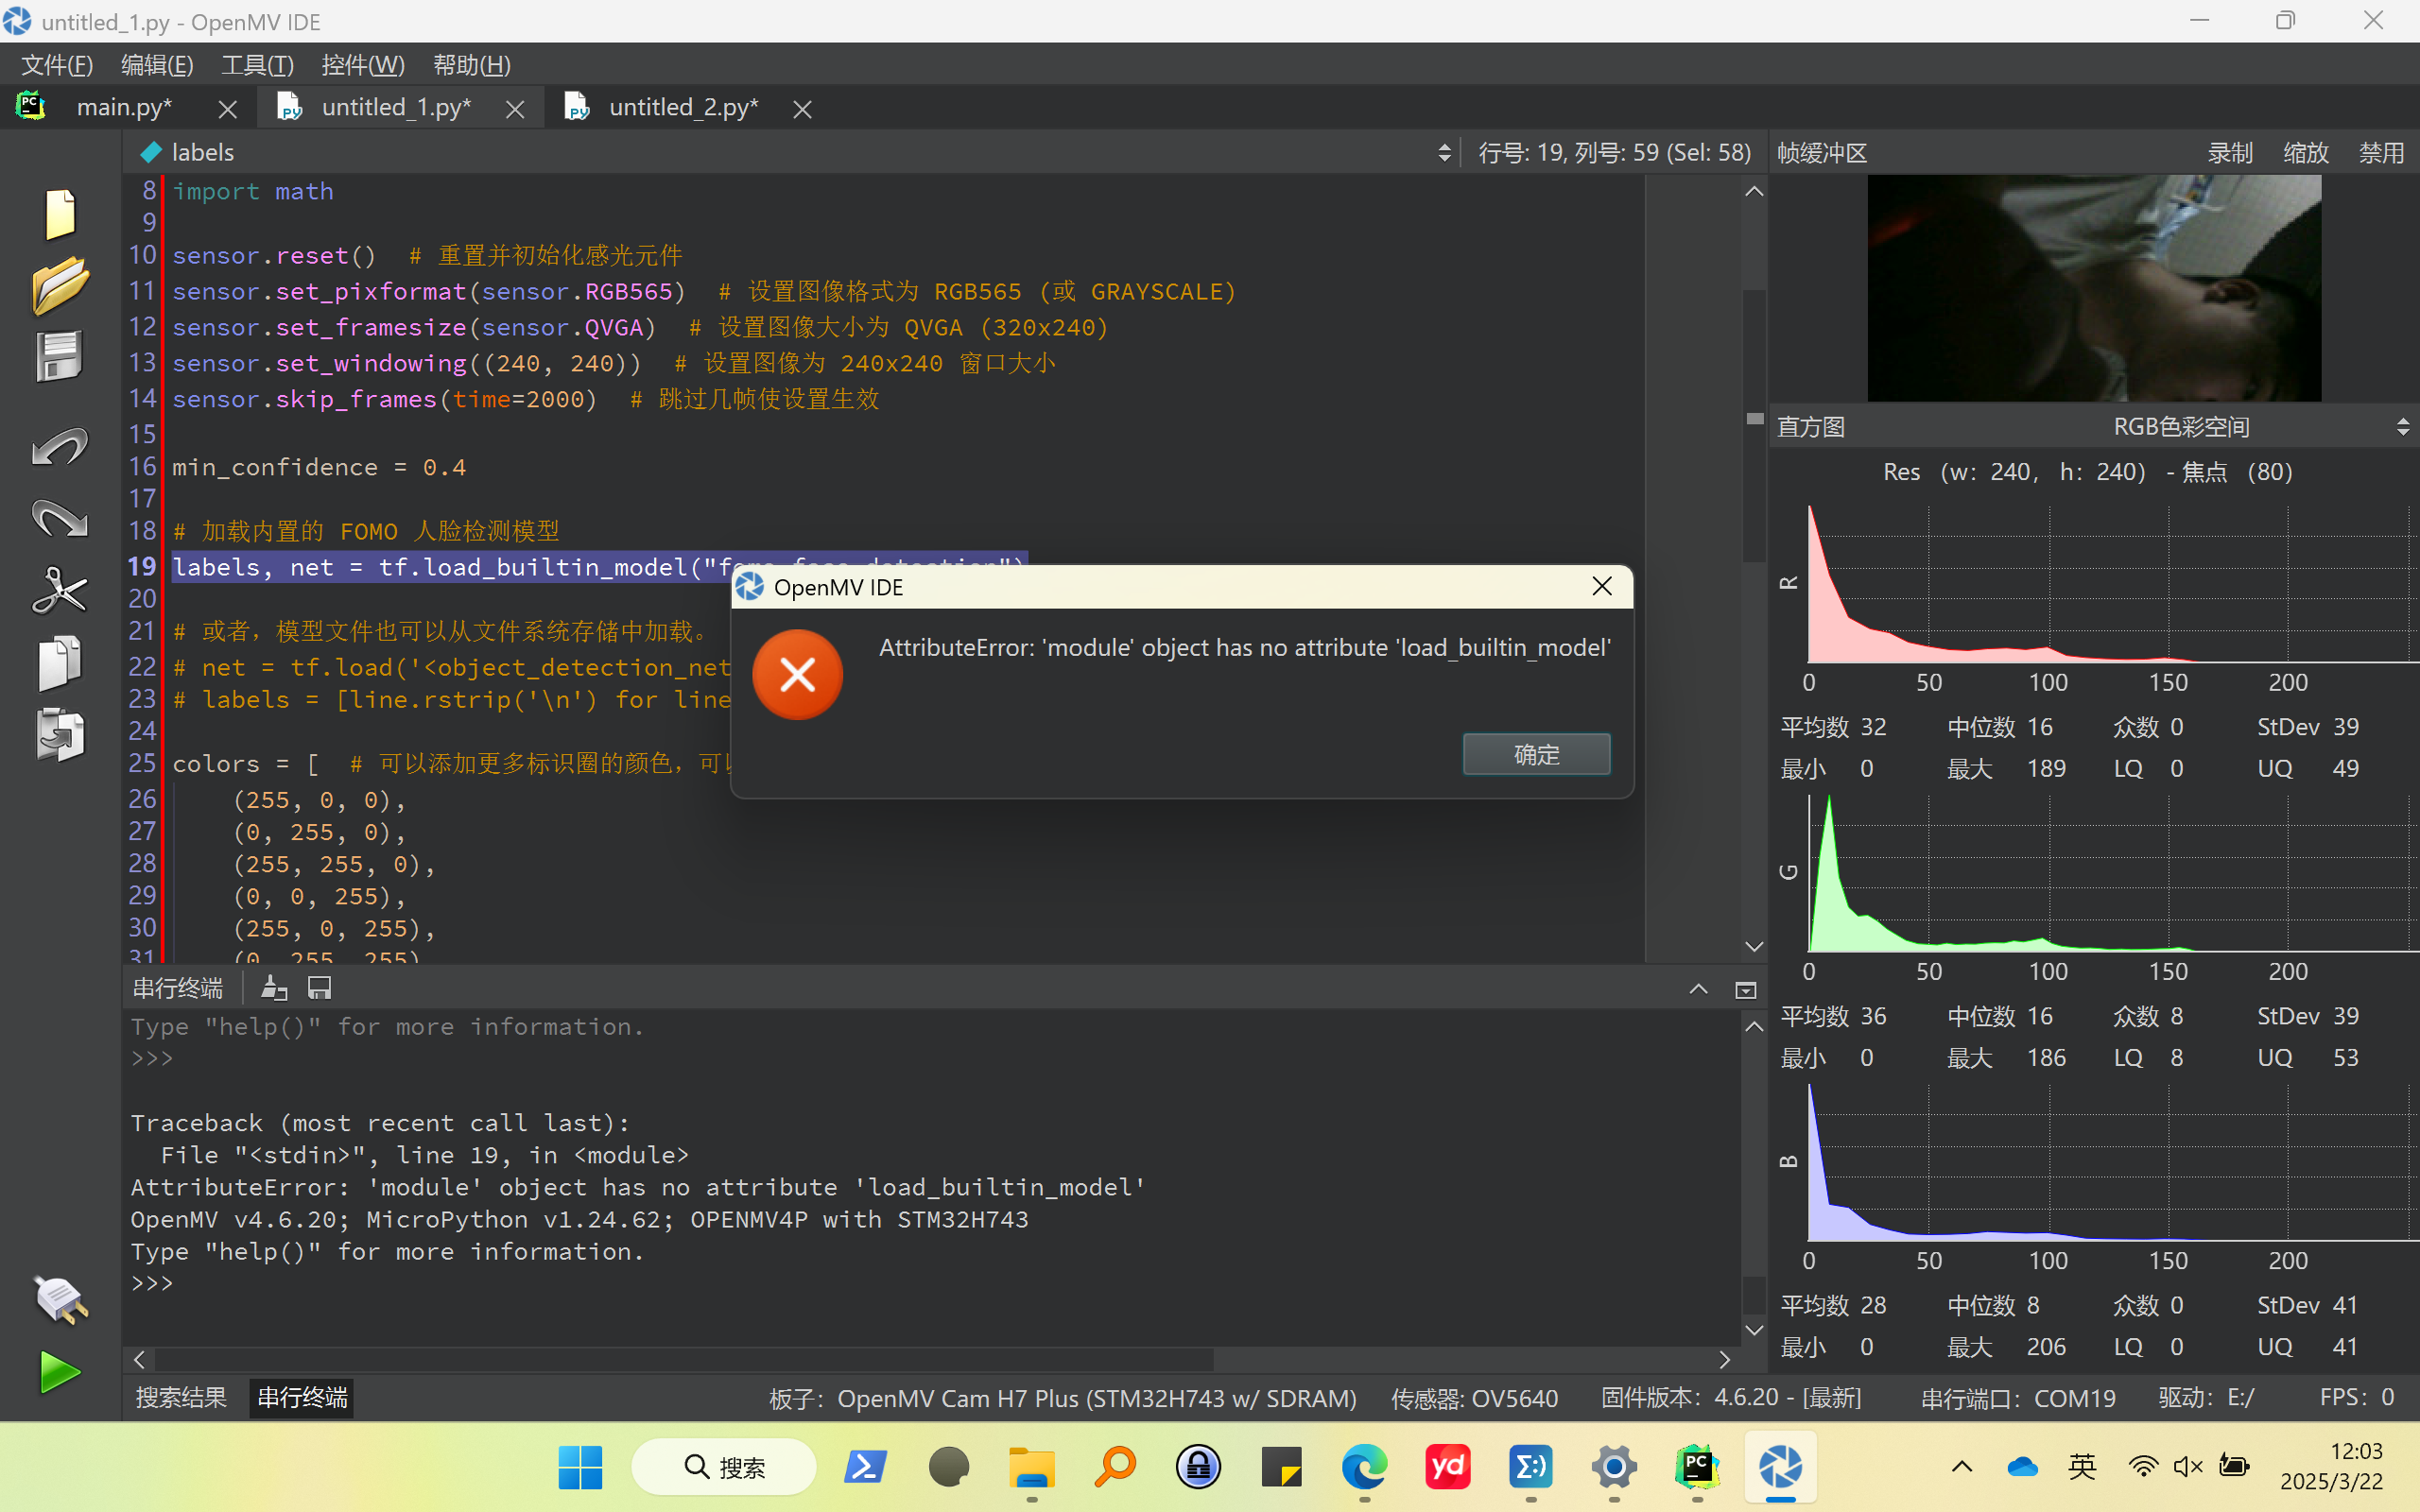
# TensorFlow Lite 目标点检测示例
#
# 本例程使用内置的FOMO模型检测人脸。

import sensor
import time
import tf
import math

sensor.reset()  # 重置并初始化感光元件
sensor.set_pixformat(sensor.RGB565)  # 设置图像格式为 RGB565 (或 GRAYSCALE)
sensor.set_framesize(sensor.QVGA)  # 设置图像大小为 QVGA (320x240)
sensor.set_windowing((240, 240))  # 设置图像为 240x240 窗口大小
sensor.skip_frames(time=2000)  # 跳过几帧使设置生效

min_confidence = 0.4

# 加载内置的 FOMO 人脸检测模型
labels, net = tf.load_builtin_model("fomo_face_detection")

# 或者,模型文件也可以从文件系统存储中加载。
# net = tf.load('<object_detection_network>', load_to_fb=True)
# labels = [line.rstrip('\n') for line in open("labels.txt")]

colors = [  # 可以添加更多标识圈的颜色,可以超过7种,不同种类目标物体用不同颜色圈表示
    (255, 0, 0),
    (0, 255, 0),
    (255, 255, 0),
    (0, 0, 255),
    (255, 0, 255),
    (0, 255, 255),
    (255, 255, 255),
]

clock = time.clock()
while True:
    clock.tick()

    img = sensor.snapshot()

    # detect() 返回图像中检测到的所有的物体 (已经按照种类分类好)
    # 跳过索引0, 因为第0个分类是 背景
    # 然后在识别到的物体中央画出圆圈

    for i, detection_list in enumerate(
        net.detect(img, thresholds=[(math.ceil(min_confidence * 255), 255)])
    ):
        if i == 0:
            continue  # 索引0是背景分类
        if len(detection_list) == 0:
            continue  # 没有检测到这个种类的物体

        print("********** %s **********" % labels[i])
        for d in detection_list:
            [x, y, w, h] = d.rect()
            center_x = math.floor(x + (w / 2))
            center_y = math.floor(y + (h / 2))
            print(f"x {center_x}\ty {center_y}")
            img.draw_circle((center_x, center_y, 12), color=colors[i], thickness=2)

    print(clock.fps(), "fps", end="\n")
-
重新在edge impulse上下载模型和代码。