@kidswong999 已经好了,不同人脸虽然差异很小但可以分辨出
Y
yzgk
@yzgk
0
声望
15
楼层
588
资料浏览
0
粉丝
0
关注
yzgk 发布的帖子
-
RE: 人脸分辨每个样本都是相差8000多,本人与本人都差7000-9000,换过很多样本,背景均匀,人脸很大,还是不行发布在 OpenMV Cam
-
人脸分辨每个样本都是相差8000多,本人与本人都差7000-9000,换过很多样本,背景均匀,人脸很大,还是不行发布在 OpenMV Cam
import sensor, time, image, lcd, math,pyb from pyb import UART RED_LED_PIN = 1 BLUE_LED_PIN = 3 NUM_SUBJECTS = 6 #图像库中不同人数,一共6人 NUM_SUBJECTS_IMGS = 10 #每人有3张样本图片 uart = UART(3, 115200) sensor.reset() sensor.set_contrast(3) sensor.set_gainceiling(16) sensor.set_framesize(sensor.HQVGA) # HQVGA最好,其次QVGA,QQVGA sensor.set_pixformat(sensor.GRAYSCALE) #注意人脸识别只能用灰度图哦 sensor.skip_frames(10) sensor.skip_frames(time = 1000) #等待1s face_cascade = image.HaarCascade("frontalface", stages=25) clock = time.clock() lcd.init() def face1(): #uart.write("a,ok\r\n") print("a,ok") j=0 sensor.reset() sensor.set_contrast(3) sensor.set_gainceiling(16) sensor.set_framesize(sensor.HQVGA) # HQVGA最好,其次QVGA,QQVGA sensor.set_pixformat(sensor.GRAYSCALE) #注意人脸识别只能用灰度图哦 sensor.skip_frames(10) # Let new settings take affect. sensor.skip_frames(time = 1000) #等待1s while (True): pyb.LED(RED_LED_PIN).on() img = sensor.snapshot() # 拍摄一张照片 lcd.display(sensor.snapshot()) objects = img.find_features(face_cascade, threshold=0.75, scale=1.35) #thresholds越大,匹配速度越快,错误率也会上升。scale可以缩放被匹配特征的大小。 for r in objects: img.draw_rectangle(r) #在找到的目标上画框,标记出来 if objects: for object in objects: fs=object[2]*object[3] if fs>=14884: j+=1 if j==10: print(fs) print(objects) #uart.write("a,over\r\n") break if j==10: uart.write("a") pyb.LED(RED_LED_PIN).off() #红灯灭,蓝灯亮 pyb.LED(BLUE_LED_PIN).on() pyb.LED(BLUE_LED_PIN).off() break def dis_face(): #global NUM_SUBJECTS #图像库中不同人数,一共6人 #NUM_SUBJECTS = 4 #uart.write("c,ok\r\n") print("c,ok") sensor.reset() # Initialize the camera sensor. sensor.set_pixformat(sensor.GRAYSCALE) # or sensor.GRAYSCALE sensor.set_framesize(sensor.B128X128) # or sensor.QQVGA (or others) sensor.set_windowing((92,112)) sensor.skip_frames(10) # Let new settings take affect. sensor.skip_frames(time = 3000) #等待1s lcd.init() #SUB = "s1" img = sensor.snapshot() # 拍摄当前人脸。 #img = image.Image("singtown/%s/1.pgm"%(SUB)) d0 = img.find_lbp((0, 0, img.width(), img.height())) #d0为当前人脸的lbp特征 img = None pmin = 999999 num=0 pyb.LED(RED_LED_PIN).on() lcd.display(sensor.snapshot()) for s in range(1, NUM_SUBJECTS+1): #lcd.display(sensor.snapshot()) dist = 0 for i in range(2, NUM_SUBJECTS_IMGS+1): img = image.Image("sample/s%d/%d.pgm"%(s, i)) d1 = img.find_lbp((0, 0, img.width(), img.height())) #d1为第s文件夹中的第i张图片的lbp特征 dist += image.match_descriptor(d0, d1) #计算d0 d1即样本图像与被检测人脸的特征差异度。 print("Average dist for subject %d: %d"%(s, dist/NUM_SUBJECTS_IMGS)) if (dist/NUM_SUBJECTS_IMGS)<pmin: pmin=(dist/NUM_SUBJECTS_IMGS) num=s print(pmin) if pmin<10000: if num==1: uart.write("d") if num==2: uart.write("e") if num==3: uart.write("f") if num==4: uart.write("g") if num==5: uart.write("h") if num==6: uart.write("i") elif pmin>10000: uart.write("j") print(num) # num为当前最匹配的人的编号。 #uart.write("%d\r\n" %num) #uart.write("c,over\r\n") pyb.LED(RED_LED_PIN).off() #红灯灭,蓝灯亮 pyb.LED(BLUE_LED_PIN).on() pyb.LED(BLUE_LED_PIN).off() def dis_face1(): #global NUM_SUBJECTS #图像库中不同人数,一共6人 #NUM_SUBJECTS = 4 #uart.write("c,ok\r\n") print("m,ok") sensor.reset() # Initialize the camera sensor. sensor.set_pixformat(sensor.GRAYSCALE) # or sensor.GRAYSCALE sensor.set_framesize(sensor.B128X128) # or sensor.QQVGA (or others) sensor.set_windowing((92,112)) sensor.skip_frames(10) # Let new settings take affect. sensor.skip_frames(time = 1000) #等待1s lcd.init() #SUB = "s1" img = sensor.snapshot() # 拍摄当前人脸。 #img = image.Image("singtown/%s/1.pgm"%(SUB)) d0 = img.find_lbp((0, 0, img.width(), img.height())) #d0为当前人脸的lbp特征 img = None pmin = 999999 num=0 pyb.LED(RED_LED_PIN).on() lcd.display(sensor.snapshot()) for s in range(1, NUM_SUBJECTS+1): #lcd.display(sensor.snapshot()) dist = 0 for i in range(2, NUM_SUBJECTS_IMGS+1): img = image.Image("sample/s%d/%d.pgm"%(s, i)) d1 = img.find_lbp((0, 0, img.width(), img.height())) #d1为第s文件夹中的第i张图片的lbp特征 dist += image.match_descriptor(d0, d1) #计算d0 d1即样本图像与被检测人脸的特征差异度。 print("Average dist for subject %d: %d"%(s, dist/NUM_SUBJECTS_IMGS)) if (dist/NUM_SUBJECTS_IMGS)<pmin: pmin=(dist/NUM_SUBJECTS_IMGS) num=s print(pmin) #if pmin<6500: #if num==1: #uart.write("d") #if num==2: #uart.write("e") #if num==3: #uart.write("f") #if num==4: #uart.write("g") #if num==5: #uart.write("h") #if num==6: #uart.write("i") #elif pmin>6500: uart.write("j") print(num) # num为当前最匹配的人的编号。 #uart.write("%d\r\n" %num) #uart.write("c,over\r\n") pyb.LED(RED_LED_PIN).off() #红灯灭,蓝灯亮 pyb.LED(BLUE_LED_PIN).on() pyb.LED(BLUE_LED_PIN).off() def length(): #uart.write("b,ok\r\n") print("b,ok") K=4148#the value should be measured length=0 sensor.reset() sensor.set_contrast(3) sensor.set_gainceiling(16) sensor.set_framesize(sensor.HQVGA) # HQVGA最好,其次QVGA,QQVGA sensor.set_pixformat(sensor.GRAYSCALE) #注意人脸识别只能用灰度图哦 sensor.skip_frames(10) # Let new settings take affect. sensor.skip_frames(time = 1000) #等待1s while (True): pyb.LED(RED_LED_PIN).on() img = sensor.snapshot() # 拍摄一张照片 lcd.display(sensor.snapshot()) objects = img.find_features(face_cascade, threshold=0.75, scale=1.35) #thresholds越大,匹配速度越快,错误率也会上升。scale可以缩放被匹配特征的大小。 for r in objects: img.draw_rectangle(r) #在找到的目标上画框,标记出来 if objects: for object in objects: print(object[2],object[3]) cx = int(object[0]+object[2]/2) cy = int(object[1]+object[3]/2) Lm = (object[2]+object[3])/2 length = K/Lm img.draw_cross(cx, cy) # cx, cy print(length) #uart.write("%d\r\n" %length) #uart.write("b,over\r\n") break if length!=0: uart.write("l") pyb.LED(RED_LED_PIN).off() #红灯灭,蓝灯亮 pyb.LED(BLUE_LED_PIN).on() pyb.LED(BLUE_LED_PIN).off() break def snapshot1(): #uart.write("k,ok\r\n") print("k,ok") print("%d\r\n" %NUM_SUBJECTS) sensor.reset() # Initialize the camera sensor. sensor.set_pixformat(sensor.GRAYSCALE) # or sensor.GRAYSCALE sensor.set_framesize(sensor.HQVGA) # B128X128or sensor.QQVGA (or others) sensor.set_windowing((92,112)) sensor.skip_frames(10) # Let new settings take affect. sensor.skip_frames(time = 1000) clock = time.clock() num = 2 #设置被拍摄者序号,第一个人的图片保存到s1文件夹,第二个人的图片保存到s2文件夹,以此类推。每次更换拍摄者时,修改num值。 n = 10 #设置每个人拍摄图片数量。 while(n): pyb.LED(RED_LED_PIN).on() #红灯亮 lcd.display(sensor.snapshot()) sensor.skip_frames(time = 3000) #等待3s,准备一下表情。 pyb.LED(RED_LED_PIN).off() #红灯灭,蓝灯亮 pyb.LED(BLUE_LED_PIN).on() print(n) sensor.snapshot().save("data/s%s/%s.pgm" % (num, n) ) #保存截取到的图片到SD卡 n -= 1 pyb.LED(BLUE_LED_PIN).off() if n==1: print("Done! Reset the camera to see the saved image.") #uart.write("k,over\r\n") uart.write("k\r\n") while(True): #clock.tick() #img = sensor.snapshot() #1 #lcd.display(sensor.snapshot()) #2 这两行无论哪一行运行,串口都无法接收到数据 a='0' if uart.any(): a=uart.readline().decode() print(a) #pyb.delay(100) if a=='a': #uart.write("a,ready\r\n") face1() #人脸识别(日常模式) print("face1") if a=='b': #uart.write("b,ready\r\n") length() #人脸识别(测额头距) print("length") if a=='c': #uart.write("c,ready\r\n") dis_face() #分辨人脸 print("dis_face") if a=='k': #uart.write("k,ready\r\n") snapshot1() #拍照保存(人脸样本) print("snapshot1") if a=='m': #uart.write("c,ready\r\n") dis_face1() #分辨人脸 print("dis_face1") #else: #print("not a ") #print("a:",a) -
RE: uart.write()与sensor.snapshot()和lcd.display()为什么不能同时使用?发布在 OpenMV Cam
@kidswong999
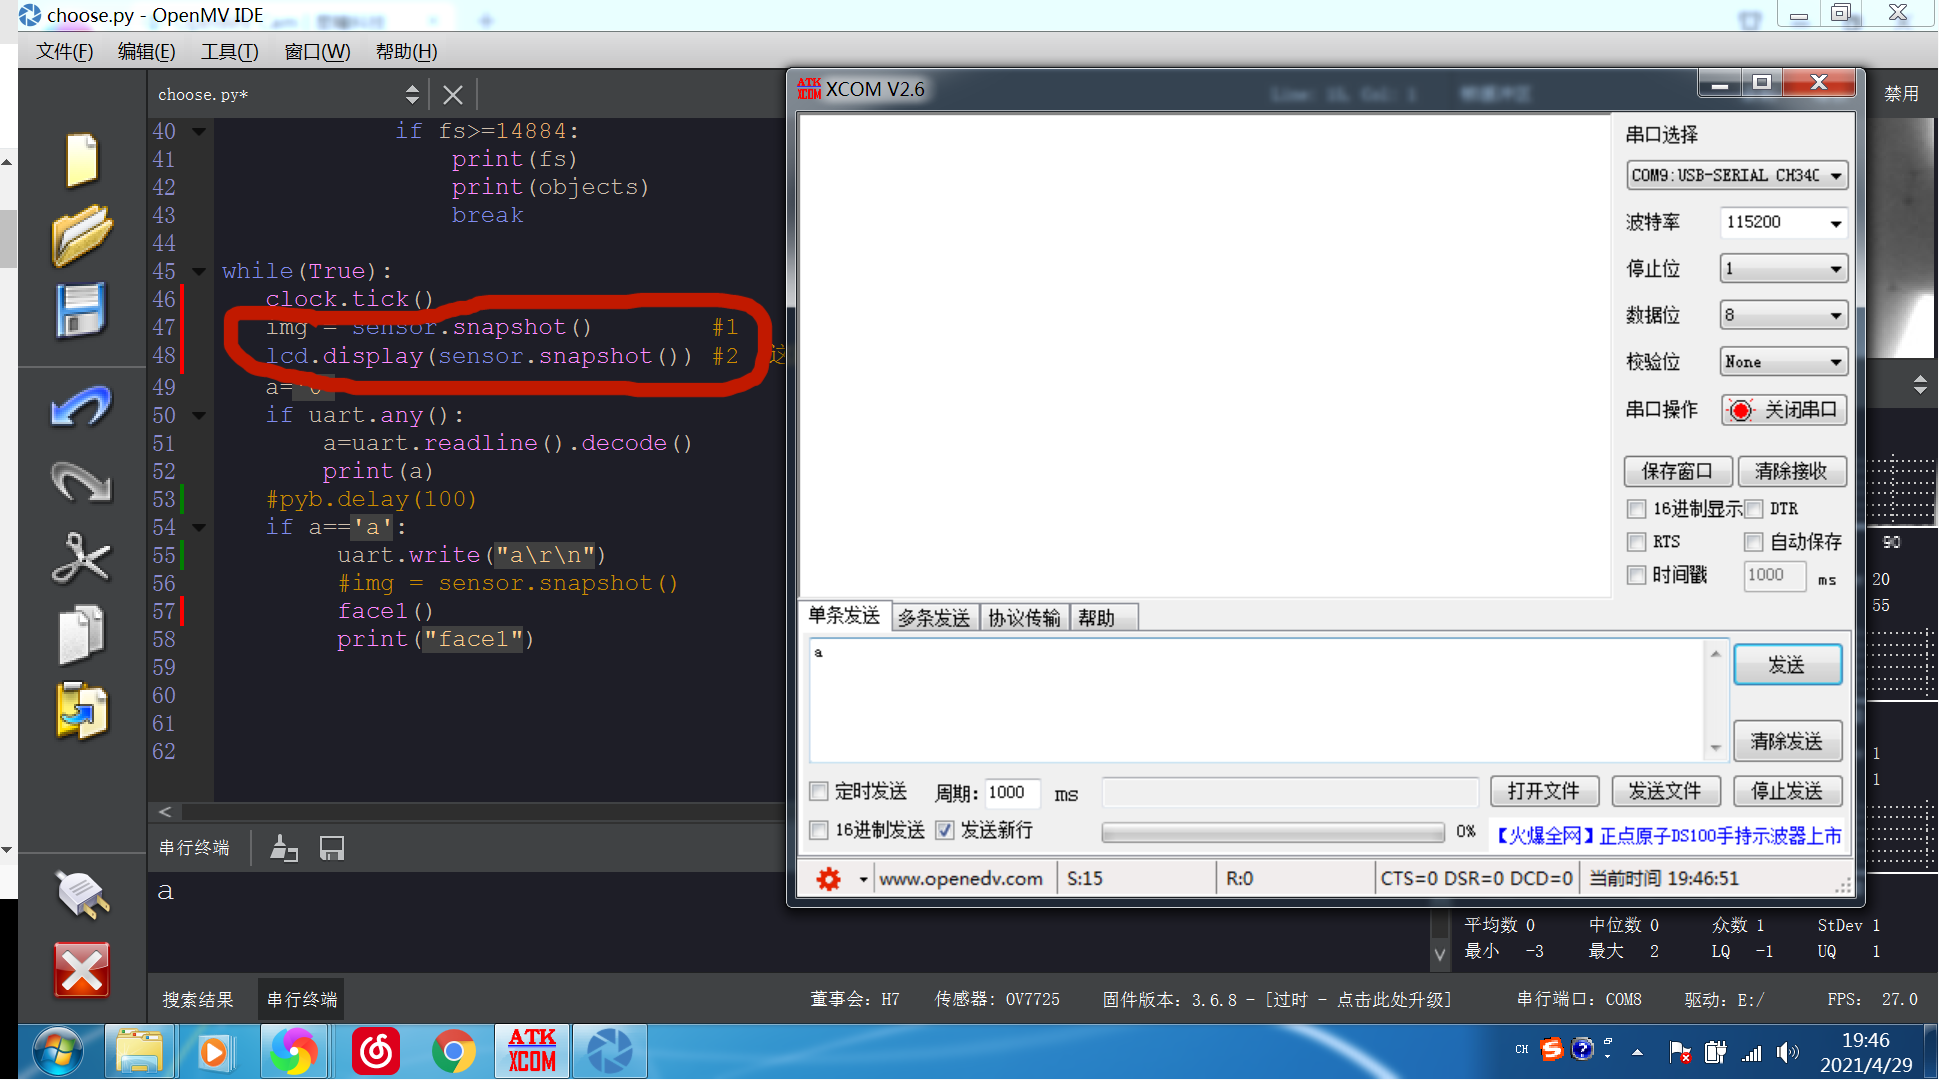 这两行,你可以把代码贴到IDE中去试一下,只要这两行不注释掉,就无法发送数据
 -
RE: uart.write()与sensor.snapshot()和lcd.display()为什么不能同时使用?发布在 OpenMV Cam
@kidswong999 三次截图的不同之处在于,我把代码中的两行代码注释与否,所以才会得出不同结果,我想问的是代码中标记的两行代码为什么会影响串口发送数据?因为我看不到库是怎么写的,只有使用方法,所以现在不知道是哪里冲突还是怎样
 这是第三张,接收到数据
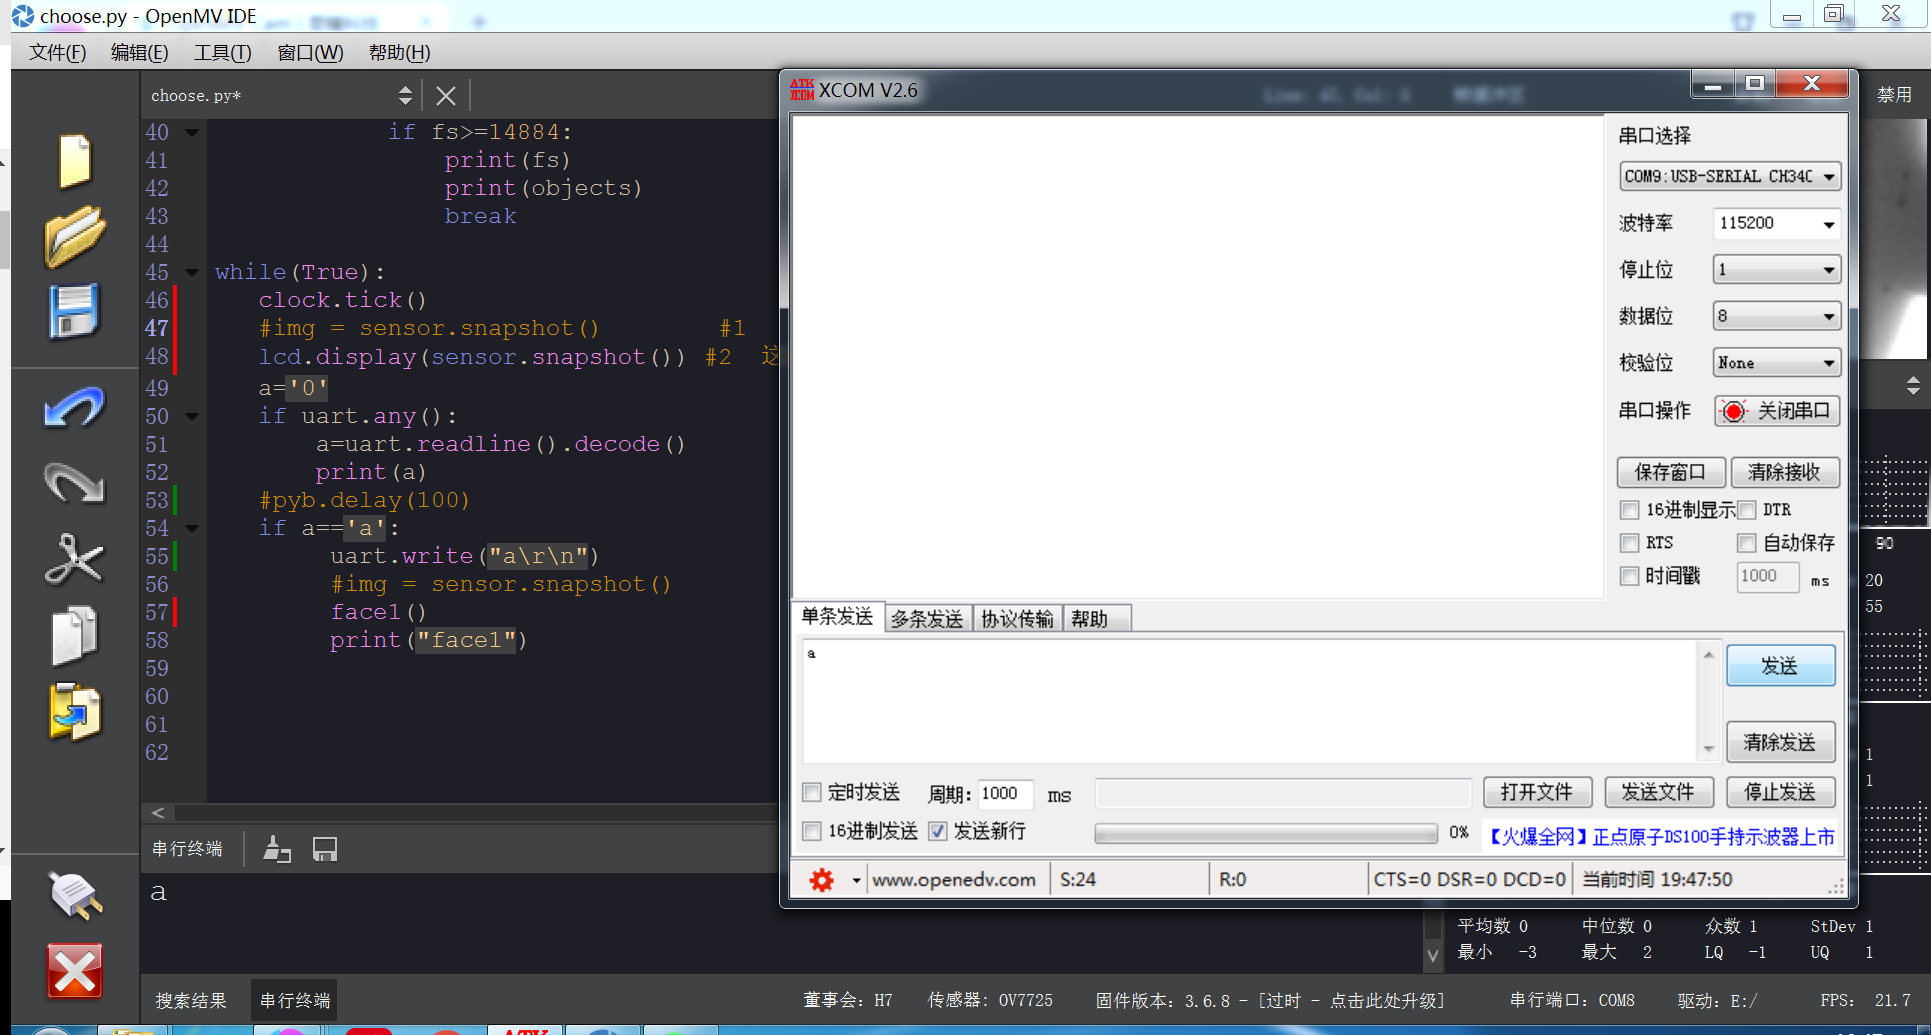 这是第二张,没接到数据
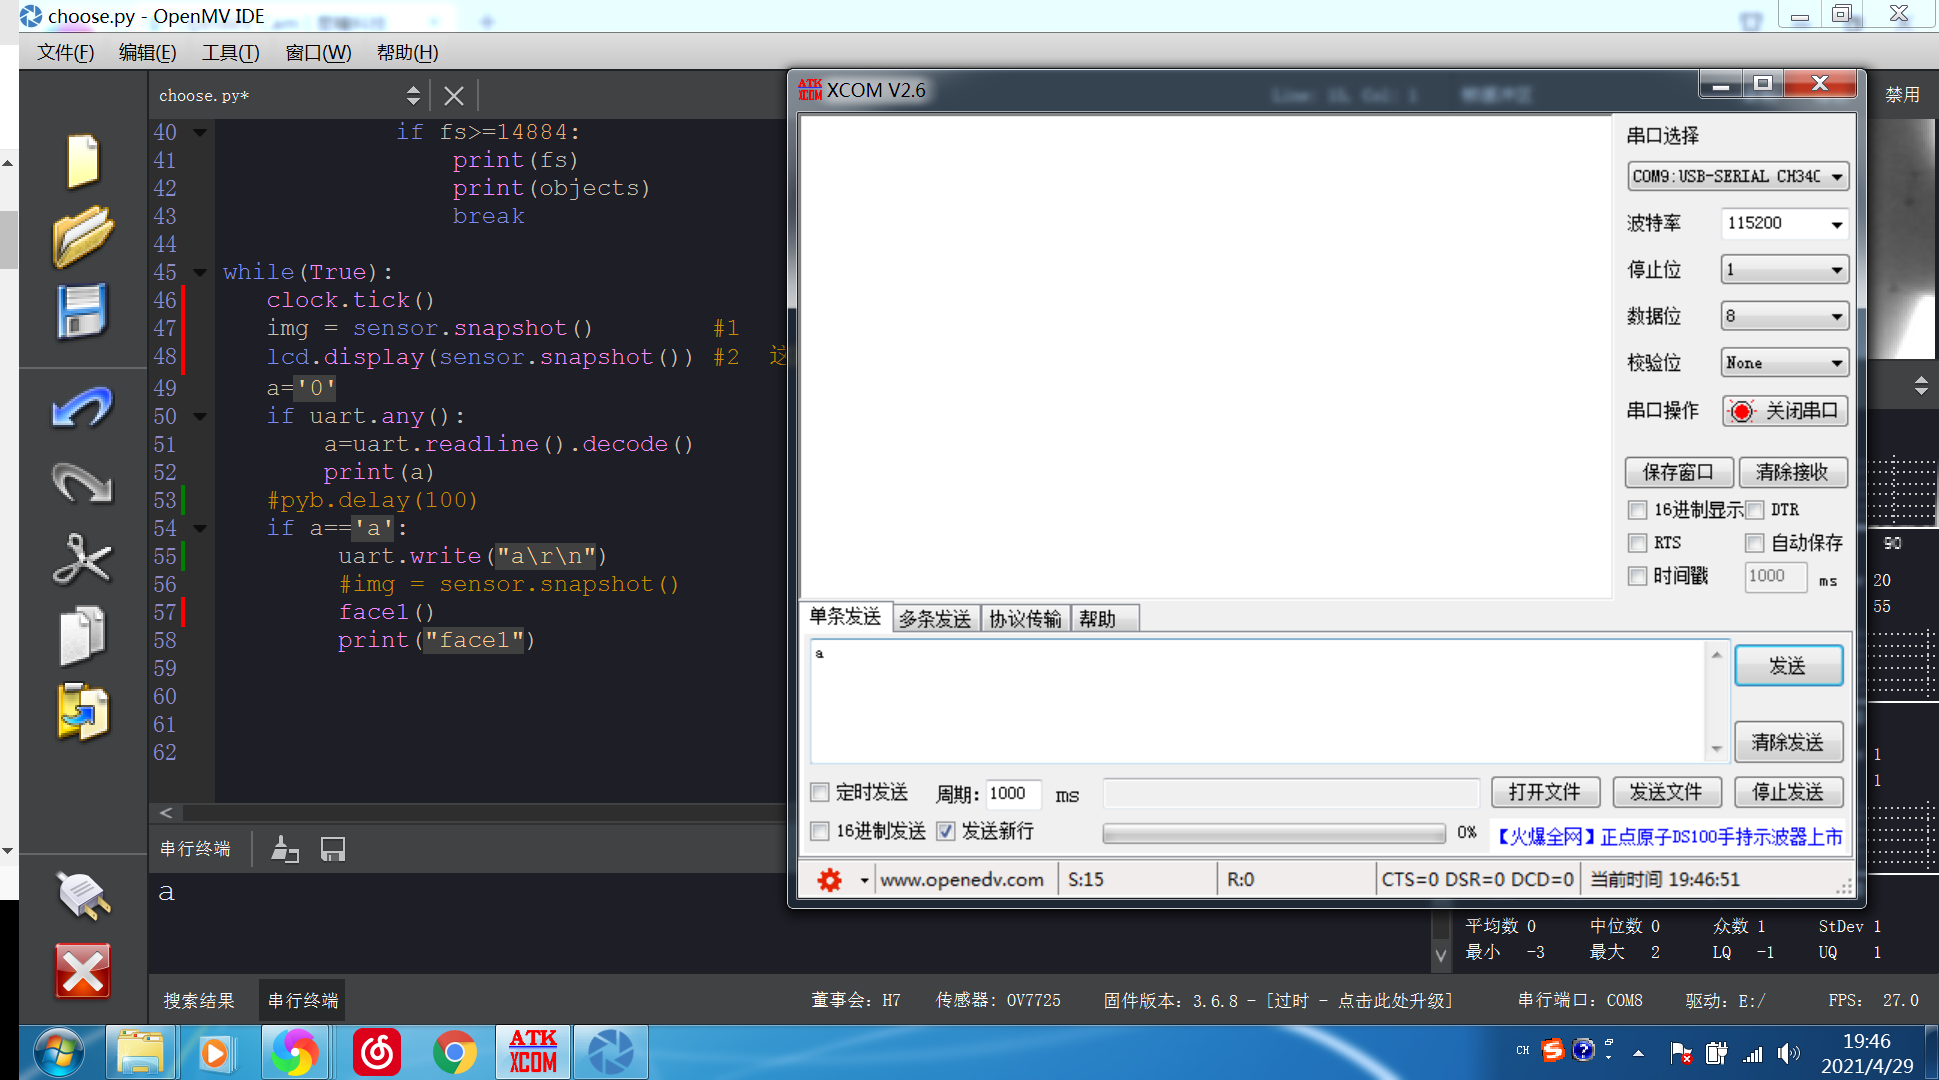 这是第一张,没接到数据