@kidswong999 重新插拔一下USB接口 ,就正常了
X
xd4v 发布的帖子
-
RE: 直线检测报错,求教!发布在 OpenMV Cam
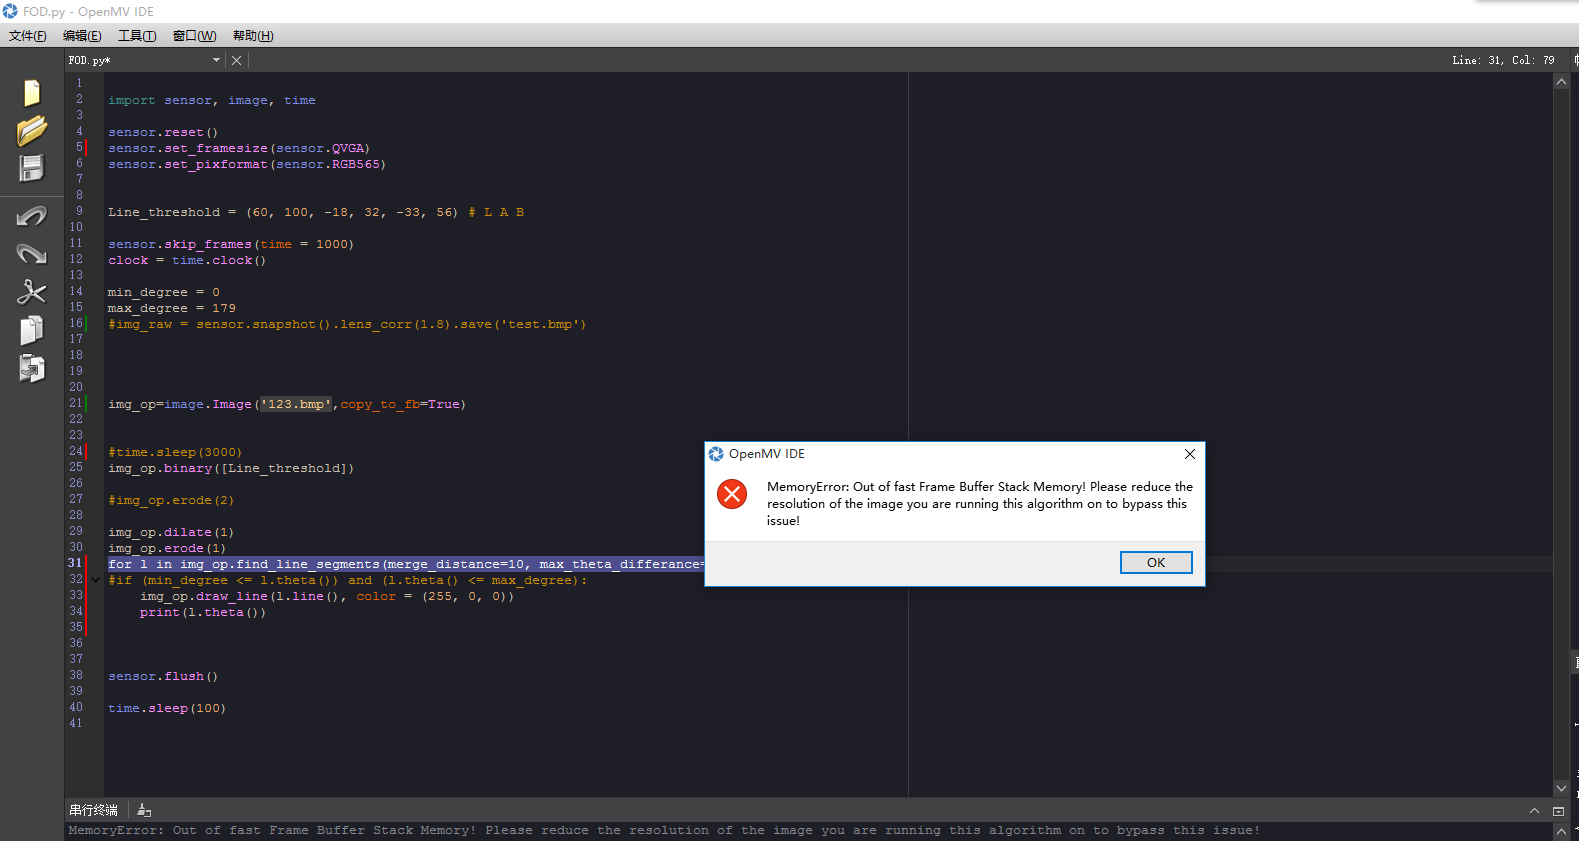
嗯嗯 刚才忘了加冒号。。。改过之后变成这样了,说帧缓存区空间不够?这是怎么回事啊
import sensor, image, time sensor.reset() sensor.set_framesize(sensor.QVGA) sensor.set_pixformat(sensor.RGB565) Line_threshold = (60, 100, -18, 32, -33, 56) # L A B sensor.skip_frames(time = 1000) clock = time.clock() min_degree = 0 max_degree = 179 #img_raw = sensor.snapshot().lens_corr(1.8).save('test.bmp') img_op=image.Image('123.bmp',copy_to_fb=True) #time.sleep(3000) img_op.binary([Line_threshold]) #img_op.erode(2) img_op.dilate(1) img_op.erode(1) for l in img_op.find_line_segments(merge_distance=10, max_theta_differance=2): #if (min_degree <= l.theta()) and (l.theta() <= max_degree): img_op.draw_line(l.line(), color = (255, 0, 0)) print(l.theta()) sensor.flush() time.sleep(100) -
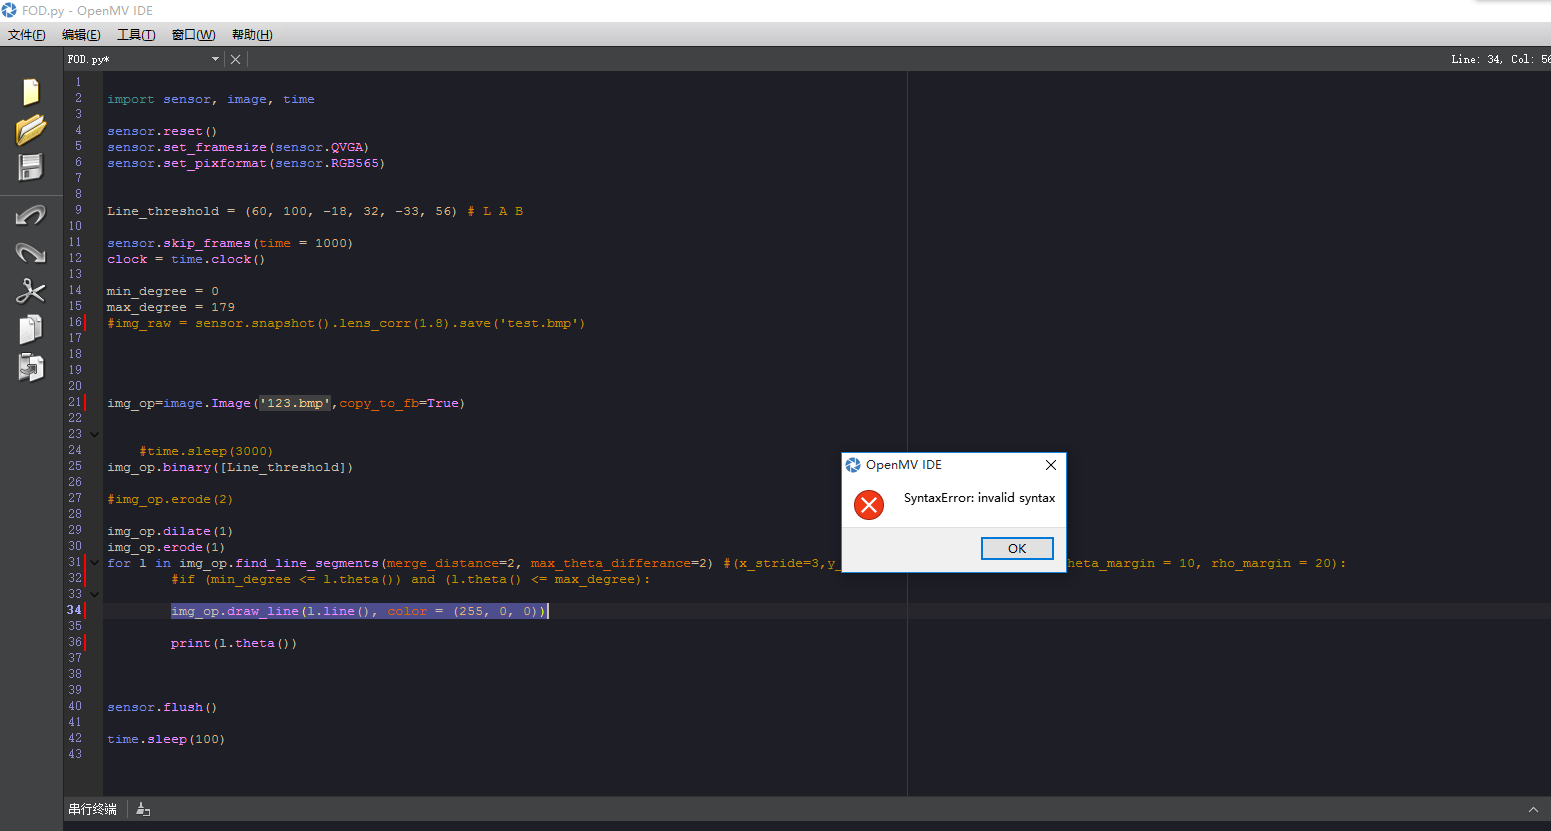
RE: 直线检测报错,求教!发布在 OpenMV Cam
import sensor, image, time sensor.reset() sensor.set_framesize(sensor.QVGA) sensor.set_pixformat(sensor.RGB565) Line_threshold = (60, 100, -18, 32, -33, 56) # L A B sensor.skip_frames(time = 1000) clock = time.clock() min_degree = 0 max_degree = 179 #img_raw = sensor.snapshot().lens_corr(1.8).save('test.bmp') img_op=image.Image('123.bmp',copy_to_fb=True) #time.sleep(3000) img_op.binary([Line_threshold]) #img_op.erode(2) img_op.dilate(1) img_op.erode(1) for l in img_op.find_line_segments(merge_distance=2, max_theta_differance=2) #(x_stride=3,y_stride=3,threshold = 1000, theta_margin = 10, rho_margin = 20): #if (min_degree <= l.theta()) and (l.theta() <= max_degree): img_op.draw_line(l.line(), color = (255, 0, 0)) print(l.theta()) sensor.flush() time.sleep(100) -
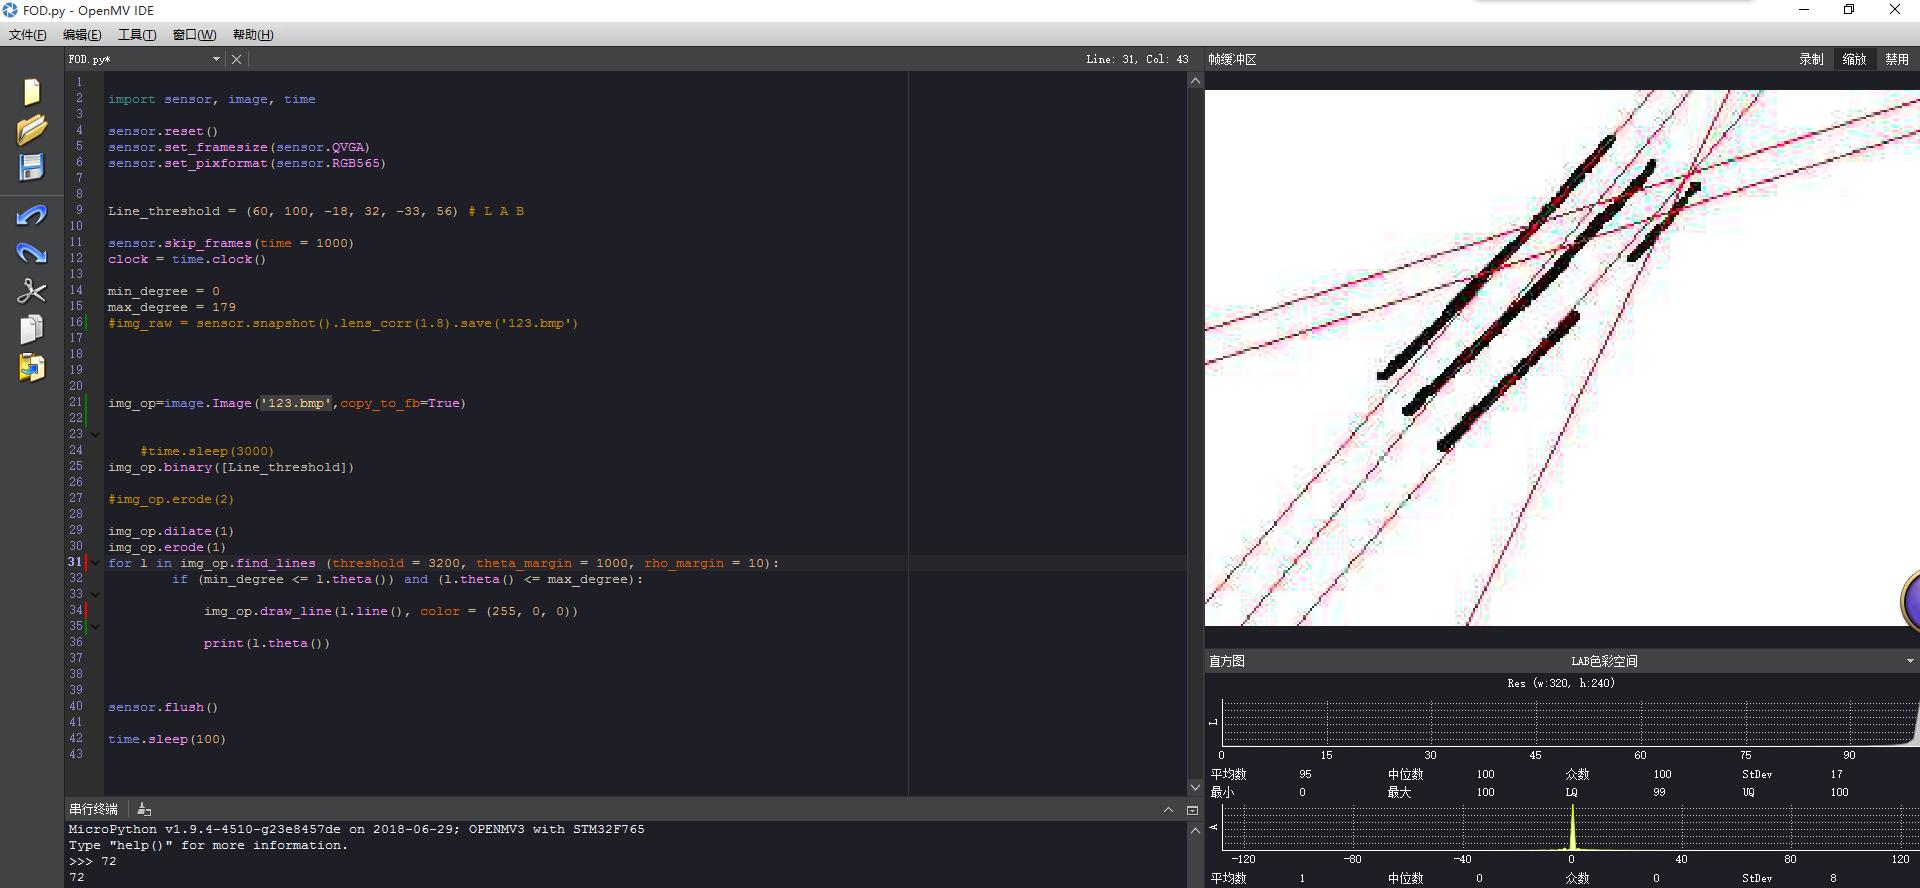
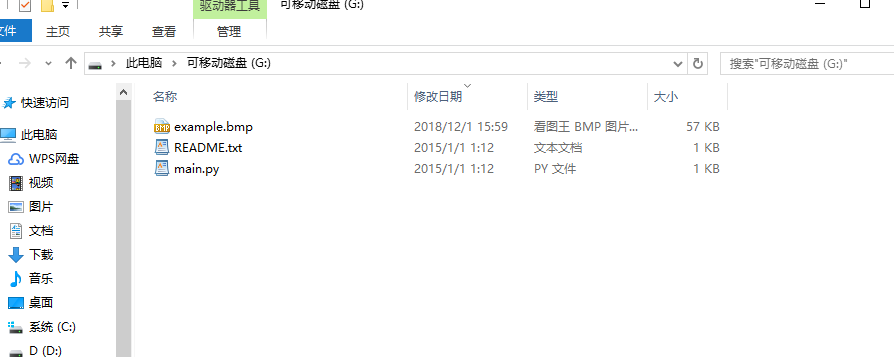
求助:为什么二值化以后仍然有灰色的像素点?发布在 OpenMV Cam
图上,黑色的线周围有一些灰色的像素点,不知道是怎么回事0.0......求教
import sensor, image, time

sensor.reset()
sensor.set_framesize(sensor.QVGA)
sensor.set_pixformat(sensor.RGB565)


Line_threshold = (60, 100, -18, 32, -33, 56) # L A B

sensor.skip_frames(time = 1000)
clock = time.clock()

min_degree = 0
max_degree = 179
#img_raw = sensor.snapshot().lens_corr(1.8).save('123.bmp')


img_op=image.Image('123.bmp',copy_to_fb=True)


    #time.sleep(3000)
img_op.binary([Line_threshold])

#img_op.erode(2)

img_op.dilate(1)
img_op.erode(1)
for l in img_op.find_lines (threshold = 3300, theta_margin = 1000, rho_margin = 10):
        if (min_degree <= l.theta()) and (l.theta() <= max_degree):

           # img_op.draw_line(l.line(), color = (255, 0, 0))

            print(l.theta())


sensor.flush()

time.sleep(100)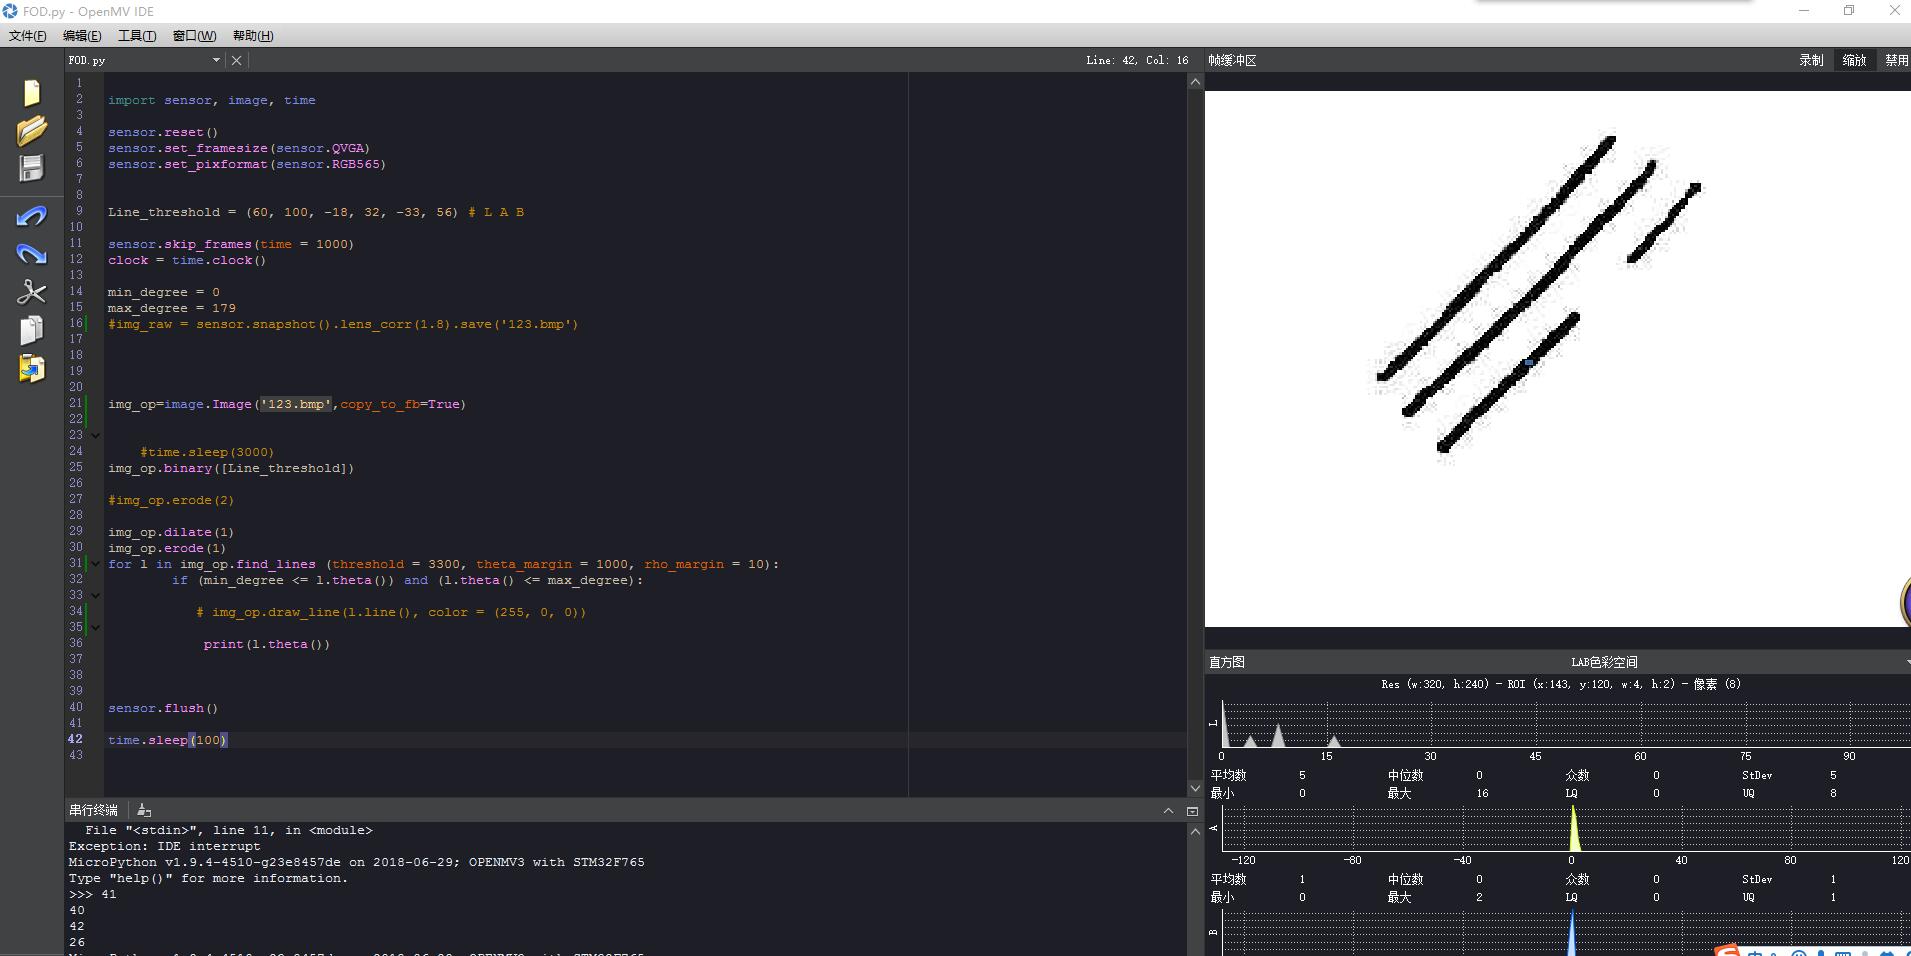
-
无法把图片读入framebuffer,求教发布在 OpenMV Cam
import sensor, image, time # 仍然需要初始化 sensor sensor.reset() # 设置 sensor sensor.set_contrast(1) sensor.set_gainceiling(16) # 设置sensor的 pixel format sensor.set_framesize(sensor.QQVGA) sensor.set_pixformat(sensor.GRAYSCALE) # 导入 image img = image.Image("/example.bmp", copy_to_fb=True) # 添加画线的代码 # img.draw_line(...) # Flush FB sensor.flush() # Add a small delay to allow the IDE to read the flushed image. time.sleep(100) -
RE: 请问怎么在帧缓冲区显示想要看的图像发布在 OpenMV Cam
这是第二个代码,刚刚忘了贴
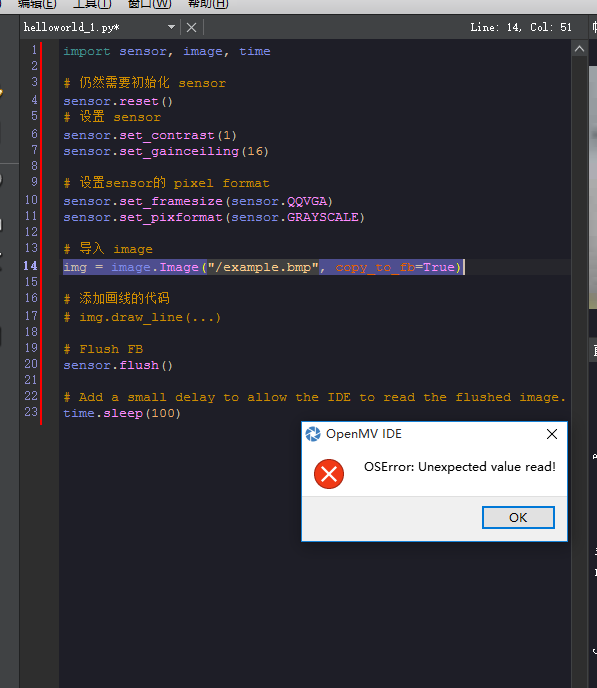
# Hello World Example # # Welcome to the OpenMV IDE! Click on the green run arrow button below to run the script! import sensor, image, time, pyb sensor.reset() sensor.set_pixformat(sensor.RGB565) sensor.set_framesize(sensor.QVGA)#160X120 sensor.skip_frames(time=100) clock=time.clock() while(True): s=sensor.snapshot() a=s.copy(copy_to_fb=True) a.to_grayscale() -
请问怎么在帧缓冲区显示想要看的图像发布在 OpenMV Cam
我设了一个变量s=sensor.snapshot(),然后让a=s,但是发现a灰度化后,帧缓冲区显示的是灰度化的图像,等于说显示的是a的图像。但是a不是在堆区存放吗?
 # Hello World Example
#
# Welcome to the OpenMV IDE! Click on the green run arrow button below to run the script!

import sensor, image, time, pyb

sensor.reset()
sensor.set_pixformat(sensor.RGB565)
sensor.set_framesize(sensor.QVGA)#160X120
sensor.skip_frames(time=100)
clock=time.clock()

while(True):
    time_start = pyb.millis()

    scr_shot=sensor.snapshot()
    #scr_shot.lens_corr(1.8)
    a=scr_shot
    a.to_grayscale()

    duration = pyb.elapsed_millis(time_start)
    print(duration)
不知道怎么才能让想要显示的图像显示在帧缓冲区,求教!!!
另外,这是另一个错误,麻烦帮忙解释一下
-
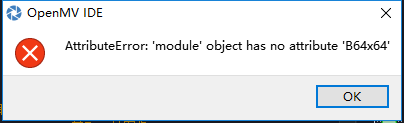
光流例程无法实现,最新版的固件不支持吗?发布在 OpenMV Cam
# MAVLink OpticalFlow Script.
#
# This script sends out OpticalFlow detections using the MAVLink protocol to
# an LIGHT/PixHawk UAV controller for position control using your OpenMV Cam.
#
# P4 = TXD 115200,8,N,1


import sensor, image, time, pyb, struct, math

sensor.reset() # Initialize the camera sensor.
sensor.set_pixformat(sensor.RGB565) # or sensor.GRAYSCALE
sensor.set_framesize(sensor.B64x64) # or B40x30 or B64x64
clock = time.clock() # Tracks FPS.

old = sensor.snapshot()

uart = pyb.UART(3, 115200, timeout_char = 1000)

def send_optical_flow_packet(x, y, c):
    temp = struct.pack("<bbiii",
                       0xAA,
                       0xAE,
                       int(x * 100000 ), # up sample by 4
                       int(y * 100000 ), # up sample by 4
                       int(c * 100000))
    uart.write(temp)


while(True):
    clock.tick() # 获取时间
    img = sensor.snapshot() # 获取一帧图像
    '''
    find_displacement 这个功能函数使用是是2D FFT算法获得新旧两张图像的相位移动,由于OPenMV上单片机内存的问题,只能计算
    64x64或者64*32的图片(openmv2),如果使用OPenMV3可以计算128*32或者32*128的图片
    '''
    [delta_x, delta_y, response] = old.find_displacement(img) #获取前面一张图像与刚捕获的图像之间的偏移
    old = img.copy()
    #print("%0.6fX   %0.6fY   %0.2fC   %0.2fFPS" % (delta_x, delta_y, response, clock.fps()))
    if (not (math.isnan(delta_x) or math.isnan(delta_y) or math.isnan(response))):
        send_optical_flow_packet(delta_x, delta_y, response)