请问蜂鸣器的VCC引脚与OPENM4 H7 Plus的哪个引脚相连接?是VIN还是3.3V
V
vim1
@vim1
0
声望
9
楼层
287
资料浏览
0
粉丝
0
关注
vim1 发布的帖子
-
请问蜂鸣器的VCC引脚与OPENM4 H7 Plus的哪个引脚相连接?是VIN还是3.3V发布在 OpenMV Cam
-
光源扩展板做人脸识别亮度不够发布在 OpenMV Cam
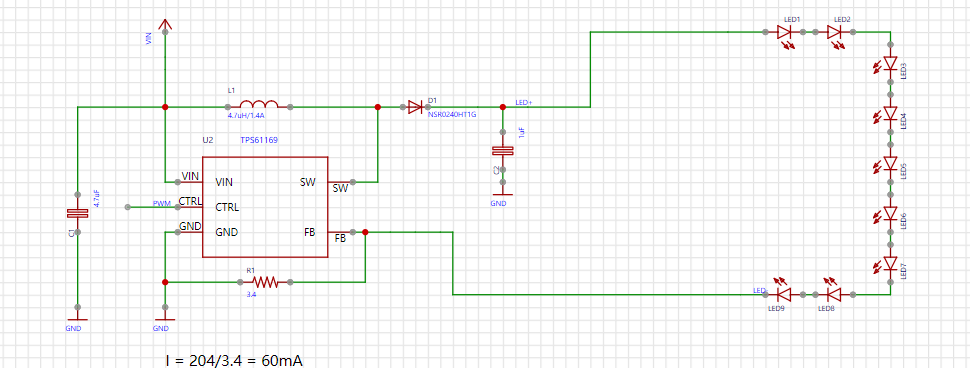
用了光源扩展板做人脸识别还是亮度不够,我自己重新做pcb的话,能不能在电路图上将九个LED改为十几个,比如15个,只增加串联LED的数量,会对整个电路结构、散热以及运行有影响吗?可行吗?

-
RE: 只运行人脸识别代码识别效果很好,但运行人脸追踪云台的代码发现识别效果差,但是这两段代码识别人脸代码是相同的,是为什么?发布在 OpenMV Cam
1.就是摄像头识别不出人脸,但是只用人脸识别的代码无论脸在哪都能识别,在人脸移动的时候也能看到一直能够识别出人脸,这两个的效果差异很明显,
2.我看他是识别到人脸云台才会运动,但现在就是识别不出人脸 -
只运行人脸识别代码识别效果很好,但运行人脸追踪云台的代码发现识别效果差,但是这两段代码识别人脸代码是相同的,是为什么?发布在 OpenMV Cam
#为什么只运行人脸识别代码识别效果很好,但运行人脸追踪云台的代码发现识别效果差,能够明显看到识别到的人脸矩形框断断续续,很多时候识别不到,但是这两段代码识别人脸代码是相同的,这是什么原因?


# 人脸识别例程
#
# 这个例子展示了OpenMV Cam的内置人脸检测功能。
#
# 人脸检测通过在图像上使用Haar Cascade特征检测器来工作。 haar级联是
# 一系列简单的区域对比检查。 对于内置的前表面探测器,有25个阶段的检查,
# 每个阶段有数百个检查一块。 Haar Cascades运行速度很快,因为只有在
# 以前的阶段过去后才会评估后期阶段。 此外,您的OpenMV使用称为
# 整体图像的数据结构来在恒定时间内快速执行每个区域对比度检查
#(特征检测仅为灰度的原因是因为整体图像的空间需求)。

import sensor, time, image

# 重置感光元件
sensor.reset()

# 感光元件设置
sensor.set_contrast(3)
sensor.set_gainceiling(16)
# HQVGA and GRAYSCALE are the best for face tracking.
# HQVGA和灰度对于人脸识别效果最好
sensor.set_framesize(sensor.HQVGA)
sensor.set_pixformat(sensor.GRAYSCALE)
#注意人脸识别只能用灰度图哦

sensor.set_vflip(True)

# 加载Haar算子
# 默认情况下,这将使用所有阶段,更低的satges更快,但不太准确。
face_cascade = image.HaarCascade("frontalface", stages=25)
#image.HaarCascade(path, stages=Auto)加载一个haar模型。haar模型是二进制文件,
#这个模型如果是自定义的,则引号内为模型文件的路径;也可以使用内置的haar模型,
#比如“frontalface” 人脸模型或者“eye”人眼模型。
#stages值未传入时使用默认的stages。stages值设置的小一些可以加速匹配,但会降低准确率。
print(face_cascade)

# FPS clock
clock = time.clock()

while (True):
    clock.tick()

    # 拍摄一张照片
    img = sensor.snapshot()

    # Find objects.
    # Note: Lower scale factor scales-down the image more and detects smaller objects.
    # Higher threshold results in a higher detection rate, with more false positives.
    objects = img.find_features(face_cascade, threshold=0.75, scale=1.35)
    #image.find_features(cascade, threshold=0.5, scale=1.5),thresholds越大,
    #匹配速度越快,错误率也会上升。scale可以缩放被匹配特征的大小。

    #在找到的目标上画框,标记出来
    for r in objects:
        img.draw_rectangle(r)

    # 打印FPS。
    # 注:实际FPS更高,流FB使它更慢。
    print(clock.fps())


#人脸追踪云台代码

import sensor, image, time

from pid import PID
from pyb import Servo

pan_servo=Servo(1)
tilt_servo=Servo(2)

pan_servo.calibration(500,2500,500)
tilt_servo.calibration(500,1500,500)

pan_servo.angle(10)
tilt_servo.angle(50)
pan_pid = PID(p=0.05, i=0, imax=90) #脱机运行或者禁用图像传输,使用这个PID
tilt_pid = PID(p=0.01, i=0, imax=90) #脱机运行或者禁用图像传输,使用这个PID
#pan_pid = PID(p=0.1, i=0, imax=90)#在线调试使用这个PID
#tilt_pid = PID(p=0.1, i=0, imax=90)#在线调试使用这个PID

sensor.set_contrast(3)
sensor.set_gainceiling(16)
sensor.set_vflip(True)

sensor.reset() # Initialize the camera sensor.
sensor.set_pixformat(sensor.GRAYSCALE) # use RGB565.
sensor.set_framesize(sensor.WVGA) # use QQVGA for speed.
sensor.skip_frames(10) # Let new settings take affect.
sensor.set_auto_whitebal(False) # turn this off.
sensor.set_vflip(True)

clock = time.clock() # Tracks FPS.

face_cascade = image.HaarCascade("frontalface", stages=25)

def find_max(blobs):
    max_size=0
    for blob in blobs:
        if blob[2]*blob[3] > max_size:
            max_blob=blob
            max_size = blob[2]*blob[3]
    return max_blob


while(True):
    clock.tick() # Track elapsed milliseconds between snapshots().
    img = sensor.snapshot() # Take a picture and return the image.

    blobs = img.find_features(face_cascade, threshold=0.75, scale=1.5)#返回外接矩形框
    # 一个矩形元组(x, y, w, h)x-左上角的x位置 y-左上角的y位置 w-宽度 h-高度,也可以索引[0][1][2][3]取得这个值。
    if blobs:
        max_blob = find_max(blobs)
        pan_error = max_blob[0]+max_blob[2]/2-img.width()/2
        tilt_error = max_blob[1]+max_blob[3]/2-img.height()/2

        print("pan_error: ", pan_error)
        print("tilt_error: ", tilt_error)

        img.draw_rectangle(max_blob) # rect
        img.draw_cross(int(max_blob[0]+max_blob[2]/2), int(max_blob[1]+max_blob[3]/2)) # cx, cy

        pan_output=pan_pid.get_pid(pan_error,1)/2
        tilt_output=tilt_pid.get_pid(tilt_error,1)
        print("pan_output",pan_output)
        pan_servo.angle(pan_servo.angle()+pan_output)
        tilt_servo.angle(tilt_servo.angle()-tilt_output)


