固件与IDE也升级到最新版本,依然报错
A
a2bm 发布的帖子
-
连接延长线为什么会报错,不使用延长线是可以正常使用的发布在 OpenMV Cam
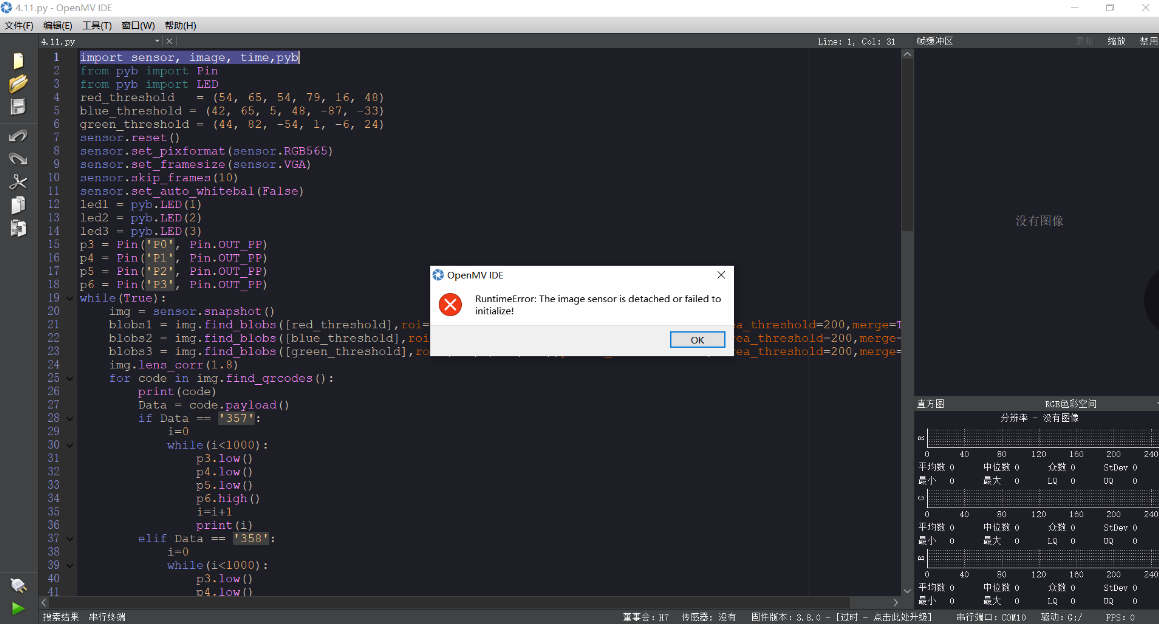
import sensor, image, time,pyb
from pyb import Pin
from pyb import LED
red_threshold   = (54, 65, 54, 79, 16, 48)
blue_threshold = (42, 65, 5, 48, -87, -33)
green_threshold = (44, 82, -54, 1, -6, 24)
sensor.reset()
sensor.set_pixformat(sensor.RGB565)
sensor.set_framesize(sensor.VGA)
sensor.skip_frames(10)
sensor.set_auto_whitebal(False)
led1 = pyb.LED(1)
led2 = pyb.LED(2)
led3 = pyb.LED(3)
p3 = Pin('P0', Pin.OUT_PP)
p4 = Pin('P1', Pin.OUT_PP)
p5 = Pin('P2', Pin.OUT_PP)
p6 = Pin('P3', Pin.OUT_PP)
while(True):
    img = sensor.snapshot()
    blobs1 = img.find_blobs([red_threshold],roi=(270,5,150,250), pixels_threshold=150, area_threshold=200,merge=True)
    blobs2 = img.find_blobs([blue_threshold],roi=(270,5,150,250), pixels_threshold=150, area_threshold=200,merge=True)
    blobs3 = img.find_blobs([green_threshold],roi=(270,5,150,250),pixels_threshold=150, area_threshold=200,merge=True)
    img.lens_corr(1.8)
    for code in img.find_qrcodes():
        print(code)
        Data = code.payload()
        if Data == '357':
            i=0
            while(i<1000):
                p3.low()
                p4.low()
                p5.low()
                p6.high()
                i=i+1
                print(i)
        elif Data == '358':
            i=0
            while(i<1000):
                p3.low()
                p4.low()
                p5.high()
                p6.low()
                i=i+1
                print(i)
        elif Data == '367':
            i=0
            while(i<1000):
                p3.low()
                p4.low()
                p5.high()
                p6.high()
                i=i+1
                print(i)
        elif Data == '368':
            i=0
            while(i<1000):
                p3.low()
                p4.high()
                p5.low()
                p6.low()
                i=i+1
                print(i)
        elif Data == '457':
            i=0
            while(i<1000):
                p3.low()
                p4.high()
                p5.low()
                p6.high()
                i=i+1
                print(i)
        elif Data == '458':
            i=0
            while(i<1000):
                p3.low()
                p4.high()
                p5.high()
                p6.low()
                i=i+1
                print(i)
        elif Data == '467':
            i=0
            while(i<1000):
                p3.low()
                p4.high()
                p5.high()
                p6.high()
                i=i+1
                print(i)
        elif Data == '468':
            i=0
            while(i<1000):
                p3.high()
                p4.low()
                p5.low()
                p6.low()
                i=i+1
                print(i)
    if blobs1:
        for b in blobs1:
            img.draw_rectangle(b[0:4])
            print('red')
            led1.on()
            led2.off()
            led3.off()
            p3.high()
            p4.low()
            p5.low()
            p6.high()
    elif blobs2:
        for b in blobs2:
            img.draw_rectangle(b[0:4])
            print('blue')
            led1.off()
            led2.off()
            led3.on()
            p3.high()
            p4.low()
            p5.high()
            p6.low()
-
出现莫名起码的报错,不知道为什么报错发布在 OpenMV Cam
import sensor, time, image,pyb
from pyb import Pin, Timer
from pyb import LED
sensor.reset()
sensor.set_contrast(3)
sensor.set_gainceiling(16)
sensor.set_framesize(sensor.VGA)
sensor.set_windowing((320, 240))
sensor.set_pixformat(sensor.GRAYSCALE)
sensor.skip_frames(time = 2000)
sensor.set_auto_gain(False)
sensor.set_auto_whitebal(False)
p1 = Pin("P7", Pin.OUT_PP)
p2 = Pin("P8", Pin.OUT_PP)
p3 = Pin("P4", Pin.OUT_PP)
led1 = pyb.LED(1)
led2 = pyb.LED(2)
led3 = pyb.LED(3)
kpts3 = image.load_descriptor("/a3.orb")
kpts4 = image.load_descriptor("/a4.orb")
kpts5 = image.load_descriptor("/a5.orb")
kpts51 = image.load_descriptor("/a51.orb")
kpts6 = image.load_descriptor("/a6.orb")
kpts61 = image.load_descriptor("/a61.orb")
kpts7 = image.load_descriptor("/a7.orb")
kpts71 = image.load_descriptor("/a71.orb")
kpts8 = image.load_descriptor("/a8.orb")
kpts81 = image.load_descriptor("/a81.orb")
clock = time.clock()
light = Timer(2, freq=50000).channel(1, Timer.PWM, pin=Pin("P6"))
light.pulse_width_percent(1)
while (True):
    clock.tick()
    time.sleep(1)
    img = sensor.snapshot()
    if (kpts3 == None):
        kpts3 = img.find_keypoints(max_keypoints=150, threshold=10, scale_factor=1.2)
    else:
        kpts2 = img.find_keypoints(max_keypoints=150, threshold=10, normalized=True)
        if (kpts2):
            match3 = image.match_descriptor(kpts3, kpts2, threshold=85)
            match4 = image.match_descriptor(kpts4, kpts2, threshold=85)
            match5 = image.match_descriptor(kpts5, kpts2, threshold=85)
            match51 = image.match_descriptor(kpts51, kpts2, threshold=85)
            match6 = image.match_descriptor(kpts6, kpts2, threshold=85)
            match61 = image.match_descriptor(kpts61, kpts2, threshold=85)
            match7 = image.match_descriptor(kpts7, kpts2, threshold=85)
            match71 = image.match_descriptor(kpts71, kpts2, threshold=85)
            match8 = image.match_descriptor(kpts8, kpts2, threshold=85)
            match81 = image.match_descriptor(kpts81, kpts2, threshold=85)
            if (match3.count()>15):
                img.draw_rectangle(match3.rect())
                img.draw_cross(match3.cx(), match3.cy(), size=10)
                print("3")
                p1.high()
                p2.low()
                p3.low()
            if (match4.count()>15):
                img.draw_rectangle(match4.rect())
                img.draw_cross(match4.cx(), match4.cy(), size=10)
                print("4")
                p1.low()
                p2.high()
                p3.low()
            if (match5.count()>15):
                img.draw_rectangle(match5.rect())
                img.draw_cross(match5.cx(), match5.cy(), size=10)
                print("5")
                p1.low()
                p2.low()
                p3.high()
            if (match51.count()>15):
                img.draw_rectangle(match51.rect())
                img.draw_cross(match51.cx(), match51.cy(), size=10)
                print("51")
                p1.low()
                p2.low()
                p3.high()
            if (match6.count()>15):
                img.draw_rectangle(match6.rect())
                img.draw_cross(match6.cx(), match6.cy(), size=10)
                print("6")
                p1.high()
                p2.high()
                p3.low()
            if (match61.count()>15):
                img.draw_rectangle(match61.rect())
                img.draw_cross(match61.cx(), match61.cy(), size=10)
                print("61")
                p1.high()
                p2.high()
                p3.low()
            if (match7.count()>15):
                img.draw_rectangle(match7.rect())
                img.draw_cross(match7.cx(), match7.cy(), size=10)
                print("7")
                p1.low()
                p2.high()
                p3.high()
            if (match71.count()>15):
                img.draw_rectangle(match71.rect())
                img.draw_cross(match71.cx(), match71.cy(), size=10)
                print("71")
                p1.low()
                p2.high()
                p3.high()
            if (match8.count()>15):
                img.draw_rectangle(match8.rect())
                img.draw_cross(match8.cx(), match8.cy(), size=10)
                print("8")
                p1.high()
                p2.low()
                p3.high()
            if (match81.count()>15):
                img.draw_rectangle(match81.rect())
                img.draw_cross(match81.cx(), match81.cy(), size=10)
                print("81")
                p1.high()
                p2.low()
                p3.high()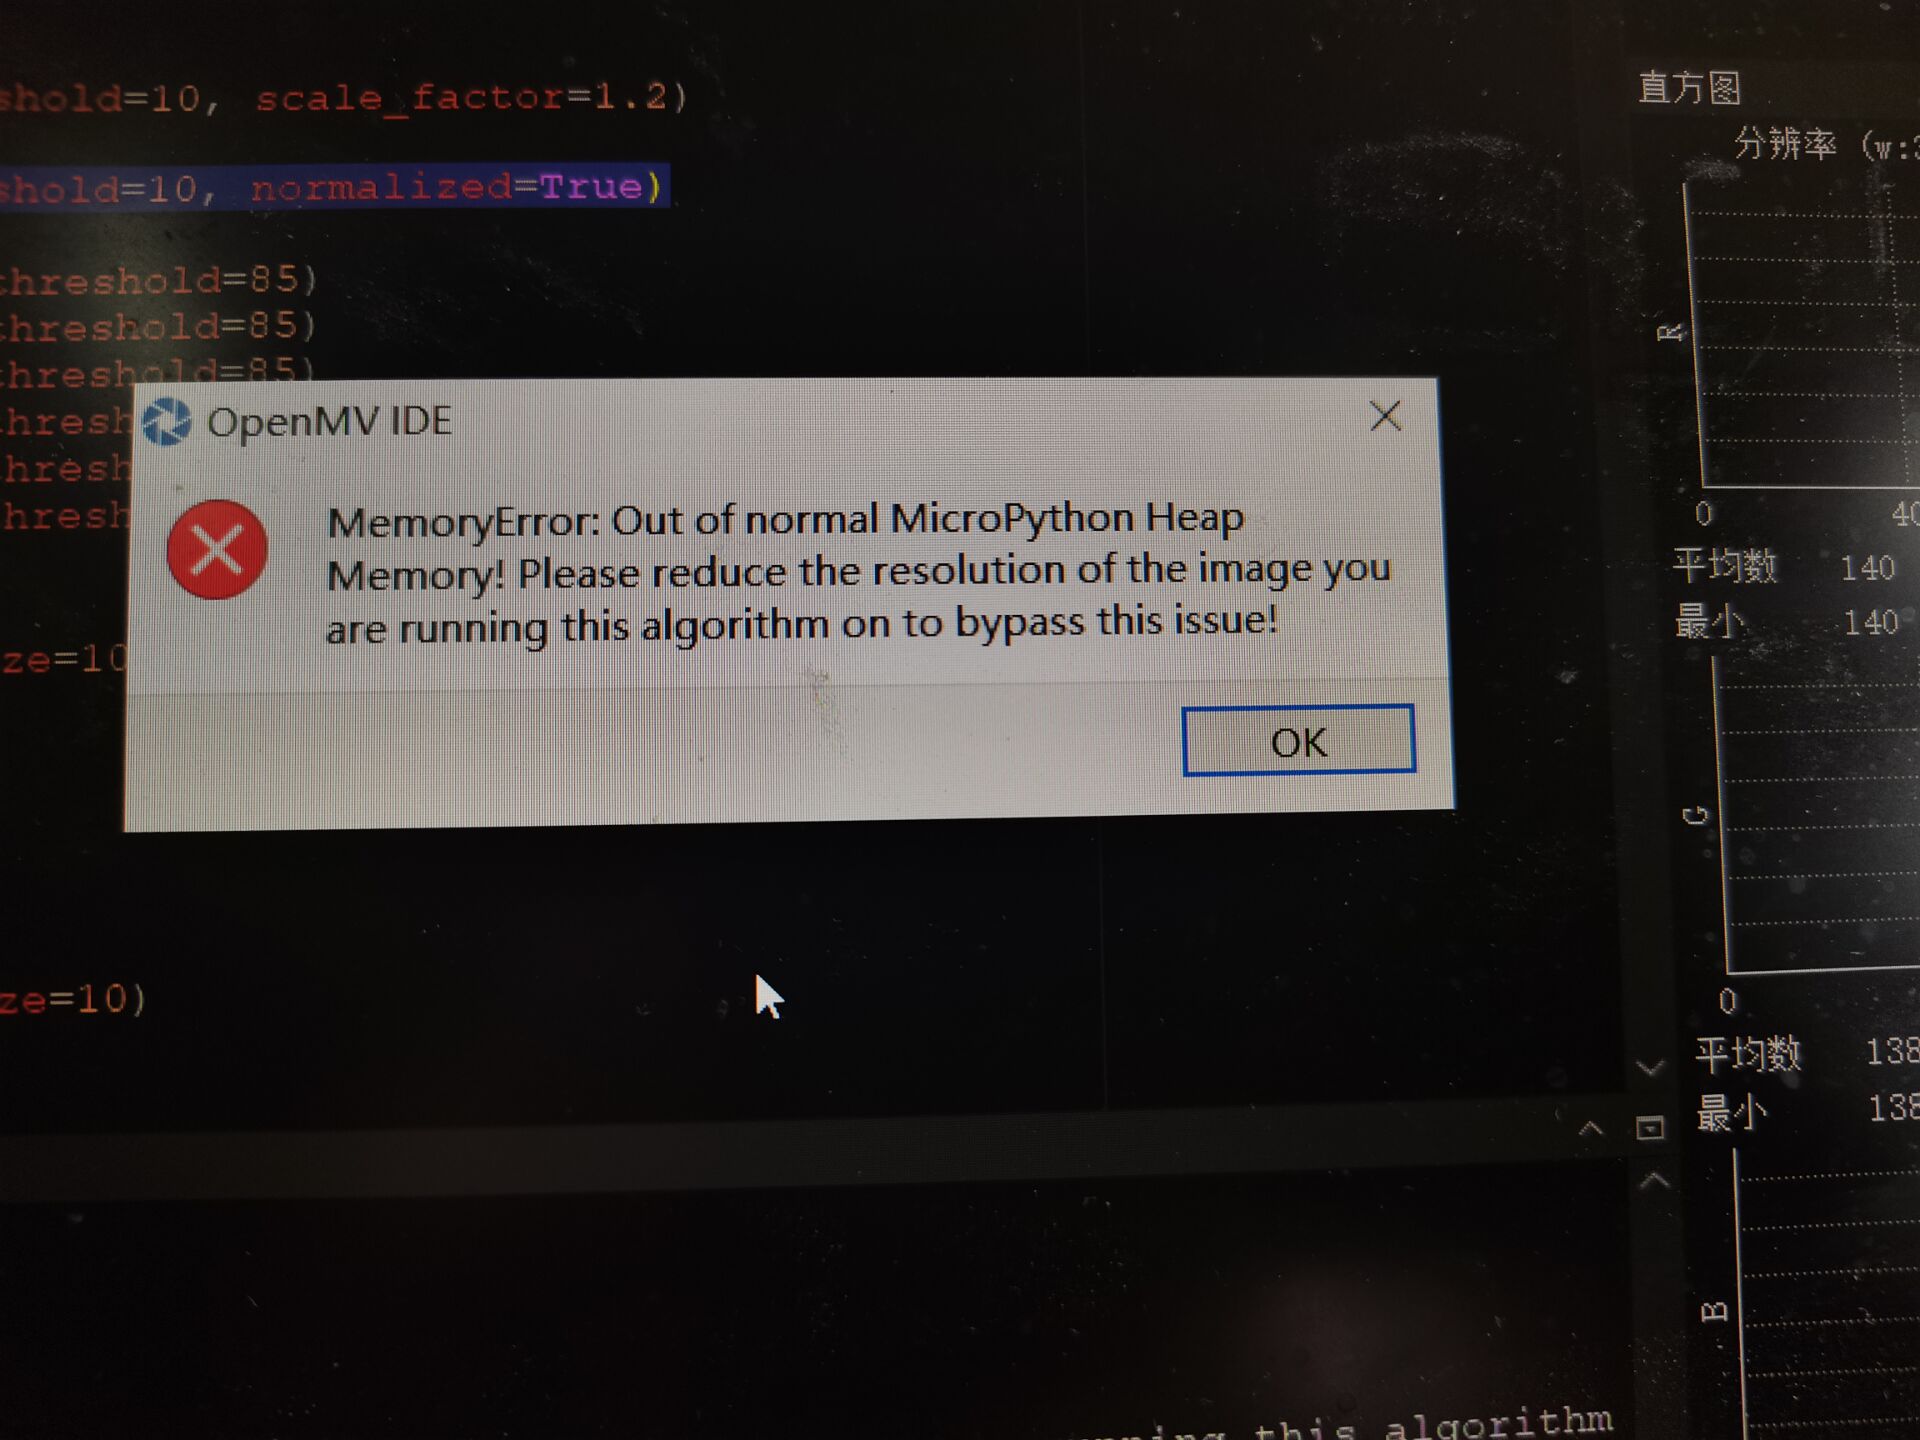
用的plus -
官网给的光源拓展板的例程会报错?发布在 OpenMV Cam
import time
from pyb import Pin, Timer

# 50kHz pin6 timer2 channel1
light = Timer(2, freq=50000).channel(1, Timer.PWM, pin=Pin("P6"))
light.pulse_width_percent(100) # 控制亮度 0~100

while (True):
    time.sleep_ms(1000)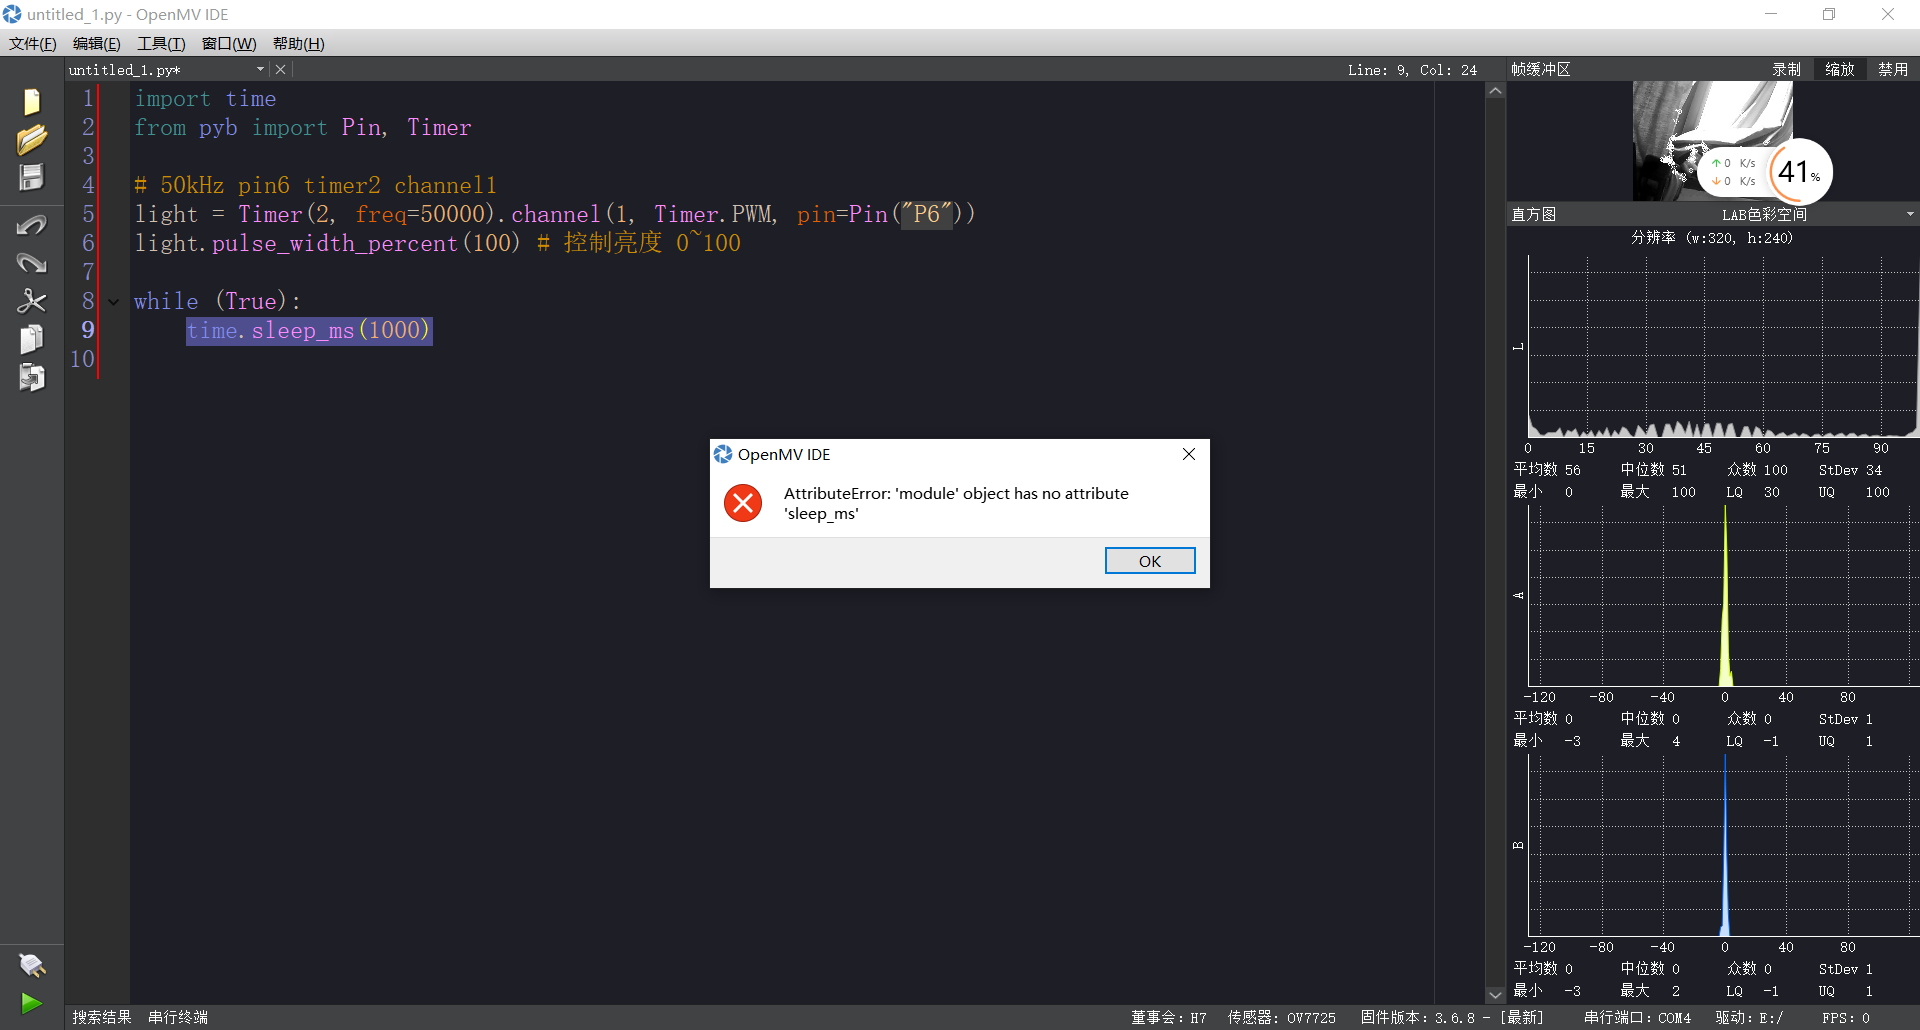
-
识别二维码,之后进行判断发布在 OpenMV Cam
我想先进行识别二维码,扫描出二维码的内容之后根据内容进行判断应该如何写
import sensor, image,pyb,time
from pyb import UART
from pyb import Pin
uart = UART(3, 9600)
led1 = pyb.LED(1)
led2 = pyb.LED(2)
led3 = pyb.LED(3)
sensor.reset()
sensor.set_pixformat(sensor.RGB565)
sensor.set_framesize(sensor.QQVGA) # can be QVGA on M7...
sensor.skip_frames(30)
sensor.set_auto_gain(False) # must turn this off to prevent image washout...

while(True):
       img = sensor.snapshot()
       img.lens_corr(1.8) # strength of 1.8 is good for the 2.8mm lens.
       for code in img.find_qrcodes():
         xingxi = code.payload()
         print(xingxi)
         uart.write(xingxi)
这是代码,例如:识别出二维码内容是123+123,让红灯亮,识别出内容321+321让绿灯亮。判断的程序应该怎么写
-
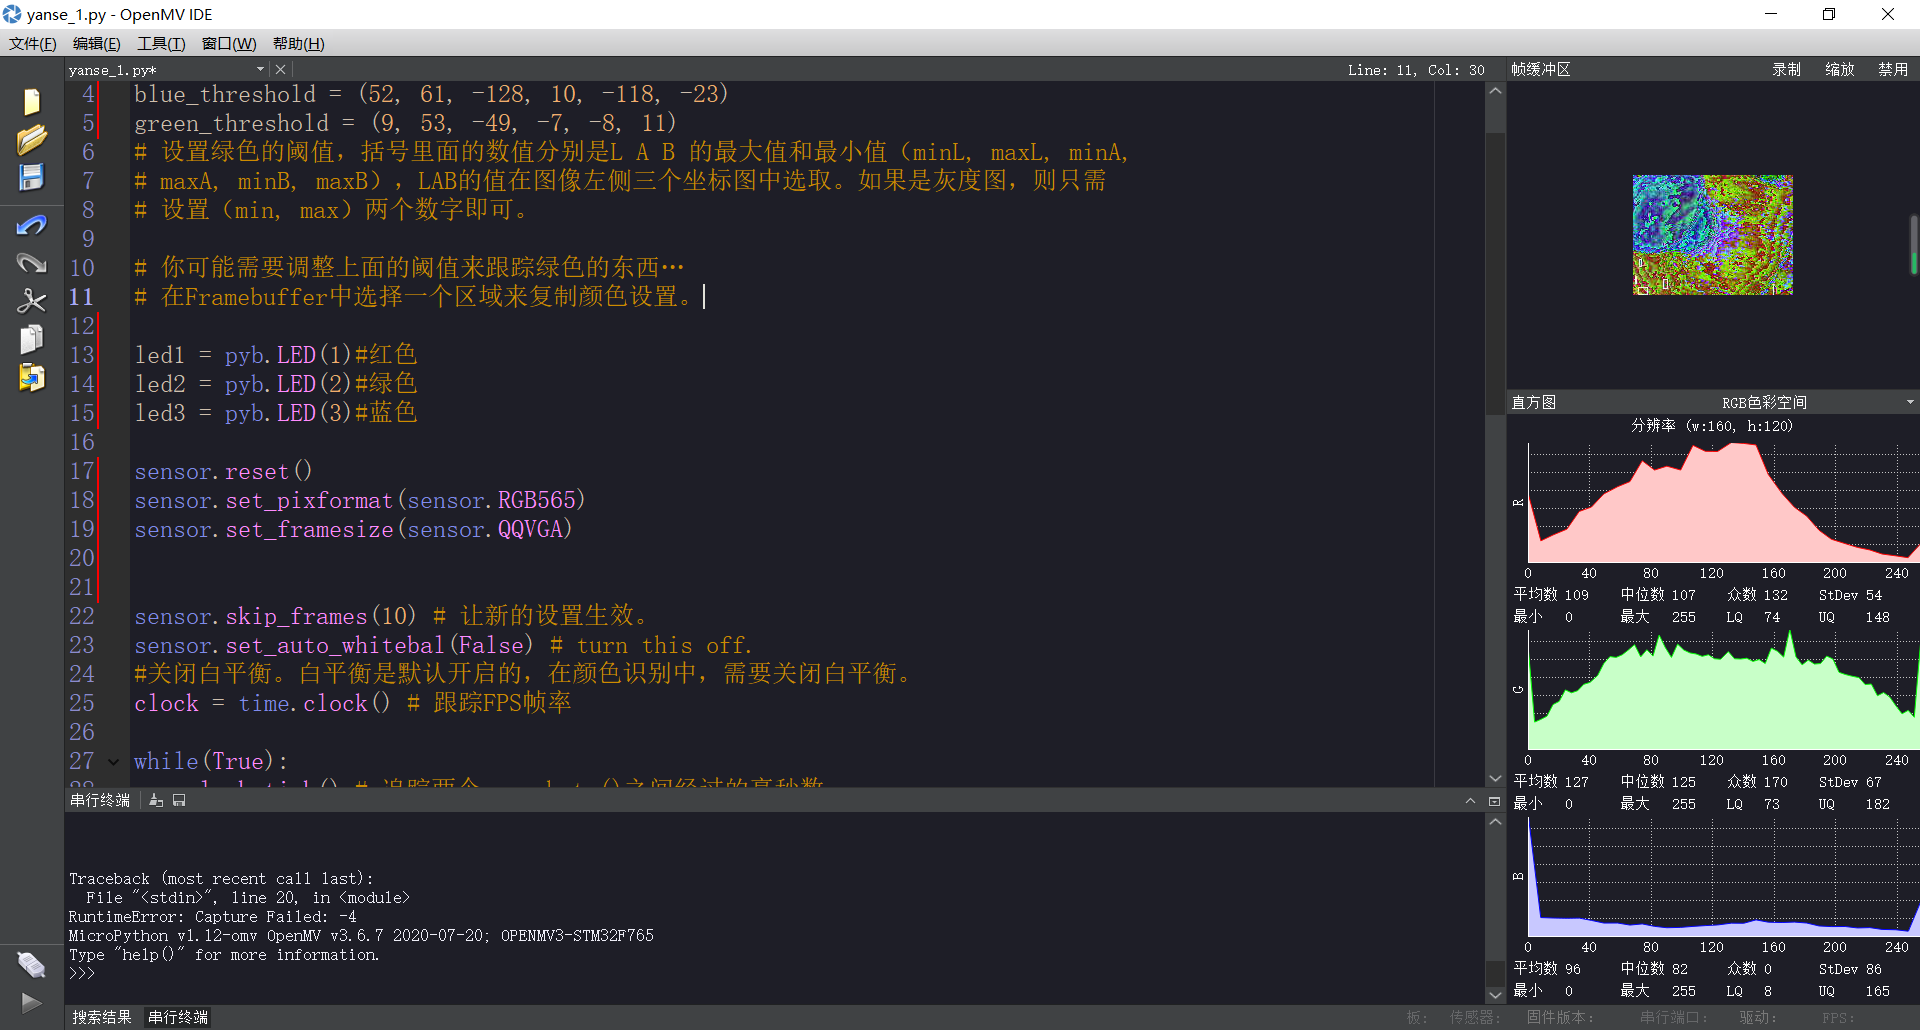
识别颜色的时候加上led灯,会出现花屏发布在 OpenMV Cam
这是代码
import sensor, image, time,pyb

red_threshold   = (85, 25, 93, 16, 42, 21)
blue_threshold = (52, 61, -128, 10, -118, -23)
green_threshold = (9, 53, -49, -7, -8, 11)
# 设置绿色的阈值,括号里面的数值分别是L A B 的最大值和最小值(minL, maxL, minA,
# maxA, minB, maxB),LAB的值在图像左侧三个坐标图中选取。如果是灰度图,则只需
# 设置(min, max)两个数字即可。

# 你可能需要调整上面的阈值来跟踪绿色的东西…
# 在Framebuffer中选择一个区域来复制颜色设置。

led1 = pyb.LED(1)#红色
led2 = pyb.LED(2)#绿色
led3 = pyb.LED(3)#蓝色

sensor.reset()
sensor.set_pixformat(sensor.RGB565)
sensor.set_framesize(sensor.QQVGA)


sensor.skip_frames(10) # 让新的设置生效。
sensor.set_auto_whitebal(False) # turn this off.
#关闭白平衡。白平衡是默认开启的,在颜色识别中,需要关闭白平衡。
clock = time.clock() # 跟踪FPS帧率

while(True):
    clock.tick() # 追踪两个snapshots()之间经过的毫秒数.
    img = sensor.snapshot() # 拍一张照片并返回图像。

    blobs = img.find_blobs([red_threshold])
    #find_blobs(thresholds, invert=False, roi=Auto),thresholds为颜色阈值,
    #是一个元组,需要用括号[ ]括起来。invert=1,反转颜色阈值,invert=False默认
    #不反转。roi设置颜色识别的视野区域,roi是一个元组, roi = (x, y, w, h),代表
    #从左上顶点(x,y)开始的宽为w高为h的矩形区域,roi不设置的话默认为整个图像视野。
    #这个函数返回一个列表,[0]代表识别到的目标颜色区域左上顶点的x坐标,[1]代表
    #左上顶点y坐标,[2]代表目标区域的宽,[3]代表目标区域的高,[4]代表目标
    #区域像素点的个数,[5]代表目标区域的中心点x坐标,[6]代表目标区域中心点y坐标,
    #[7]代表目标颜色区域的旋转角度(是弧度值,浮点型,列表其他元素是整型),
    #[8]代表与此目标区域交叉的目标个数,[9]代表颜色的编号(它可以用来分辨这个
    #区域是用哪个颜色阈值threshold识别出来的)。
    if blobs:
    #如果找到了目标颜色
        for b in blobs:
        #迭代找到的目标颜色区域
            # Draw a rect around the blob.
            img.draw_rectangle(b[0:4]) # rect
            #用矩形标记出目标颜色区域
            led1.on()
            time.sleep(300)
            led1.off()
            time.sleep(300)
有时候会出现花屏
-
特征点检测检测份特征点,输出不同的信号发布在 OpenMV Cam
我现在需要检测多份特征点,检测到不同的特征点时候输出不同的信号,应该怎么做一共6份特征点
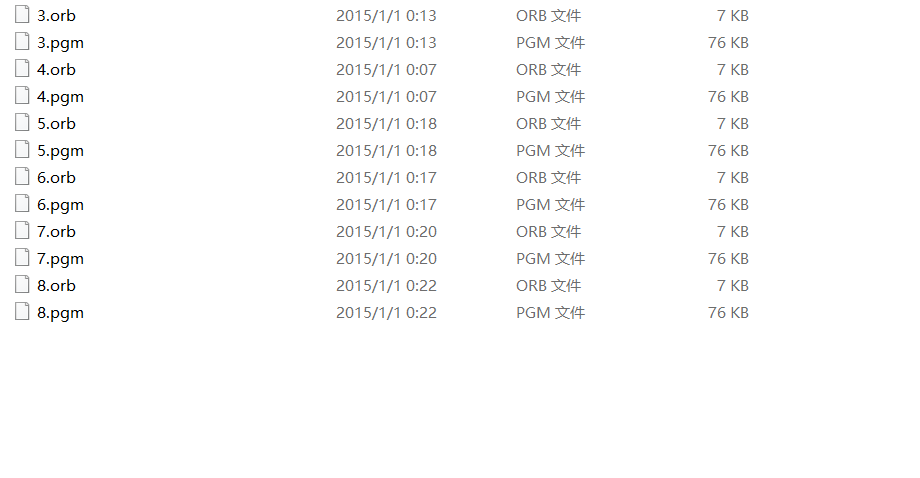
比如检测到4号特征点给一种信号,检测到5号特征点给另外一种信号。
-
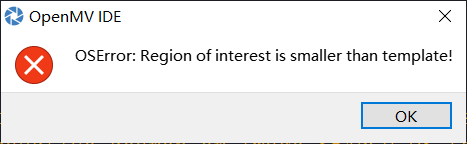
模板匹配中出现报错zzzz发布在 OpenMV Cam
在模板匹配里面
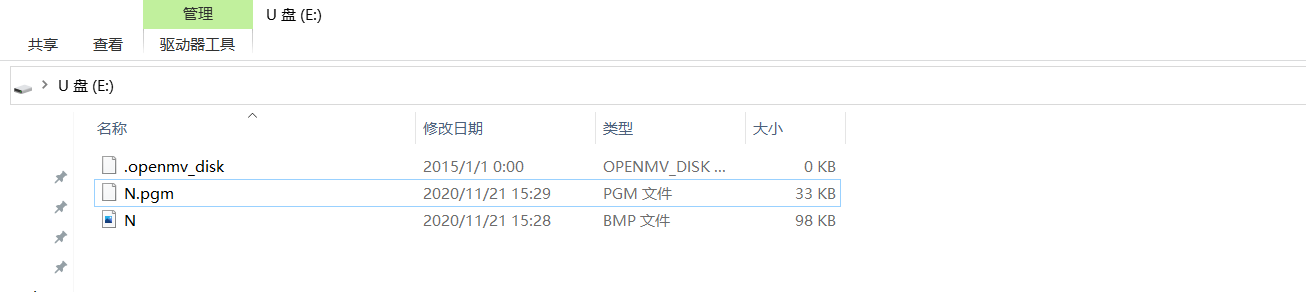
# Template Matching Example - Normalized Cross Correlation (NCC)
#
# This example shows off how to use the NCC feature of your OpenMV Cam to match
# image patches to parts of an image... expect for extremely controlled enviorments
# NCC is not all to useful.
#
# WARNING: NCC supports needs to be reworked! As of right now this feature needs
# a lot of work to be made into somethin useful. This script will reamin to show
# that the functionality exists, but, in its current state is inadequate.

import time, sensor, image
from image import SEARCH_EX, SEARCH_DS
#从imgae模块引入SEARCH_EX和SEARCH_DS。使用from import仅仅引入SEARCH_EX,
#SEARCH_DS两个需要的部分,而不把image模块全部引入。

# Reset sensor
sensor.reset()

# Set sensor settings
sensor.set_contrast(1)
sensor.set_gainceiling(16)
# Max resolution for template matching with SEARCH_EX is QQVGA
sensor.set_framesize(sensor.QQVGA)
# You can set windowing to reduce the search image.
#sensor.set_windowing(((640-80)//2, (480-60)//2, 80, 60))
sensor.set_pixformat(sensor.GRAYSCALE)

# Load template.
# Template should be a small (eg. 32x32 pixels) grayscale image.
template = image.Image("/N.pgm")
#加载模板图片

clock = time.clock()

# Run template matching
while (True):
    clock.tick()
    img = sensor.snapshot()

    # find_template(template, threshold, [roi, step, search])
    # ROI: The region of interest tuple (x, y, w, h).
    # Step: The loop step used (y+=step, x+=step) use a bigger step to make it faster.
    # Search is either image.SEARCH_EX for exhaustive search or image.SEARCH_DS for diamond search
    #
    # Note1: ROI has to be smaller than the image and bigger than the template.
    # Note2: In diamond search, step and ROI are both ignored.
    r = img.find_template(template, 0.70, step=4, search=SEARCH_EX) #, roi=(10, 0, 60, 60))
    #find_template(template, threshold, [roi, step, search]),threshold中
    #的0.7是相似度阈值,roi是进行匹配的区域(左上顶点为(10,0),长80宽60的矩形),
    #注意roi的大小要比模板图片大,比frambuffer小。
    #把匹配到的图像标记出来
    if r:
        img.draw_rectangle(r)

    print(clock.fps())
会显示错误