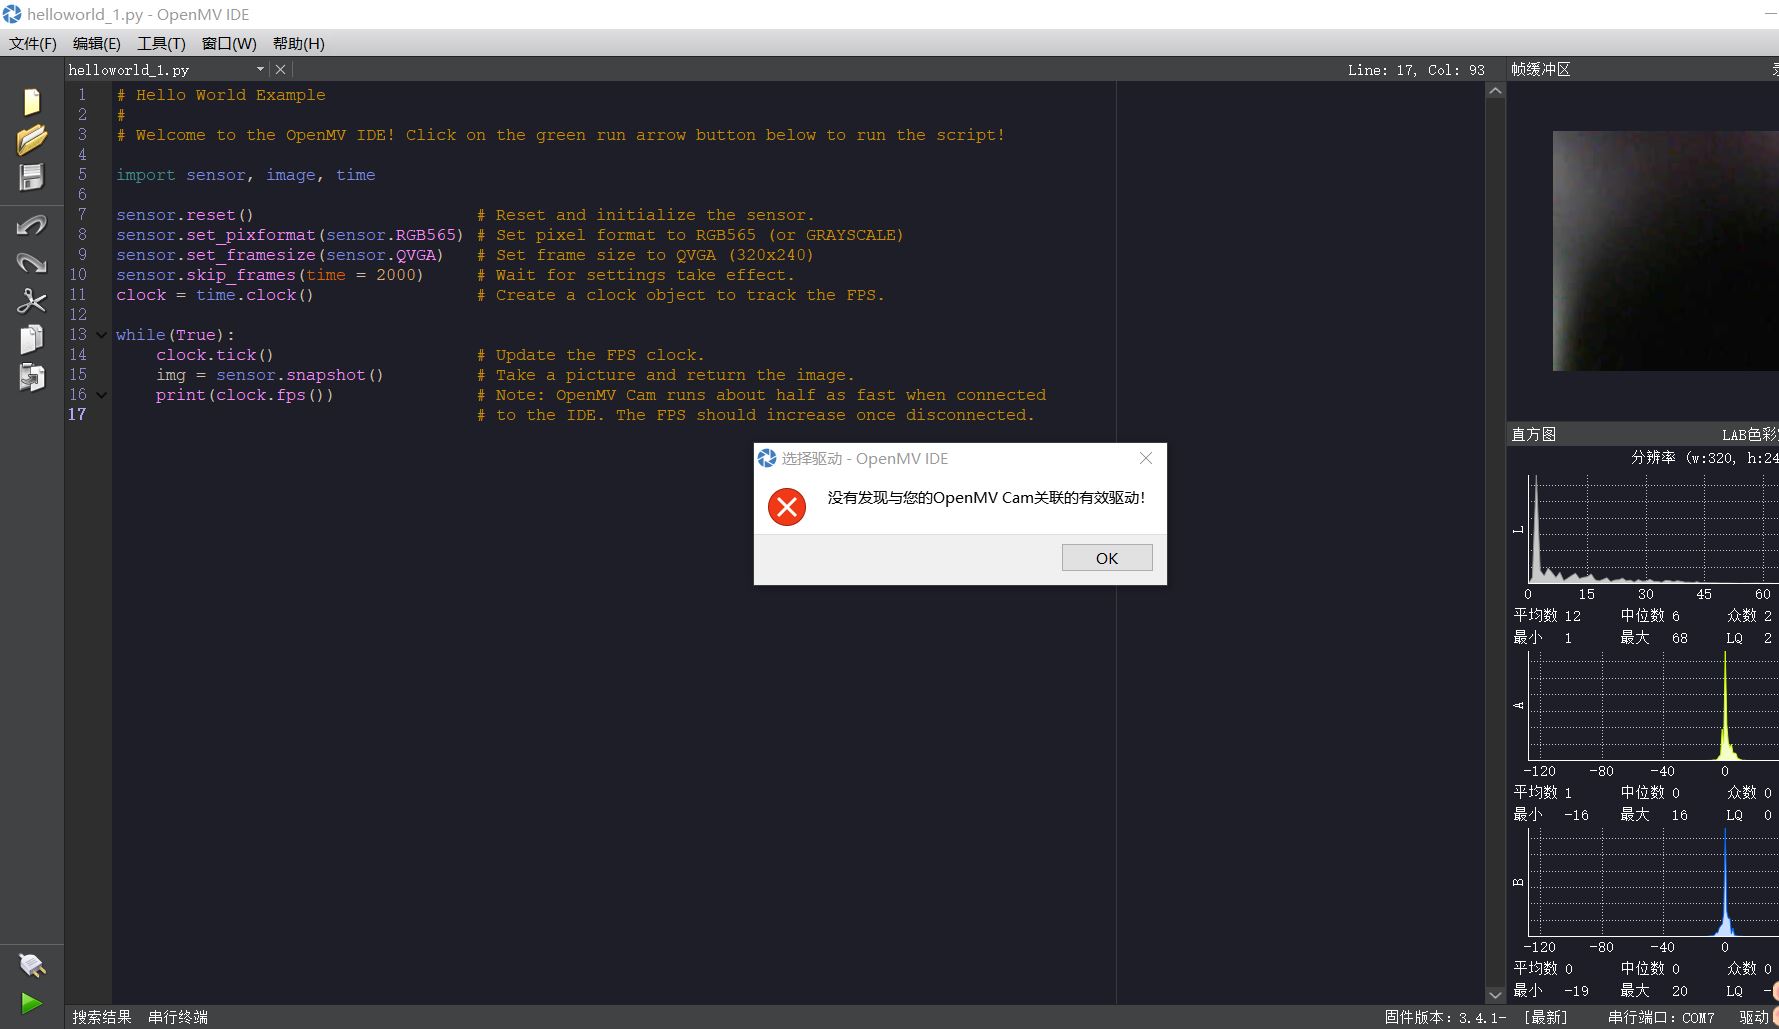
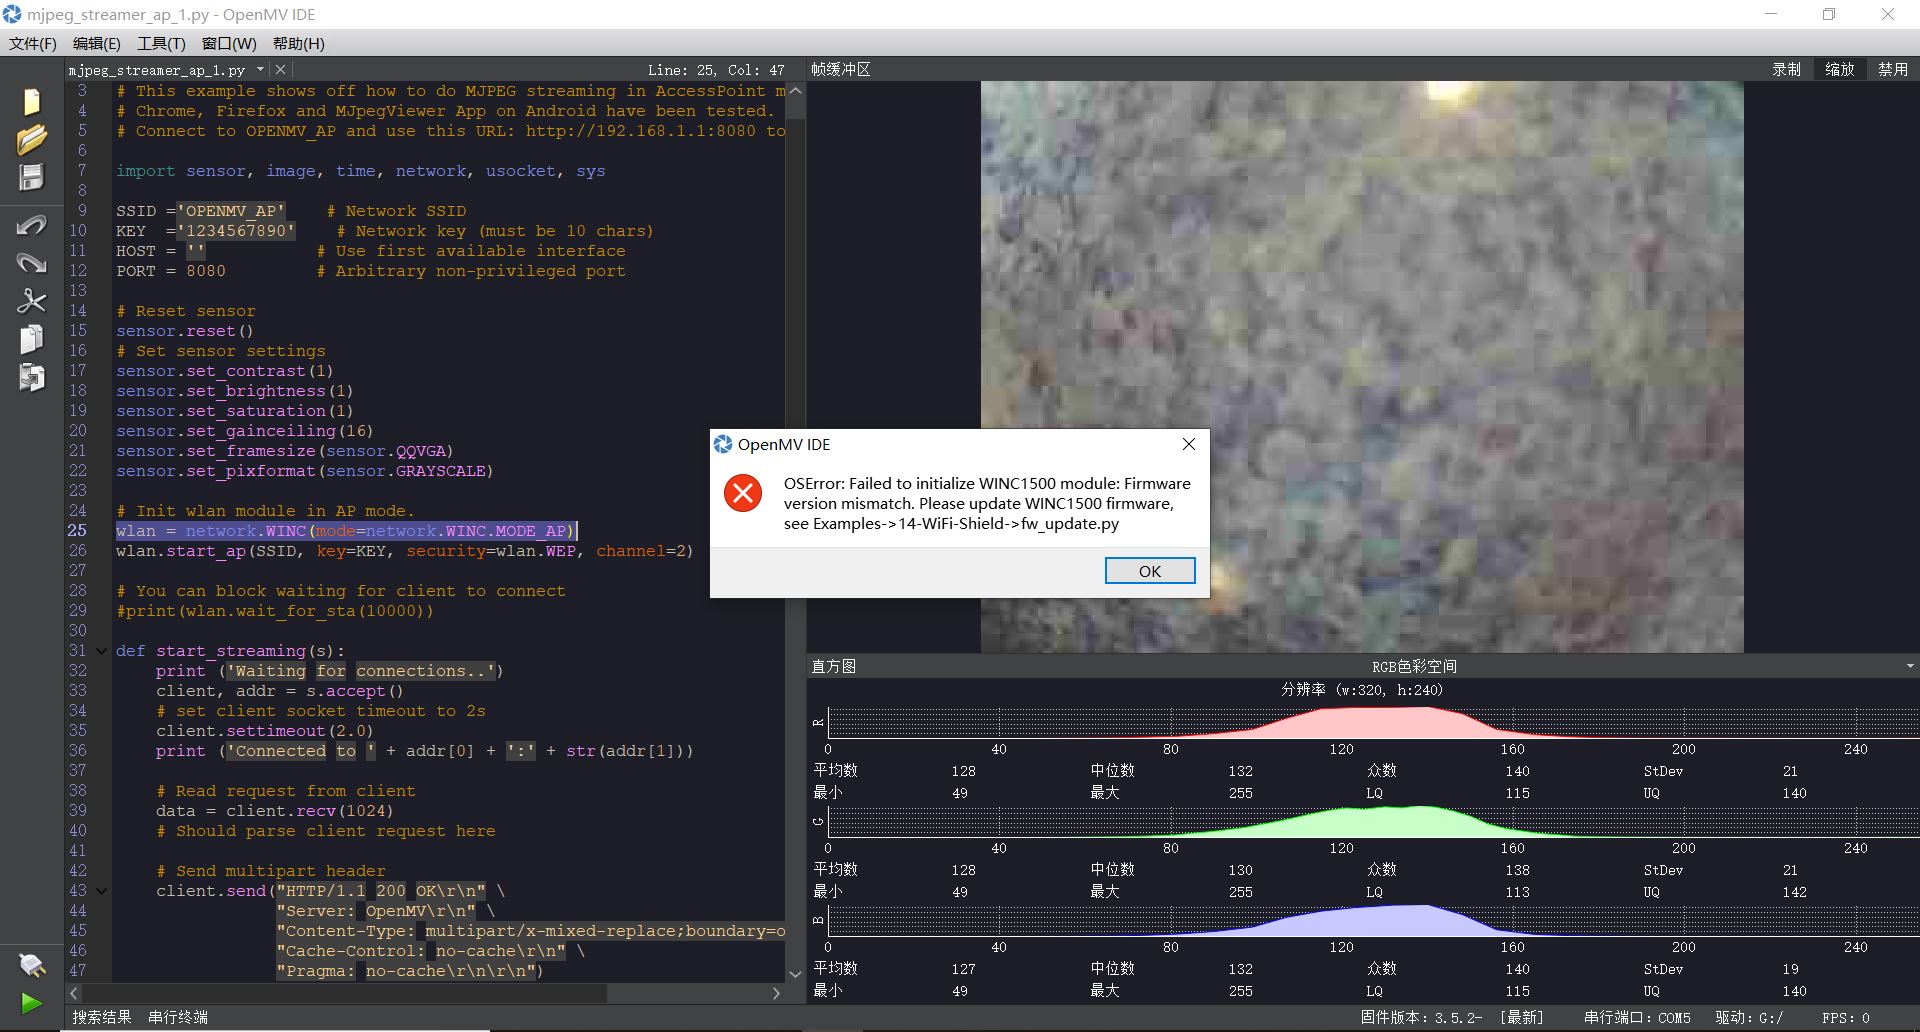
先前openmv中有WiFi代码,并且可以使用,经过一段时间重新上电,需要更新固件,未擦除原代码。发现有报错,使用推荐的历程mgpeg_streamer_ap.py,发现仍然报错。按照指示打开更新文件历程fw_update.py,运行发现仍然错,显示无法找到文件。完全使用历程,这个问题如何解决?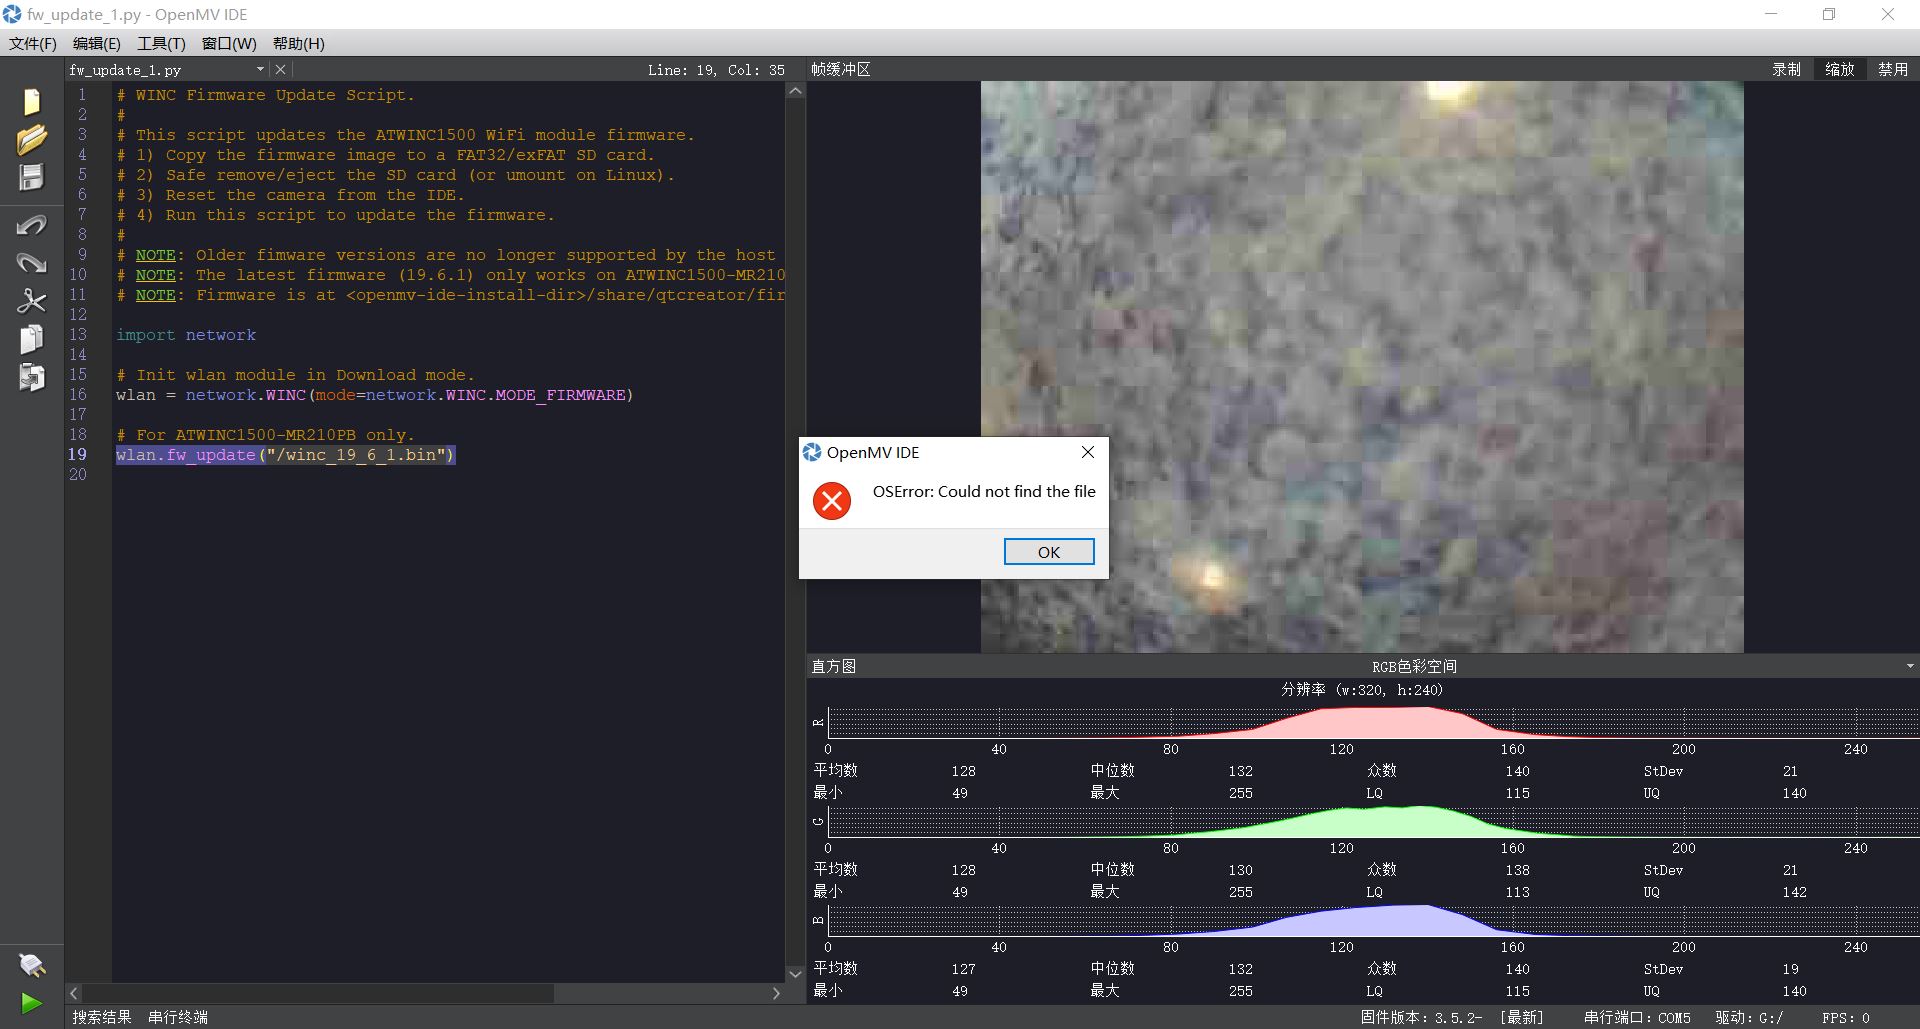
1
19805185968 发布的帖子
-
WiFi模块无法更新发布在 OpenMV Cam
-
不显示连接,无法烧录发布在 OpenMV Cam
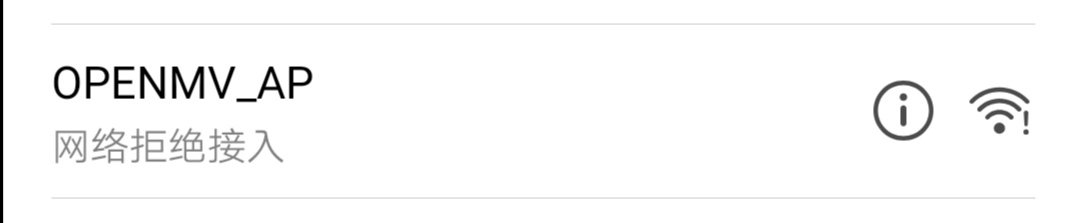
使用的多个例程代码,按照视频教程更新过固件,插上OPENMV后仍然不显示U盘插入,资源管理器无信息,无法烧录,但可以在IDE打开openmv,不脱机、不烧录的情况下运行正常。急求解决方案。
-
RE: 脱机运行为何串口无法发送?发布在 OpenMV Cam
import sensor, image, time, math, network, usocket, sys from pyb import UART uart = UART(3, 9600, timeout_char=1000) SSID ='OPENMV_AP' KEY ='1234567890' HOST = '' PORT = 8080 threshold_index = 0 thresholds = [(20, 93, -59, -22, -5, 32)] sensor.reset() sensor.set_pixformat(sensor.RGB565) sensor.set_framesize(sensor.QVGA) sensor.skip_frames(time = 2000) sensor.set_auto_gain(False) sensor.set_auto_whitebal(False) sensor.set_contrast(1) sensor.set_brightness(1) sensor.set_saturation(1) sensor.set_gainceiling(16) wlan = network.WINC(mode=network.WINC.MODE_AP) wlan.start_ap(SSID, key=KEY, security=wlan.WEP, channel=2) def start_streaming(s): print ('Waiting for connections..') client, addr = s.accept() client.settimeout(2.0) print ('Connected to ' + addr[0] + ':' + str(addr[1])) data = client.recv(1024) client.send("HTTP/1.1 200 OK\r\n" \ "Server: OpenMV\r\n" \ "Content-Type: multipart/x-mixed-replace;boundary=openmv\r\n" \ "Cache-Control: no-cache\r\n" \ "Pragma: no-cache\r\n\r\n") clock = time.clock() while (True): clock.tick() frame = sensor.snapshot() cframe = frame.compressed(quality=35) header = "\r\n--openmv\r\n" \ "Content-Type: image/jpeg\r\n"\ "Content-Length:"+str(cframe.size())+"\r\n\r\n" client.send(header) client.send(cframe) img = sensor.snapshot() clock.tick() for blob in img.find_blobs([thresholds[threshold_index]], pixels_threshold=200, area_threshold=200, merge=True): img.draw_rectangle(blob.rect()) middle = blob.cx() print(middle) if middle>=0 and middle<=70: feedback = '0x02' id = int('0x02',16) uart.writechar(id) elif middle>=90 and middle<=160: id = int('0x00',16) uart.writechar(id) else : id = int('0x06',16) uart.writechar(id) while (True): s = usocket.socket(usocket.AF_INET, usocket.SOCK_STREAM) try: s.bind([HOST, PORT]) s.listen(5) s.settimeout(3) start_streaming(s) except OSError as e: s.close() print("socket error: ", e) -
脱机运行为何串口无法发送?发布在 OpenMV Cam
本问题不涉及代码,我使用了WIFI扩展板,OPENMV直接插在电脑上供电可以在串口上打印值,但是接在充电宝上虽然仍可连接WIFI,仍可看到图像,但是串口无法打印数值。同样的代码同样的操作重复多次仍是如此,是因为电压问题吗?该如何解决呢?
-
RE: 请问为何在电脑上可以运行,脱机运行就无法连接wifi?发布在 OpenMV Cam
@kidswong999 并没有,电脑端并没有连接OPENMV的热点,还有就是使用5V电源直接供电OPENMV灯明显闪烁的不对,手机上也搜不到热点,我是使用充电宝供电才出现热点,但无法连接!
-
RE: 请问为何在电脑上可以运行,脱机运行就无法连接wifi?发布在 OpenMV Cam
# MJPEG Streaming AP. # # This example shows off how to do MJPEG streaming in AccessPoint mode. # Chrome, Firefox and MJpegViewer App on Android have been tested. # Connect to OPENMV_AP and use this URL: http://192.168.1.1:8080 to view the stream. import sensor, image, time, network, usocket, sys SSID ='OPENMV_AP' # Network SSID KEY ='1234567890' # Network key (must be 10 chars) HOST = '' # Use first available interface PORT = 8080 # Arbitrary non-privileged port # Reset sensor sensor.reset() # Set sensor settings sensor.set_contrast(1) sensor.set_brightness(1) sensor.set_saturation(1) sensor.set_gainceiling(16) sensor.set_framesize(sensor.QVGA) sensor.set_pixformat(sensor.GRAYSCALE) # Init wlan module in AP mode. wlan = network.WINC(mode=network.WINC.MODE_AP) wlan.start_ap(SSID, key=KEY, security=wlan.WEP, channel=2) # Load Haar Cascade # By default this will use all stages, lower satges is faster but less accurate. face_cascade = image.HaarCascade("frontalface", stages=25) print(face_cascade) # You can block waiting for client to connect #print(wlan.wait_for_sta(10000)) def start_streaming(s): print ('Waiting for connections..') client, addr = s.accept() # set client socket timeout to 2s client.settimeout(2.0) print ('Connected to ' + addr[0] + ':' + str(addr[1])) # Read request from client data = client.recv(1024) # Should parse client request here # Send multipart header client.send("HTTP/1.1 200 OK\r\n" \ "Server: OpenMV\r\n" \ "Content-Type: multipart/x-mixed-replace;boundary=openmv\r\n" \ "Cache-Control: no-cache\r\n" \ "Pragma: no-cache\r\n\r\n") # FPS clock clock = time.clock() # Start streaming images # NOTE: Disable IDE preview to increase streaming FPS. while (True): clock.tick() # Track elapsed milliseconds between snapshots(). frame = sensor.snapshot() cframe = frame.compressed(quality=35) header = "\r\n--openmv\r\n" \ "Content-Type: image/jpeg\r\n"\ "Content-Length:"+str(cframe.size())+"\r\n\r\n" client.send(header) client.send(cframe) #print(clock.fps()) img = sensor.snapshot() clock.tick() # Find objects. # Note: Lower scale factor scales-down the image more and detects smaller objects. # Higher threshold results in a higher detection rate, with more false positives. objects = img.find_features(face_cascade, threshold=0.75, scale=1.35) #image.find_features(cascade, threshold=0.5, scale=1.5),thresholds越大, #匹配速度越快,错误率也会上升。scale可以缩放被匹配特征的大小。 #在找到的目标上画框,标记出来 # Draw objects for r in objects: img.draw_rectangle(r) # Print FPS. # Note: Actual FPS is higher, streaming the FB makes it slower. #print(clock.fps()) if objects: middle = int((objects[0][0]+objects[0][2])/2) print(middle) else: print('no') #clock = time.clock() while (True): # Create server socket s = usocket.socket(usocket.AF_INET, usocket.SOCK_STREAM) try: # Bind and listen s.bind([HOST, PORT]) s.listen(5) # Set server socket timeout # NOTE: Due to a WINC FW bug, the server socket must be closed and reopened if # the client disconnects. Use a timeout here to close and re-create the socket. s.settimeout(3) start_streaming(s) except OSError as e: s.close() print("socket error: ", e) #sys.print_exception(e) -
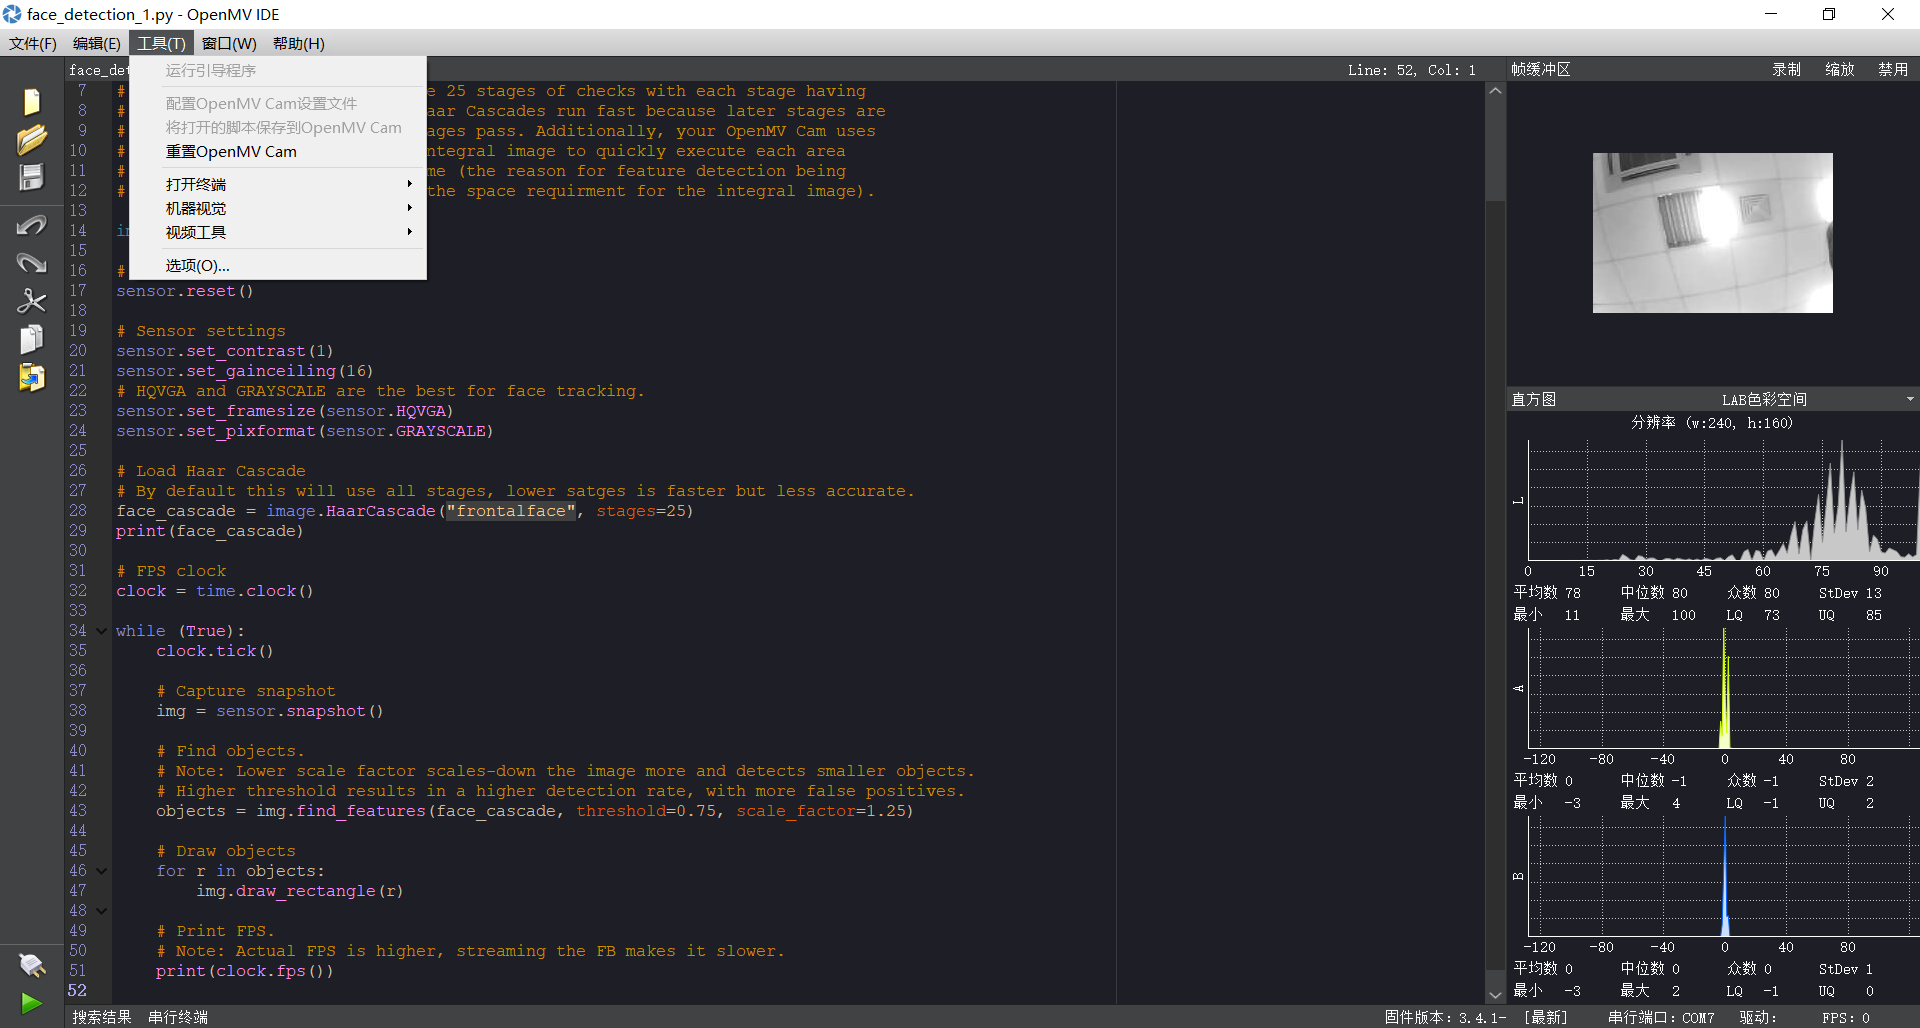
为何我直接在教程复制的代码报错?发布在 OpenMV Cam
# MJPEG Streaming AP.

#

# 这个例子展示了如何在AccessPoint模式下进行MJPEG流式传输。

# Android上的Chrome,Firefox和MJpegViewer App已经过测试。

# 连接到OPENMV_AP并使用此URL:http://192.168.1.1:8080查看流。


import sensor, image, time, network, usocket, sys


SSID ='OPENMV_AP'    # Network SSID

KEY  ='1234567890'    # Network key (must be 10 chars)

HOST = ''           # Use first available interface

PORT = 8080         # Arbitrary non-privileged port


# Reset sensor

sensor.reset()

# Set sensor settings

sensor.set_contrast(1)

sensor.set_brightness(1)

sensor.set_saturation(1)

sensor.set_gainceiling(16)

sensor.set_framesize(sensor.QQVGA)

sensor.set_pixformat(sensor.GRAYSCALE)


# 在AP模式下启动wlan模块。

wlan = network.WINC(mode=network.WINC.MODE_AP)

wlan.start_ap(SSID, key=KEY, security=wlan.WEP, channel=2)


#您可以阻止等待客户端连接

#print(wlan.wait_for_sta(10000))


def start_streaming(s):

    print ('Waiting for connections..')

    client, addr = s.accept()

    # 将客户端套接字超时设置为2秒

    client.settimeout(2.0)

    print ('Connected to ' + addr[0] + ':' + str(addr[1]))


    # 从客户端读取请求

    data = client.recv(1024)

    # 应该在这里解析客户端请求


    # 发送多部分head

    client.send("HTTP/1.1 200 OK\r\n" \

                "Server: OpenMV\r\n" \

                "Content-Type: multipart/x-mixed-replace;boundary=openmv\r\n" \

                "Cache-Control: no-cache\r\n" \

                "Pragma: no-cache\r\n\r\n")


    # FPS clock

    clock = time.clock()


    # 开始流媒体图像

    #注:禁用IDE预览以增加流式FPS。

    while (True):

        clock.tick() # Track elapsed milliseconds between snapshots().

        frame = sensor.snapshot()

        cframe = frame.compressed(quality=35)

        header = "\r\n--openmv\r\n" \

                 "Content-Type: image/jpeg\r\n"\

                 "Content-Length:"+str(cframe.size())+"\r\n\r\n"

        client.send(header)

        client.send(cframe)

        print(clock.fps())


while (True):

    # 创建服务器套接字

    s = usocket.socket(usocket.AF_INET, usocket.SOCK_STREAM)

    try:

        # Bind and listen

        s.bind([HOST, PORT])

        s.listen(5)


        # 设置服务器套接字超时

        # 注意:由于WINC FW bug,如果客户端断开连接,服务器套接字必须

        # 关闭并重新打开。在这里使用超时关闭并重新创建套接字。

        s.settimeout(3)

        start_streaming(s)

    except OSError as e:

        s.close()

        print("socket error: ", e)

        #sys.print_exception(e)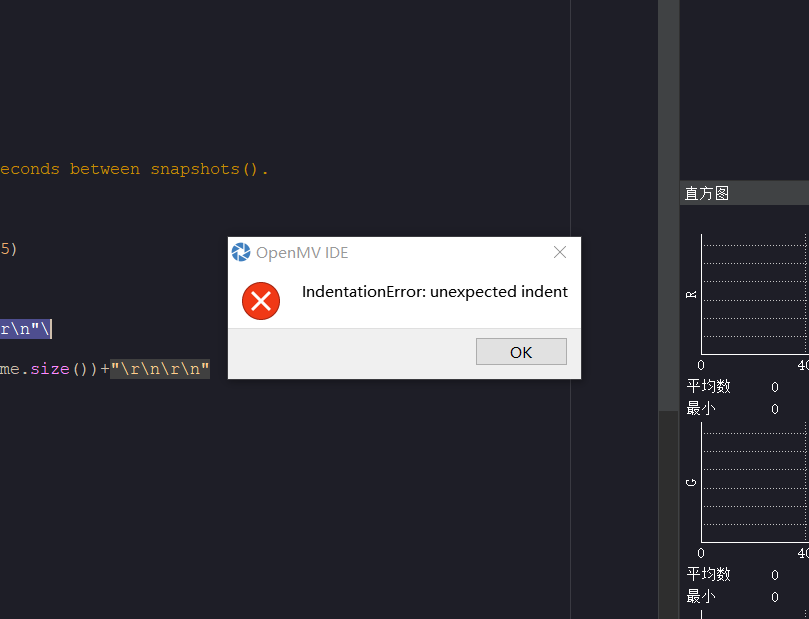
-
想写一个只返回人脸识别图框中心横轴坐标的代码,代码报错,求更改后的完整源代码?发布在 OpenMV Cam
# 人脸识别例程 # import sensor, time, image # Reset sensor sensor.reset() # Sensor settings sensor.set_contrast(1) sensor.set_gainceiling(16) # HQVGA and GRAYSCALE are the best for face tracking. sensor.set_framesize(sensor.QVGA) sensor.set_pixformat(sensor.GRAYSCALE) #注意人脸识别只能用灰度图哦 # Load Haar Cascade # By default this will use all stages, lower satges is faster but less accurate. face_cascade = image.HaarCascade("frontalface", stages=25) #image.HaarCascade(path, stages=Auto)加载一个haar模型。haar模型是二进制文件, #这个模型如果是自定义的,则引号内为模型文件的路径;也可以使用内置的haar模型, #比如“frontalface” 人脸模型或者“eye”人眼模型。 #stages值未传入时使用默认的stages。stages值设置的小一些可以加速匹配,但会降低准确率。 print(face_cascade) green_threshold = (76, 96, -110, -30, 8, 66) size_threshold = 2000 # FPS clock clock = time.clock() def find_max(blobs): max_size=0 for blob in blobs: if blob[2]*blob[3] > max_size: max_blob=blob max_size = blob[2]*blob[3] return max_blob while (True): clock.tick() # Capture snapshot img = sensor.snapshot() blobs = img.find_blobs([green_threshold]) if blobs: max_blob = find_max(blobs) x_error = max_blob[5]-img.width()/2 h_error = max_blob[2]*max_blob[3]-size_threshold print("x error: ", x_error) # Find objects. # Note: Lower scale factor scales-down the image more and detects smaller objects. # Higher threshold results in a higher detection rate, with more false positives. objects = img.find_features(face_cascade, threshold=0.75, scale=1.35) #image.find_features(cascade, threshold=0.5, scale=1.5),thresholds越大, #匹配速度越快,错误率也会上升。scale可以缩放被匹配特征的大小。 #在找到的目标上画框,标记出来 # Draw objects for r in objects: img.draw_rectangle(r) image.find_features(cascade, roi=objects, threshold=0.5, scale=1.5) # Print FPS. # Note: Actual FPS is higher, streaming the FB makes it slower. #print(clock.fps()) -
RE: 想检测人脸,希望达到最大人脸在左侧输出“left”,右侧“right”,无人脸pass,希望修改代码?发布在 OpenMV Cam
@kidswong999 嗯,更详细的说,根据分辨率分为320份,编写代码让其返回人脸框图中央坐标(横),然后根据坐标返回不同值
-
RE: 想检测人脸,希望达到最大人脸在左侧输出“left”,右侧“right”,无人脸pass,希望修改代码?发布在 OpenMV Cam
@kidswong999 可不可以将整个显示区域纵向分为三百六十份,中央竖直线设置为零,左侧为负,右侧为正?
-
想检测人脸,希望达到最大人脸在左侧输出“left”,右侧“right”,无人脸pass,希望修改代码?发布在 OpenMV Cam
# 人脸识别例程

#

# 这个例子展示了OpenMV Cam的内置人脸检测功能。

#

# 人脸检测通过在图像上使用Haar Cascade特征检测器来工作。 haar级联是

# 一系列简单的区域对比检查。 对于内置的前表面探测器,有25个阶段的检查,

# 每个阶段有数百个检查一块。 Haar Cascades运行速度很快,因为只有在

# 以前的阶段过去后才会评估后期阶段。 此外,您的OpenMV使用称为

# 整体图像的数据结构来在恒定时间内快速执行每个区域对比度检查

#(特征检测仅为灰度的原因是因为整体图像的空间需求)。


import sensor, time, image


# Reset sensor

sensor.reset()


# Sensor settings

sensor.set_contrast(1)

sensor.set_gainceiling(16)

# HQVGA and GRAYSCALE are the best for face tracking.

sensor.set_framesize(sensor.HQVGA)

sensor.set_pixformat(sensor.GRAYSCALE)

#注意人脸识别只能用灰度图哦


# Load Haar Cascade

# By default this will use all stages, lower satges is faster but less accurate.

face_cascade = image.HaarCascade("frontalface", stages=25)

#image.HaarCascade(path, stages=Auto)加载一个haar模型。haar模型是二进制文件,

#这个模型如果是自定义的,则引号内为模型文件的路径;也可以使用内置的haar模型,

#比如“frontalface” 人脸模型或者“eye”人眼模型。

#stages值未传入时使用默认的stages。stages值设置的小一些可以加速匹配,但会降低准确率。

print(face_cascade)


# FPS clock

clock = time.clock()


while (True):

    clock.tick()


    # Capture snapshot

    img = sensor.snapshot()


    # Find objects.

    # Note: Lower scale factor scales-down the image more and detects smaller objects.

    # Higher threshold results in a higher detection rate, with more false positives.

    objects = img.find_features(face_cascade, threshold=0.75, scale=1.35)

    #image.find_features(cascade, threshold=0.5, scale=1.5),thresholds越大,

    #匹配速度越快,错误率也会上升。scale可以缩放被匹配特征的大小。


    #在找到的目标上画框,标记出来

    # Draw objects

    for r in objects:

        img.draw_rectangle(r)


    # Print FPS.

    # Note: Actual FPS is higher, streaming the FB makes it slower.

    #print(clock.fps())
    if (clock.fps()>16.8 and clock.fps()<17.2) or (clock.fps()>20.8 and clock.fps()<21.2) or (clock.fps()>28.1 and clock.fps()<28.5):
        print('middle')
    elif clock.fps()<16.8 or clock.fps()<20.8 or clock.fps()<28.1:
        print('left')
    elif clock.fps()>17.2 or clock.fps()>21.2 or clock.fps()>28.5:
        print('right')