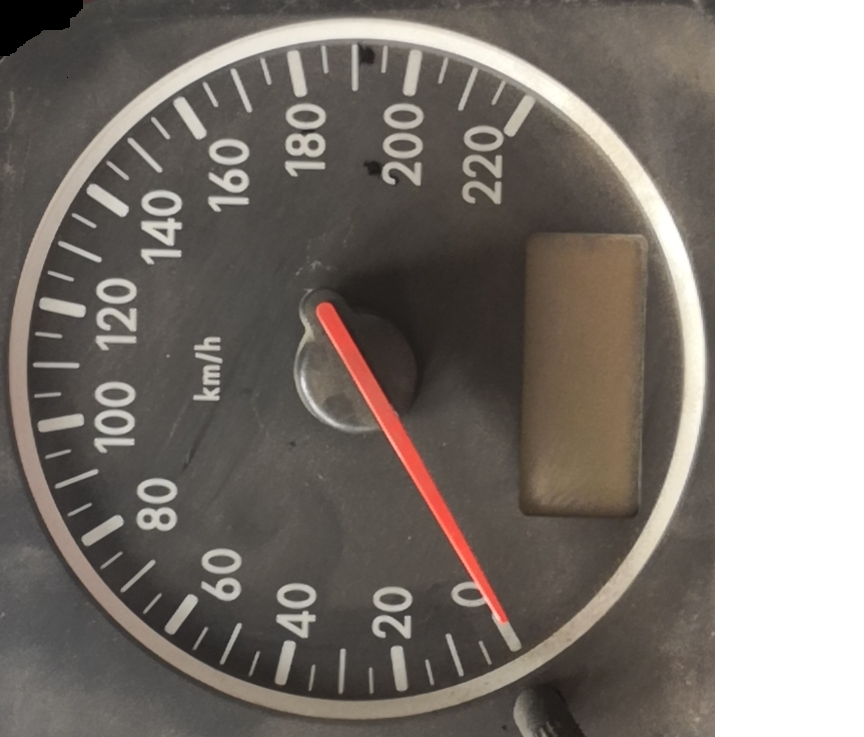
关于OpenMV H7的模块识别仪表盘表针角度的问题
-
大家好,我目前要用OpenMV H7的模块去识别仪表盘表针(类似于汽车上的仪表)的角度,按照官方教程“视频教程4 - 颜色识别:https://singtown.com/learn/49993/”,更改待识别对象的LAB值,可以识别到表针,但blob中的blob.rotation() 返回色块的旋转角度和实际的对不上。请大家帮忙分析一下,另外有没有其他更好的方法或教程可以借鉴的,谢谢!!!
-
此回复已被删除!
-
你提供一下具体的图片,和代码。
如果涉及代码,需要报错提示与全部代码文本,请注意不要贴代码图片
-
@kidswong999 谢谢,代码就是官方的例程,只不过把色块的LAB值改了一下

-
你得发具体的代码,我才能测试。
-
Single Color RGB565 Blob Tracking Example
This example shows off single color RGB565 tracking using the OpenMV Cam.
import sensor, image, time, math
threshold_index = 0 # 0 for red, 1 for green, 2 for blue
Color Tracking Thresholds (L Min, L Max, A Min, A Max, B Min, B Max)
The below thresholds track in general red/green/blue things. You may wish to tune them...
#thresholds = [(30, 100, 15, 127, 15, 127), # generic_red_thresholds
# (30, 100, -64, -8, -32, 32), # generic_green_thresholds
# (0, 30, 0, 64, -128, 0)] # generic_blue_thresholdsthresholds = [(9, 65, 14, 75, -21, 75), # generic_red_thresholds
(30, 100, -64, -8, -32, 32), # generic_green_thresholds
(0, 30, 0, 64, -128, 0)] # generic_blue_thresholdssensor.reset()
sensor.set_pixformat(sensor.RGB565)
sensor.set_framesize(sensor.QVGA)
sensor.skip_frames(time = 2000)
sensor.set_auto_gain(False) # must be turned off for color tracking
sensor.set_auto_whitebal(False) # must be turned off for color tracking
clock = time.clock()Only blobs that with more pixels than "pixel_threshold" and more area than "area_threshold" are
returned by "find_blobs" below. Change "pixels_threshold" and "area_threshold" if you change the
camera resolution. "merge=True" merges all overlapping blobs in the image.
while(True):
clock.tick()
img = sensor.snapshot()
for blob in img.find_blobs([thresholds[threshold_index]], pixels_threshold=200, area_threshold=200, merge=True):
# These values depend on the blob not being circular - otherwise they will be shaky.
# if blob.elongation() > 0.5:
# img.draw_edges(blob.min_corners(), color=(255,0,0))
# img.draw_line(blob.major_axis_line(), color=(0,255,0))
# img.draw_line(blob.minor_axis_line(), color=(0,0,255))
# These values are stable all the time.
img.draw_rectangle(blob.rect())
img.draw_cross(blob.cx(), blob.cy())
# Note - the blob rotation is unique to 0-180 only.
# img.draw_keypoints([(blob.cx(), blob.cy(), int(math.degrees(blob.rotation())))], size=20)
print(blob)
print(clock.fps())
-
这个指针是对称的,所以没办法直接判断方向。
你可以通过判断指针在画面的左边和右边,来辅助判断。
-
玩具而已兄弟何必认真呢?做不了
-
@kidswong999 谢谢