系统迁移中,暂时无法访问,所有数据会迁移到新的网站。
OpenMV VSCode 扩展发布了,在插件市场直接搜索OpenMV就可以安装
如果有产品硬件故障问题,比如无法开机,论坛很难解决。可以直接找售后维修。
发帖子之前,请确认看过所有的视频教程,https://singtown.com/learn/ 和所有的上手教程http://book.openmv.cc/
每一个新的提问,单独发一个新帖子
帖子需要目的,你要做什么?
如果涉及代码,需要报错提示与全部代码文本,请注意不要贴代码图片
必看:玩转星瞳论坛了解一下图片上传,代码格式等问题。
我想吧这拆机代码改为IO输入输出 有注释
-
# Template Matching Example - Normalized Cross Correlation (NCC)
#
# This example shows off how to use the NCC feature of your OpenMV Cam to match
# image patches to parts of an image... expect for extremely controlled enviorments
# NCC is not all to useful.
#
# WARNING: NCC supports needs to be reworked! As of right now this feature needs
# a lot of work to be made into somethin useful. This script will reamin to show
# that the functionality exists, but, in its current state is inadequate.


import time, sensor, image, pyb, lcd

RED_LED_PIN = 1
BLUE_LED_PIN = 3

from image import SEARCH_EX, SEARCH_DS
from pyb import UART
from pyb import Pin

# Reset sensor
sensor.reset()

# Set sensor settings
sensor.set_auto_gain(False)
sensor.set_contrast(3)
sensor.set_brightness(0)
#sensor.set_vflip(True)
sensor.set_gainceiling(16)
# Max resolution for template matching with SEARCH_EX is QQVGA
sensor.set_framesize(sensor.QQVGA)
# You can set windowing to reduce the search image.
#sensor.set_windowing(((640-80)//2, (480-60)//2, 80, 60))
sensor.set_pixformat(sensor.GRAYSCALE)

#sensor.set_pixformat(sensor.RGB565) # or sensor.GRAYSCALE
#sensor.set_framesize(sensor.QQVGA2) # Special 128x160 framesize for LCD Shield.
lcd.init() # Initialize the lcd screen.

uart = UART(3, 19200, timeout_char=1000)

# GPIO Initial
#pin7 = Pin('P7', Pin.IN, Pin.PULL_UP)
#pin8 = Pin('P8', Pin.IN, Pin.PULL_UP)
#pin9 = Pin('P9', Pin.OUT_PP, Pin.PULL_NONE)


clock = time.clock()

# 定义工作模式 ------------------------------------
global g_workMode
g_workMode = 0

WORK_MODE_MATCHING = 0
WORK_MODE_SNAPSHOT = 1
# -----------------------------------------------

# 串口接收缓冲
global g_uart_rxbuf
g_uart_rxbuf = [0,0,0,0]


#global g_timer_100ms

global g_pin7ScanSta
g_pin7ScanSta = 0;

global g_pin8ScanSta
g_pin8ScanSta = 0;


global g_match_threshold
g_match_threshold = 0.0


""" 串口接收数据处理 """
def UART_RecvProcess():
    global g_uart_rxbuf
    global g_match_threshold

    if g_uart_rxbuf[0] == 101:  #ord('m'):        # 执行匹配检测操作
        g_match_threshold = float(g_uart_rxbuf[1]) / 100
        print(g_match_threshold)
        Matching()
    elif g_uart_rxbuf[0] == 102:  #ord('r'):   # 拍照并保存匹配比较模板
        SaveImage0()
    elif g_uart_rxbuf[0] == 103:  # ord('s'):   # 拍照并保存匹配比较模板
        SaveImage1()
    elif g_uart_rxbuf[0] == 104:  # ord('t'):   # 拍照并保存匹配比较空板
        SaveImage2()
    elif g_uart_rxbuf[0] == 105:  # ord('c'):   # 拍照并保存匹配比较模板
        pyb.LED(RED_LED_PIN).off()
        pyb.LED(BLUE_LED_PIN).off()


""" 执行匹配检测操作函数 """
def Matching():
    global g_match_threshold

    # Load template.
    # Template should be a small (eg. 32x32 pixels) grayscale image.
    template_s0 = image.Image("s0.pgm")   #空图片
    template_s1 = image.Image("s1.pgm")   #正模板图片
    template_s2 = image.Image("s2.pgm")   #反模板图片

    #sensor.skip_frames(time = 200)

    #clock.tick()
    #img = sensor.snapshot()
    img = sensor.snapshot().rotation_corr(x_rotation = 0.0, \
                                              y_rotation = 0.0, \
                                              z_rotation = -90, \
                                              x_translation = 0, \
                                              y_translation = 0, \
                                              zoom = 1.0)

    # Run the kernel on every pixel of the image.
    img.laplacian(1, sharpen=True)

    lcd.display(img)

    # find_template(template, threshold, [roi, step, search])
    # ROI: The region of interest tuple (x, y, w, h).
    # Step: The loop step used (y+=step, x+=step) use a bigger step to make it faster.
    # Search is either image.SEARCH_EX for exhaustive search or image.SEARCH_DS for diamond search
    #
    # Note1: ROI has to be smaller than the image and bigger than the template.
    # Note2: In diamond search, step and ROI are both ignored.
    mflag = 0

    #########################################33
    ccnt = 0
    while (ccnt < 7):   # 如果原图片匹配错误,则旋转一定角度再进行匹配
        if ccnt == 1:
            img.rotation_corr(x_rotation = 0.0, \
                                y_rotation = 0.0, \
                                z_rotation = 2.0, \
                                x_translation = 0, \
                                y_translation = 0, \
                                zoom = 1.0)
        elif ccnt == 2:
            img.rotation_corr(x_rotation = 0.0, \
                                y_rotation = 0.0, \
                                z_rotation = 4.0, \
                                x_translation = 0, \
                                y_translation = 0, \
                                zoom = 1.0)

        elif ccnt == 3:
            img.rotation_corr(x_rotation = 0.0, \
                                y_rotation = 0.0, \
                                z_rotation = -6.0, \
                                x_translation = 0, \
                                y_translation = 0, \
                                zoom = 1.0)

        elif ccnt == 4:
            img.rotation_corr(x_rotation = 0.0, \
                                y_rotation = 0.0, \
                                z_rotation = -2.0, \
                                x_translation = 0, \
                                y_translation = 0, \
                                zoom = 1.0)

        if mflag == 0:
            #g_match_threshold = float(g_uart_rxbuf[1]) / 100
            #print(g_match_threshold)
            r = img.find_template(template_s1, g_match_threshold, step=1, search=SEARCH_EX) #, roi=(10, 0, 60, 60))
            if r:
                mflag = 2
                break

        if mflag == 0:
            #g_match_threshold = float(g_uart_rxbuf[1]) / 100
            #print(g_match_threshold)
            r = img.find_template(template_s2, g_match_threshold, step=1, search=SEARCH_EX) #, roi=(10, 0, 60, 60))
            if r:
                mflag = 3
                break

        if mflag == 0:
            #g_match_threshold = float(g_uart_rxbuf[1]) / 100
            #print(g_match_threshold)
            r = img.find_template(template_s0, g_match_threshold, step=1, search=SEARCH_EX) #, roi=(10, 0, 60, 60))
            if r:
                mflag = 1
                break

        ccnt = ccnt + 1
    ####################################################33


    if mflag == 1:     # 空商标
        pyb.LED(RED_LED_PIN).on()
        img.draw_string(35, 15, "NC", scale=1)
        uart.write("0")

    elif mflag == 2:     # 正模板匹配
        pyb.LED(BLUE_LED_PIN).on()
        img.draw_rectangle(r)
        img.draw_string(35, 15, "OK", scale=1)
        lcd.display(img)
        uart.write("1")

    elif mflag == 3:     # 反模板匹配
        pyb.LED(RED_LED_PIN).on()
        img.draw_string(35, 15, "IN", scale=1)
        uart.write("2")

    elif mflag == 0:     # 商标错误
        pyb.LED(RED_LED_PIN).on()
        img.draw_string(35, 15, "ER", scale=1)
        uart.write("3")


    time.sleep(100)
    pyb.LED(RED_LED_PIN).off()
    pyb.LED(BLUE_LED_PIN).off()

    #print(clock.fps())


""" 拍照工作模式执行函数 """
def Snapshot():
    #sensor.skip_frames(time = 10)
    #time.sleep(100)
    #img = sensor.snapshot()
    img = sensor.snapshot().rotation_corr(x_rotation = 0.0, \
                                              y_rotation = 0.0, \
                                              z_rotation = -90, \
                                              x_translation = 0, \
                                              y_translation = 0, \
                                              zoom = 1.0)

    # Run the kernel on every pixel of the image.
    img.laplacian(1, sharpen=True)

    img.draw_rectangle(40, 10, 80, 100, color = (255, 255, 255), thickness = 2, fill = False)

    lcd.display(img) # Take a picture and display the image.


""" 拍照并保存匹配比较空板函数 """
def SaveImage0():
    pyb.LED(RED_LED_PIN).on()
    sensor.skip_frames(time = 1000) # Give the user time to get ready.

    pyb.LED(RED_LED_PIN).off()
    pyb.LED(BLUE_LED_PIN).on()

    print("You're on camera!")
    #img = sensor.snapshot()
    img = sensor.snapshot().rotation_corr(x_rotation = 0.0, \
                                              y_rotation = 0.0, \
                                              z_rotation = -90, \
                                              x_translation = 0, \
                                              y_translation = 0, \
                                              zoom = 1.0)

    # Run the kernel on every pixel of the image.
    img.laplacian(1, sharpen=True)

    img.save("s0.pgm",(40, 10, 80, 100)) # or "example.bmp" (or others)

    pyb.LED(BLUE_LED_PIN).off()
    print("Done! Reset the camera to see the saved image.")
    uart.write("r")


""" 拍照并保存匹配比较正模板函数 """
def SaveImage1():
    pyb.LED(RED_LED_PIN).on()
    sensor.skip_frames(time = 1000) # Give the user time to get ready.

    pyb.LED(RED_LED_PIN).off()
    pyb.LED(BLUE_LED_PIN).on()

    print("You're on camera!")
    #img = sensor.snapshot()
    img = sensor.snapshot().rotation_corr(x_rotation = 0.0, \
                                              y_rotation = 0.0, \
                                              z_rotation = -90, \
                                              x_translation = 0, \
                                              y_translation = 0, \
                                              zoom = 1.0)

    # Run the kernel on every pixel of the image.
    img.laplacian(1, sharpen=True)

    img.save("s1.pgm",(40, 10, 80, 100)) # or "example.bmp" (or others)

    pyb.LED(BLUE_LED_PIN).off()
    print("Done! Reset the camera to see the saved image.")
    uart.write("s")

""" 拍照并保存匹配比较反模板函数 """
def SaveImage2():
    pyb.LED(RED_LED_PIN).on()
    sensor.skip_frames(time = 1000) # Give the user time to get ready.

    pyb.LED(RED_LED_PIN).off()
    pyb.LED(BLUE_LED_PIN).on()

    print("You're on camera!")
    #img = sensor.snapshot()
    img = sensor.snapshot().rotation_corr(x_rotation = 0.0, \
                                              y_rotation = 0.0, \
                                              z_rotation = -90, \
                                              x_translation = 0, \
                                              y_translation = 0, \
                                              zoom = 1.0)

    # Run the kernel on every pixel of the image.
    img.laplacian(1, sharpen=True)

    img.save("s2.pgm",(40, 10, 80, 100)) # or "example.bmp" (or others)

    pyb.LED(BLUE_LED_PIN).off()
    print("Done! Reset the camera to see the saved image.")
    uart.write("t")


""" 按钮处理函数 """
"""
def ButtonProcess():
    global g_pin7ScanSta
    #global g_pin8ScanSta

    if g_pin7ScanSta == 0:
        if pin7.value()==0:
            g_pin7ScanSta = 1
            SaveImage()
    else:
        if pin7.value()==1:
            g_pin7ScanSta = 0
"""


""" Main Loop """
global g_timer_100ms
g_timer_100ms = 0
global g_timer_20ms
g_timer_20ms = 0


global g_uart_msg
global g_uart_half_msg
g_uart_half_msg = 0


while (True):
    #sensor.skip_frames(time = 500)

    time.sleep(1)  # Main loop 执行周期为1ms

    #UART_RecvProcess()

    g_timer_100ms += 1
    if g_timer_100ms == 100:
        g_timer_100ms = 0
        Snapshot()
        #ButtonProcess()


    #for i in range(uart.any()):
        #UART_RecvProcess(uart.readchar())


    if uart.any() >= 17:
        g_uart_msg = uart.readline().decode().strip()

        if len(g_uart_msg) == 17 and g_uart_msg[:1] == 'A':
            a = g_uart_msg.split(',')
            g_uart_rxbuf[0] = int(a[1])
            g_uart_rxbuf[1] = int(a[2])
            g_uart_rxbuf[2] = int(a[3])
            g_uart_rxbuf[3] = int(a[4])

            #print(g_uart_rxbuf[0])
            #print(g_uart_rxbuf[1])
            #print(g_uart_rxbuf[2])
            #print(g_uart_rxbuf[3])
            UART_RecvProcess()
-
@ri1k
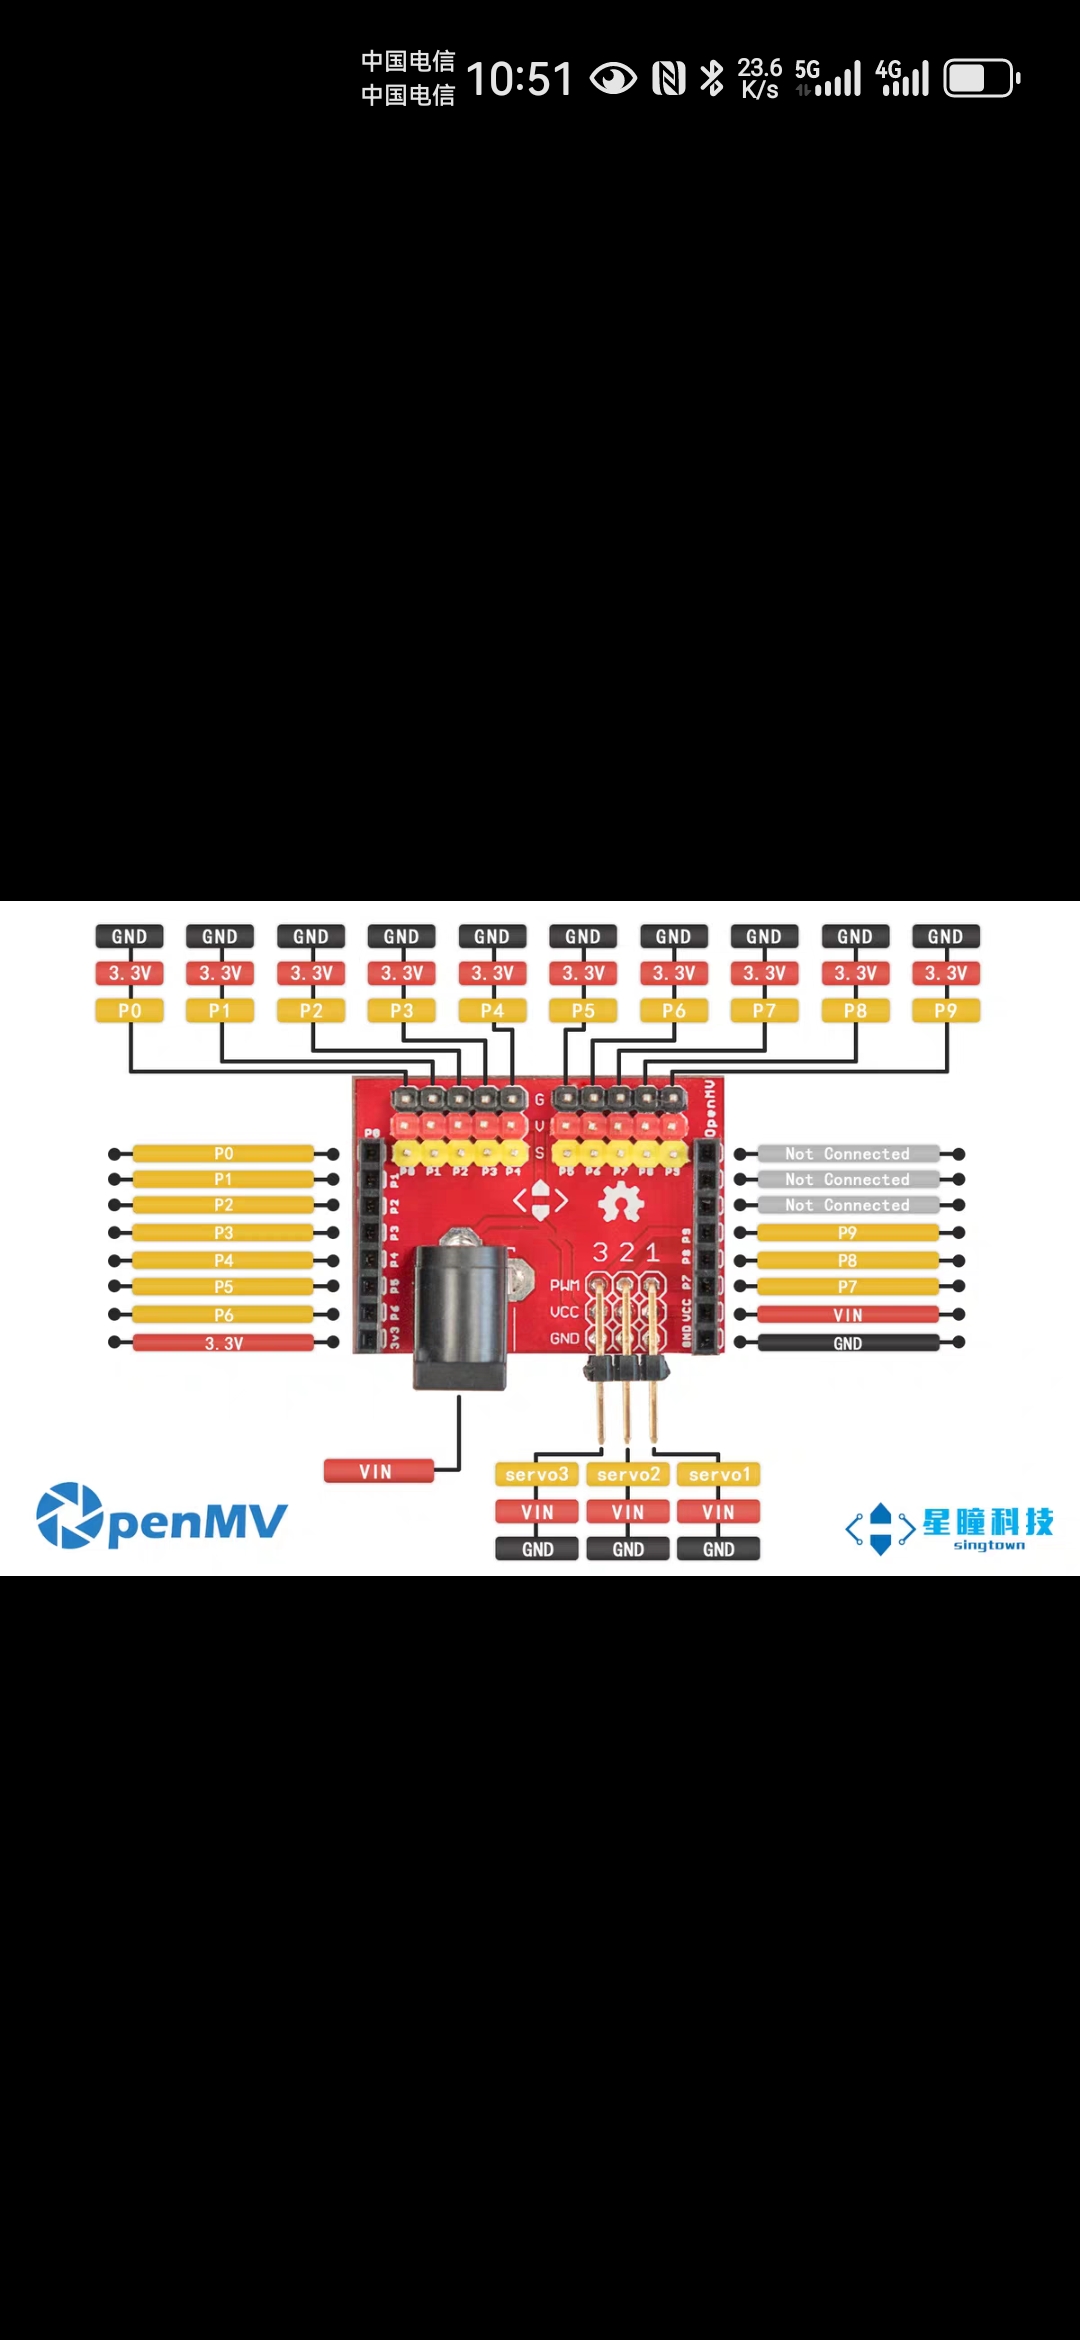
买了这IO模块
-
请技术帮我处理一下 感谢
-
代码需要你自己编写,我只能负责回答问题。
-
就是怎么也该不了呀
-
@kidswong999 需要安装穿裤助手吗
-
@kidswong999 
这是什么问题