set_pixel写入的值和用get_pixel读到的值不一样
-
我刚写入一个像素点的值,再立马读这个像素点的数据就不一样了是怎么回事
# Untitled - By: 22096 - 周日 4月 16 2023

import sensor, image, time

sensor.reset()
sensor.set_pixformat(sensor.RGB565)
sensor.set_framesize(sensor.QVGA)
sensor.skip_frames(time = 2000)

clock = time.clock()
def rgb_to_hsv(color_rgb):
    r,g,b = color_rgb[0]/255.0, color_rgb[1]/255.0, color_rgb[2]/255.0
    max_val = max(r, g, b)
    min_val = min(r, g, b)
    diff = max_val - min_val
    if max_val == min_val:
        h = 0
    elif max_val == r:
        h = (60 * ((g-b)/diff) + 360) % 360
    elif max_val == g:
        h = (60 * ((b-r)/diff) + 120) % 360
    else:
        h = (60 * ((r-g)/diff) + 240) % 360

    if max_val == 0:
        s = 0
    else:
        s = (diff/max_val)*100

    v = max_val*100

    return (int(h),int(s),int(v))

img = sensor.snapshot()

for j in range(img.height()):
    for i in range(img.width()):
        color_rgb = img.get_pixel(i,j)
        color_hsv = rgb_to_hsv(color_rgb)   # 要写入的值
        img.set_pixel(i,j,color_hsv)        # 写入
        if ( (3 == i) and ( 31 == j ) ):
            print(color_rgb)
            print(color_hsv)
            print(img.get_pixel(i,j))       # 再读这个值就和要写入的不一样了
-
Image对象是RGB565格式,你写hsv不行的。
-
@kidswong999 写入的内容代表的意义不重要,重要的是它和我想写入的值不一样是因为什么,写入一个值,读到的却是另一个值
# Hello World Example
#
# Welcome to the OpenMV IDE! Click on the green run arrow button below to run the script!

import sensor, image, time

sensor.reset()                      # Reset and initialize the sensor.
sensor.set_pixformat(sensor.RGB565) # Set pixel format to RGB565 (or GRAYSCALE)
sensor.set_framesize(sensor.QVGA)   # Set frame size to QVGA (320x240)
sensor.skip_frames(time = 2000)     # Wait for settings take effect.
clock = time.clock()                # Create a clock object to track the FPS.

img = sensor.snapshot()         # Take a picture and return the image.

print(img.get_pixel(11,11))
img.set_pixel(11,11,(2,5,1))    # 在(11,11)这个坐标的像素里写入rgb值(2,5,1)
print(img.get_pixel(11,11))    # 立刻读刚刚写入的位置,结果却是(0,4,0)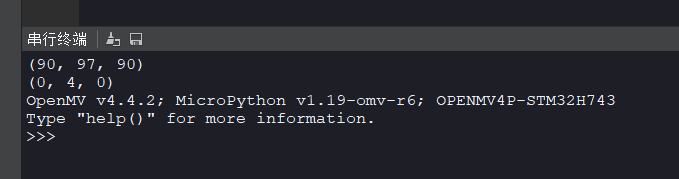
-
是因为RGB565,一共2个字节,你存的是888。会只保留R的高5位,G的高6位,B的高5位。