使用openmv4 plus串口发送一串数据,数据里面有一个数据是错误的?
-
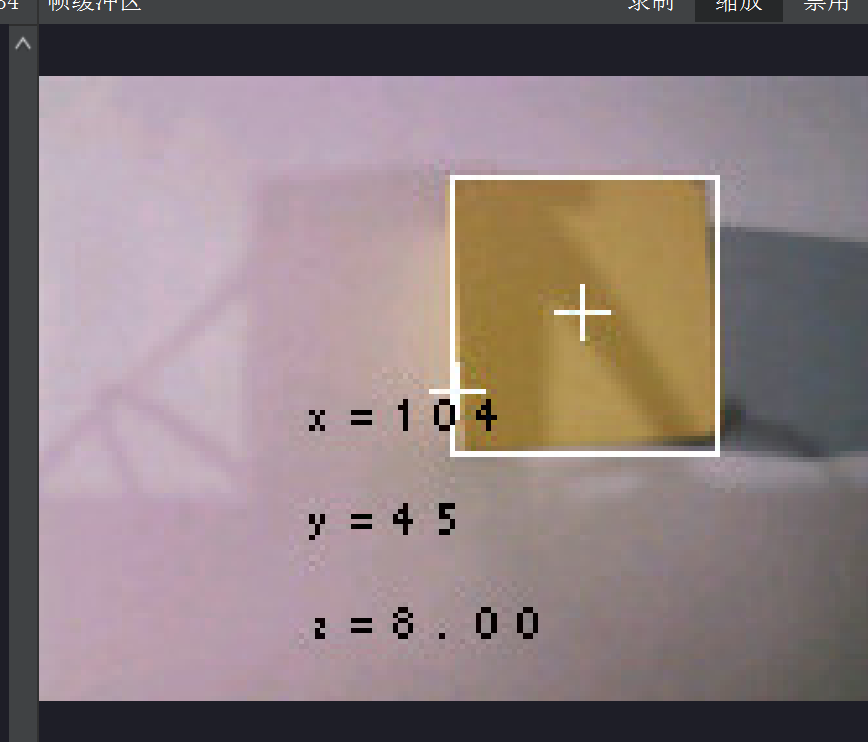
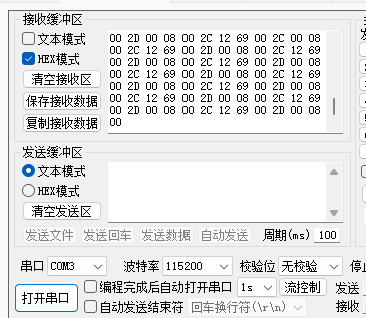
import sensor, image, time, lcd, ustruct
from pyb import UART
from pyb import LED
# 颜色追踪的例子,一定要控制环境的光,保持光线是稳定的。
threshold_yellow   =(36, 64, -32, 21, 21, 78)#黄色
threshold_blue    =(16, 50, -83, 36, -87, -36)#蓝色
threshold_red   =(0, 24, 14, 42, -12, 23)#红色
threshold_green =  (9, 27, -54, -9, -6, 34)#绿色
size_threshold= 2000        #图像非常近
ROI=[40,60,34,70]        #感兴趣区域
sensor.reset() # 初始化摄像头
sensor.set_pixformat(sensor.RGB565) # 格式为 RGB565.
sensor.set_framesize(sensor.QQVGA) # 使用 QQVGA 速度快一些
sensor.skip_frames(time = 2000) # 跳过2000s,使新设置生效,并自动调节白平衡
sensor.set_auto_gain(False) # 关闭自动自动增益。默认开启的,在颜色识别中,一定要关闭白平衡。
sensor.set_auto_whitebal(False)
#sensor.set_windowing(ROI)   #设置窗口大小
#关闭白平衡。白平衡是默认开启的,在颜色识别中,一定要关闭白平衡。
clock = time.clock() # 追踪帧率
lcd.init() # LCD初始化
uart = UART(3, 115200)  #串口初始化,P4为TX,P5为RX
uart.init(115200, bits=8, parity=None,timeout=1000, read_buf_len=128)  #8位数据位,无校验位,1位停止位、
K=450   #距离=k/直径的像素,像素为Lm,测得15cm,像素点为30,k=15*30=450,同理该公式可以用于测量大小,实际大小=k*直径的像素
k2=0.1  #3/30,但是测量大小只适合位置固定的物体
flag_yellow=0  #选择颜色输出标志位
flag_blue=0  #选择颜色输出标志位
flag_red=0  #选择颜色输出标志位
flag_green=0  #选择颜色输出标志位

def sending_data(cx,cy,cz):
    global uart;
    data = ustruct.pack("<bbhhh",      #格式为俩个字符俩个短整型(2字节)
                   0x2C,                      #帧头1
                   0x12,                      #帧头2
                   int(cx), # up sample by 4   #数据1
                   int(cy), # up sample by 4    #数据2
                   int(cz), # up sample by 4    #数据1
                       )
    uart.write(data);   #必须要传入一个字节数组

while(True):
    clock.tick()
    img = sensor.snapshot() # 从感光芯片获得一张图像
    img.draw_cross(80, 60) # 在图像中间画十字
    blob_yellow = img.find_blobs([threshold_yellow],x_stride=20,y_stride=20,invert=False)
    blob_blue = img.find_blobs([threshold_blue],x_stride=20,y_stride=20,invert=False)
    blob_red = img.find_blobs([threshold_red],x_stride=15,y_stride=15,invert=False)
    blob_green = img.find_blobs([threshold_green],x_stride=15,y_stride=15,invert=False)

    if blob_yellow:
    #如果找到了目标颜色
        flag_yellow=1
        for Y in blob_yellow:        #迭代找到的目标颜色区域
            img.draw_rectangle(Y[0:4]) # rect            #用矩形标记出目标颜色区域
            img.draw_cross(Y[5], Y[6]) # cx, cy            #在目标颜色区域的中心画十字形标记
            img.draw_cross(Y.cx(),Y.cy())
            Lm = (Y[2]+Y[3])/2  #b的像素宽,高,平均值
            cz = int(K/Lm)     #求出距离
            img.draw_string(50,60,'x='+str(Y.cx()),color=(0,0,0))
            img.draw_string(50,80,'y='+str(Y.cy()),color=(0,0,0))
            img.draw_string(50,100,'z='+'%.2f'%cz,color=(0,0,0))
            cx = Y.cx()
            cy = Y.cy()
           # FH = bytearray([0x2c,0x12,cx,cy,cz])
           # uart.write(FH)
          #  time.sleep_ms(1000)
            sending_data(cx,cy,cz)    #坐标发送
            time.sleep_ms(1000)
            #print(cx,cy,cz)
    lcd.display(img) # 显示图片
-
你说的数据是哪个不对,直接发送数据是对的吗?