为什么会报错 Out of fast Frame Buffer Stack Memory呢?
-
请在这里粘贴代码

# 旋转校正
#
# This example shows off how to use the rotation_corr() to both correct for
# perspective distortion and then to rotate the new corrected image in 3D
# space aftwards to handle movement.
# 这个例子展示了如何使用rotation_corr()来纠正透视图的失真,
# 然后在3D空间中向右旋转新的校正后的图像来处理移动。

import sensor, image, time

sensor.reset()
sensor.set_pixformat(sensor.RGB565)
sensor.set_framesize(sensor.QVGA)
sensor.skip_frames(time = 2000)
clock = time.clock()

# The image will be warped such that the following points become the new:
# 图像将变形,使以下几点成为新的:
#
#   (0,   0)
#   (w-1, 0)
#   (w-1, h-1)
#   (0,   h-1)
#
# Try setting the points below to the corners of a quadrilateral
# (in clock-wise order) in the field-of-view. You can get points
# on the image by clicking and dragging on the frame buffer and
# recording the values shown in the histogram widget.
# 试着把下面的点设置到一个四边形的角上(按时钟顺序)。
# 您可以通过单击和拖动帧缓冲区并记录histogram小部件中显示的值来获得图像上的点。

w = sensor.width()
h = sensor.height()

TARGET_POINTS = [(0,   0),   # (x, y) CHANGE ME!
                 (w-1, 0),   # (x, y) CHANGE ME!
                 (w-1, h-1), # (x, y) CHANGE ME!
                 (0,   h-1)] # (x, y) CHANGE ME!

# Degrees per frame to rotation by...
# 每帧旋转的角度…
X_ROTATION_DEGREE_RATE = 5
Y_ROTATION_DEGREE_RATE = 0.5
Z_ROTATION_DEGREE_RATE = 0
X_OFFSET = 0
Y_OFFSET = 0

ZOOM_AMOUNT = 1 # Lower zooms out - Higher zooms in. 较低的值缩小-较高的放大
FOV_WINDOW = 25 # Between 0 and 180. Represents the field-of-view of the scene
                # window when rotating the image in 3D space. When closer to
                # zero results in lines becoming straighter as the window
                # moves away from the image being rotated in 3D space. A large
                # value moves the window closer to the image in 3D space which
                # results in the more perspective distortion and sometimes
                # the image in 3D intersecting the scene window.
                # 在0和180之间。表示在三维空间中旋转图像时场景窗口的视场。
                # 当接近于0时,随着窗口远离在三维空间中旋转的图像,直线会变得更直。
                # 在三维空间中,较大的值会使窗口更靠近图像,从而导致更多的透视畸变,
                # 有时会导致三维图像与场景窗口相交。

x_rotation_counter = 0
y_rotation_counter = 0
z_rotation_counter = 0

while(True):
    clock.tick()

    img = sensor.snapshot().rotation_corr(x_rotation = x_rotation_counter, \
                                          y_rotation = y_rotation_counter, \
                                          z_rotation = z_rotation_counter, \
                                          x_translation = X_OFFSET, \
                                          y_translation = Y_OFFSET, \
                                          zoom = ZOOM_AMOUNT, \
                                          fov = FOV_WINDOW, \
                                          corners = TARGET_POINTS)

    x_rotation_counter += X_ROTATION_DEGREE_RATE
    y_rotation_counter += Y_ROTATION_DEGREE_RATE
    z_rotation_counter += Z_ROTATION_DEGREE_RATE

    print(clock.fps())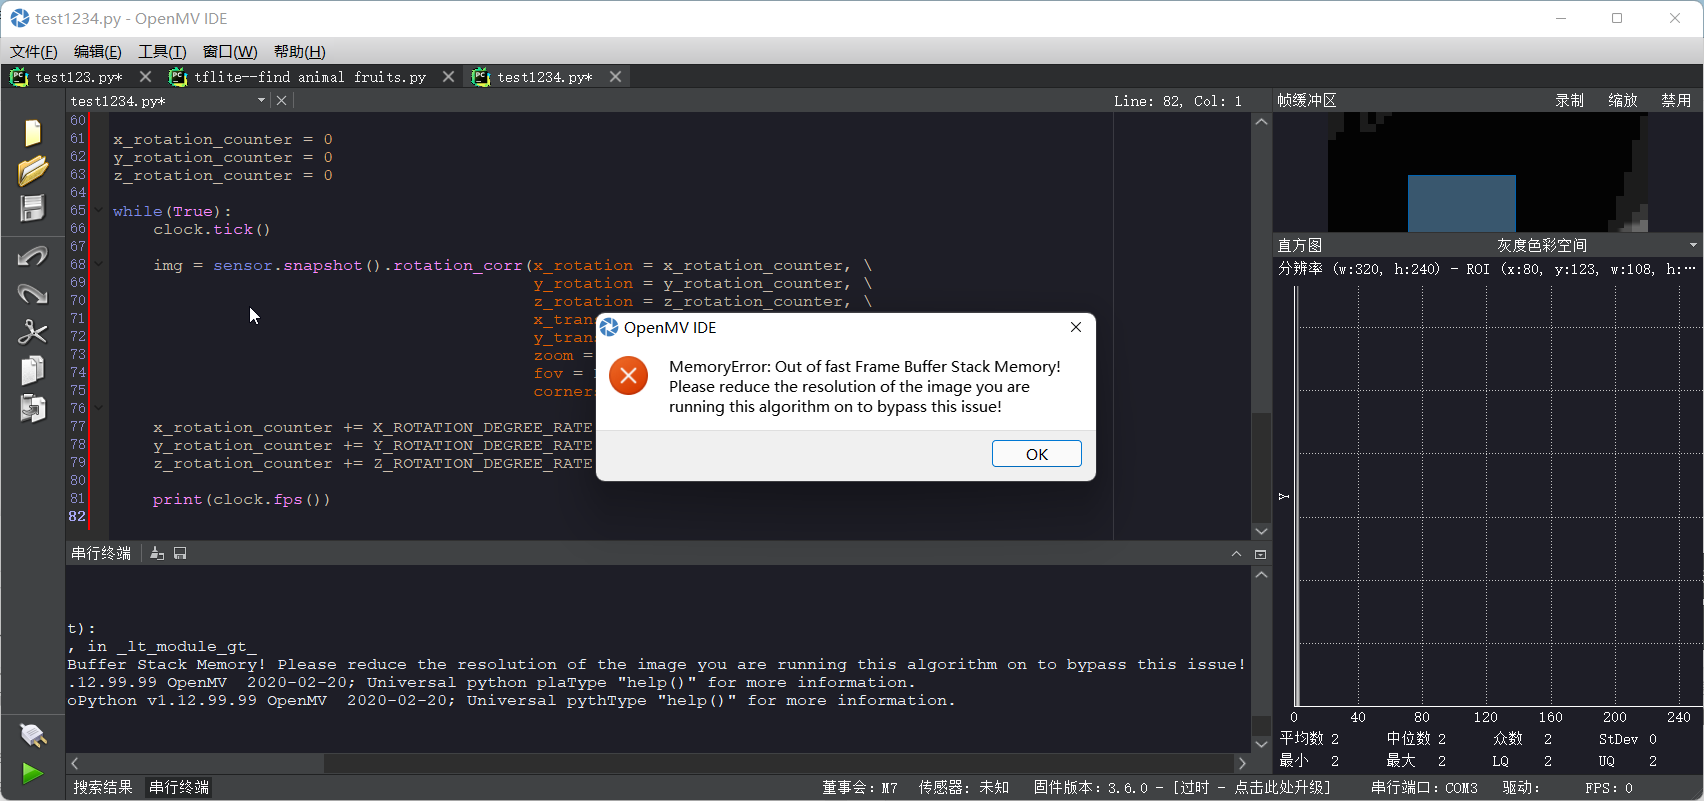
-
升级到最新固件。我使用OpenMV3测试没有出现错误。