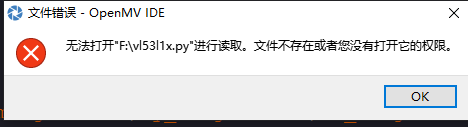
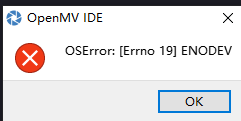
报错信息:
代码如下:
# Find Rects Example
#
# 这个例子展示了如何使用april标签代码中的四元检测代码在图像中找到矩形。
#四元检测算法以非常稳健的方式检测矩形,并且比基于Hough变换的方法好得多。
#例如,即使镜头失真导致这些矩形看起来弯曲,它仍然可以检测到矩形。 圆角矩形是没有问题的!
# (但是,这个代码也会检测小半径的圆)...

import sensor, image, time, pyb
from pyb import UART
from pyb import Pin
from machine import I2C
from vl53l1x import VL53L1X


i2c = I2C(2)
distance = VL53L1X(i2c)

p_out1 = Pin('P7', Pin.OUT_PP)#设置p_out为输出引脚
p_out2 = Pin('P8', Pin.OUT_PP)#设置p_out为输出引脚

p_out1.high()#设置p_out1引脚为高
p_out2.high()#设置p_out2引脚为高

led_red = pyb.LED(1)
led_green = pyb.LED(2)


uart = UART(3, 115200, timeout_char=1000)
sensor.reset()
sensor.set_pixformat(sensor.RGB565) # 灰度更快(160x120 max on OpenMV-M7)
sensor.set_framesize(sensor.QQVGA)
sensor.skip_frames(time = 2000)

clock = time.clock()


while(True):
    clock.tick()
    print("range: mm ", distance.read())
    img = sensor.snapshot()

    # 下面的`threshold`应设置为足够高的值,以滤除在图像中检测到的具有
    # 低边缘幅度的噪声矩形。最适用与背景形成鲜明对比的矩形。

    for r in img.find_rects(threshold = 10000):
        img.draw_rectangle(r.rect(), color = (255, 0, 0))
        for p in r.corners(): img.draw_circle(p[0], p[1], 5, color = (0, 255, 0))
        #led_red.on()
        p_out1.low()#设置p_out1引脚为低
        time.sleep_ms(150)
        #led_red.off()
        p_out1.high()#设置p_out1引脚为高
        uart.write("1\r\n")


#margin  圆的合并 分别由 x y z像素点主导
#r_min,r_max,r_step 控制测试圆的半径(缩小圆的半径效果会好)
#threshold 视野中检测的圆比较多 增大阈值
    for c in img.find_circles(threshold = 3500, x_margin = 10, y_margin = 10, r_margin = 10,r_min = 2, r_max = 100, r_step = 2):
       img.draw_circle(c.x(), c.y(), c.r(), color = (255, 0, 0))
       #led_green.on()
       #time.sleep_ms(150)
       #led_green.off()
       #led_red.on()
       p_out2.low()#设置p_out1引脚为低
       time.sleep_ms(150)
       #led_red.off()
       p_out2.high()#设置p_out1引脚为高
       uart.write("2\r\n")