THRESHOLD = (18, 61, 14, 89, -2, 63) # Grayscale threshold for dark things...
import sensor, image, time,ustruct
from pyb import UART,LED
#from pid import PID
#rho_pid = PID(p=0.4, i=0)
#theta_pid = PID(p=0.001, i=0)
import pyb
LED(1).on()
LED(2).on()
LED(3).on()
sensor.reset()
#sensor.set_vflip(True)
#sensor.set_hmirror(True)
sensor.set_pixformat(sensor.RGB565)
sensor.set_framesize(sensor.QQQVGA) # 80x60 (4,800 pixels) - O(N^2) max = 2,3040,000.
#sensor.set_windowing([0,20,80,40])
sensor.skip_frames(time = 2000) # WARNING: If you use QQVGA it may take seconds
clock = time.clock() # to process a frame sometimes.
uart = UART(3,115200) #定义串口3变量
uart.init(115200, bits=8, parity=None, stop=1) # init with given parameters
#识别区域
roi1 = [(0, 17, 15, 25), # 左 x y w h
(65,17,15,25),# 右
(30,0,20,15),#上
(0,0,80,60)]#停车
def outuart(x,a,flag):
global uart;
f_x=0
f_a=0
if flag==0:
if x<0:
x=-x
f_x=1
if a<0:
a=-a
f_a=1
if flag==1: #十字
x,a,f_x,f_a=(0,0,0,1)
if flag==2: #上左
x,a,f_x,f_a=(0,0,1,0)
if flag==3: #上右
x,a,f_x,f_a=(0,0,1,1)
if flag==4: #stop
x,a,f_x,f_a=(1,1,1,2)
#frame=[0x2C,18,cx%0xff,int(cx/0xff),cy%0xff,int(cy/0xff),0x5B];
#data = bytearray(frame)
data = ustruct.pack("<bbhhhhb", #格式为俩个字符俩个短整型(2字节)
0x2C, #帧头1
0x12, #帧头2
int(x), # up sample by 4 #数据1
int(a), # up sample by 4 #数据2
int(f_x), # up sample by 4 #数据1
int(f_a), # up sample by 4 #数据2
0x5B)
if flag!=1:
uart.write(data); #必须要传入一个字节数组
else:
for x in range(50):
uart.write(data); #必须要传入一个字节数组
time.sleep_ms(1)
p9_flag=0 #p9需检测从低变高
not_stop=0
while(True):
clock.tick()
img = sensor.snapshot().binary([THRESHOLD])
line = img.get_regression([(100,100)], robust = True)
left_flag,right_flag,up_flag=(0,0,0)
for rec in roi1:
img.draw_rectangle(rec, color=(255,0,0))#绘制出roi区域
p = pyb.Pin("P9", pyb.Pin.IN)
print(p.value())
if p.value()==0:
p9_flag=1
if p.value()==1 and p9_flag==1:
not_stop=1
p9_flag=0
if (line):
rho_err = abs(line.rho())-img.width()/2
if line.theta()>90:
theta_err = line.theta()-180
else:
theta_err = line.theta()
#直角坐标调整
img.draw_line(line.line(), color = 127)
#画出直线
#print(rho_err,line.magnitude(),rho_err)
if line.magnitude()>8:
#if -40<b_err<40 and -30<t_err<30:
#rho_pid直线左右偏移的距离,theta_err角度偏移
#rho_output = rho_pid.get_pid(rho_err,1)
#theta_output = theta_pid.get_pid(theta_err,1)
#output = rho_output+theta_output
outdata=[rho_err,theta_err,0]
print(outdata)
outuart(rho_err,theta_err,0)
if img.find_blobs([(96, 100, -13, 5, -11, 18)],roi=roi1[0]): #left
#print('left')
left_flag=1
if img.find_blobs([(96, 100, -13, 5, -11, 18)],roi=roi1[1]): #right
#print('right')
right_flag=1
if img.find_blobs([(96, 100, -13, 5, -11, 18)],roi=roi1[2]): #up
#print('up')
up_flag=1
#if not img.find_blobs([(96, 100, -13, 5, -11, 18)],roi=roi1[3]): #stop
##print('up')
#stop_flag=1
if left_flag==1 and right_flag==1:
outuart(0,0,1)
#time.sleep_ms(5)
print('shizi')
continue
if left_flag==1 and up_flag==1:
outuart(0,0,2)
print('up-left')
continue
if right_flag==1 and up_flag==1:
outuart(0,0,3)
print('up-right')
continue
#if stop_flag==1:
#outuart(0,0,4)
#print('stop')
#continue
#car.run(50+output, 50-output)
else:
#outuart(0,0,4)
##car.run(0,0)
#print('stop')
pass
else:
#car.run(50,-50)
outuart(0,0,4)
#if not_stop==1:
#time.sleep_ms(1000)
#not_stop=0
print('stop')
#print(clock.fps())
F
fwrd
@fwrd
0
声望
2
楼层
145
资料浏览
0
粉丝
0
关注
fwrd 发布的帖子
-
串口通信,openmvide串行终端发送的数据和星瞳助手接收的数据不一样?
-
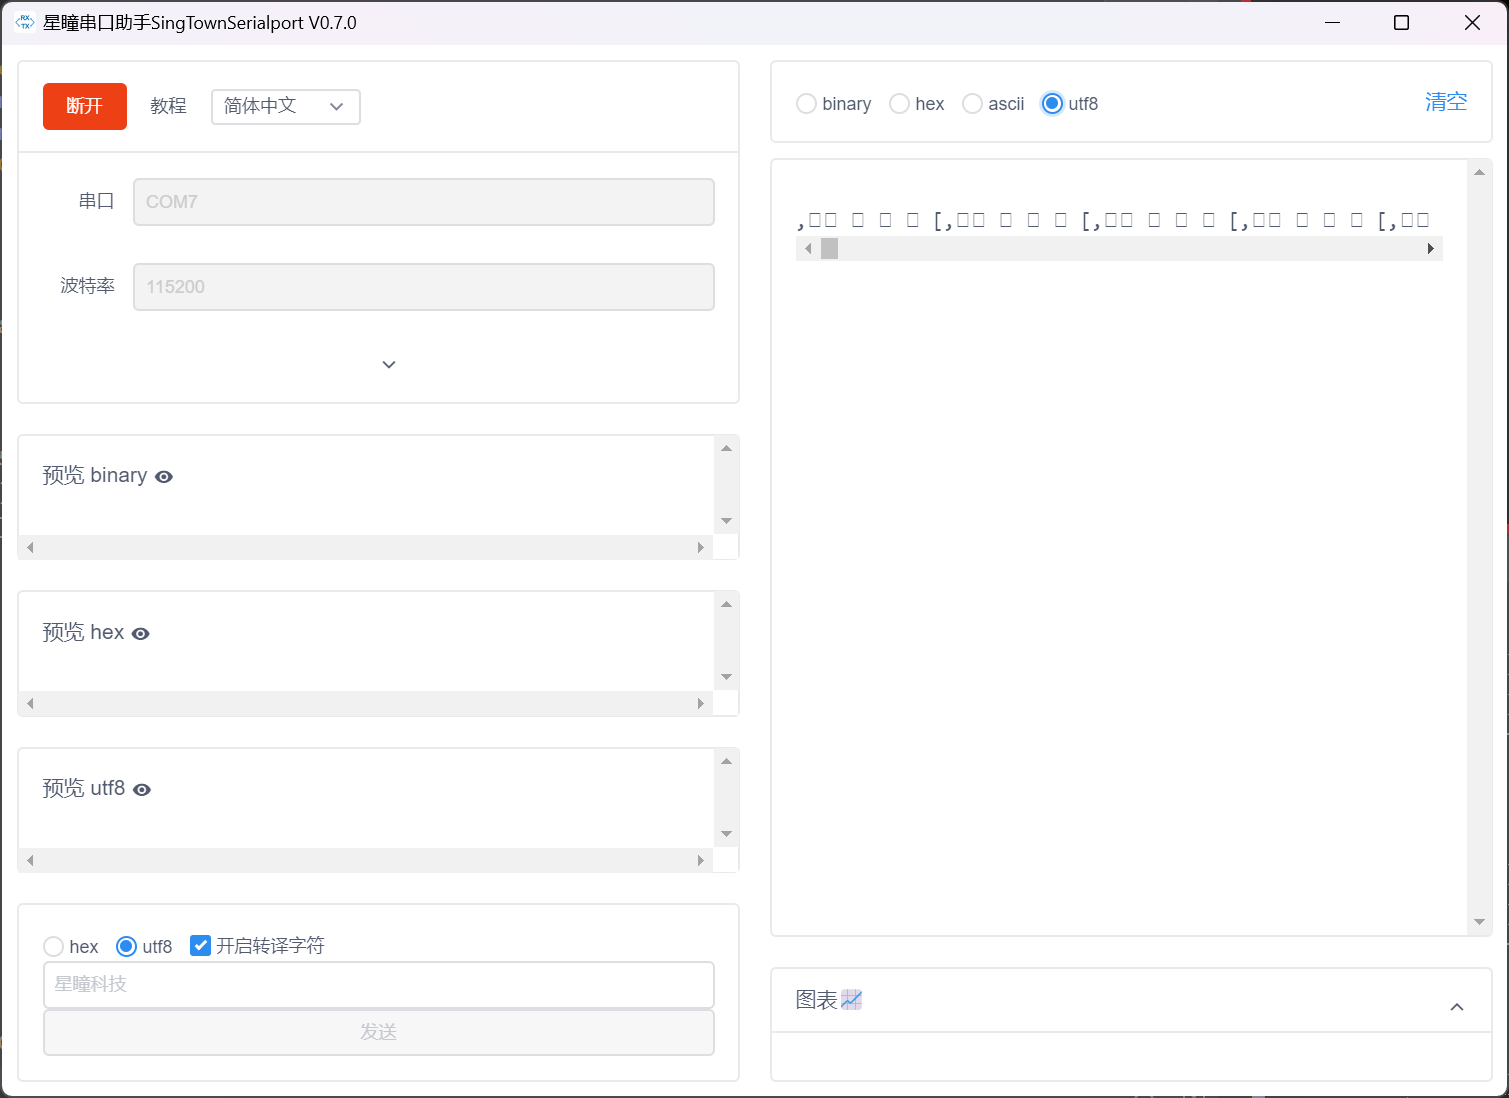
串口通信时,openmvide中串行终端的数据与星瞳串口助手发送的数据不一样,并且星瞳串口助手出现乱码,为什么?
![0_1720663314270_1C7E68DB-4A5A-4A0D-9FCB-0BDB821ECF86.jpeg](正在上传 0%)
THRESHOLD = (32, 6, -23, 9, -18, 45) # Grayscale threshold for dark things... import sensor, image, time,ustruct from pyb import UART,LED #from pid import PID #rho_pid = PID(p=0.4, i=0) #theta_pid = PID(p=0.001, i=0) import pyb LED(1).on() LED(2).on() LED(3).on() sensor.reset() #sensor.set_vflip(True) #sensor.set_hmirror(True) sensor.set_pixformat(sensor.RGB565) sensor.set_framesize(sensor.QQQVGA) # 80x60 (4,800 pixels) - O(N^2) max = 2,3040,000. #sensor.set_windowing([0,20,80,40]) sensor.skip_frames(time = 2000) # WARNING: If you use QQVGA it may take seconds clock = time.clock() # to process a frame sometimes. uart = UART(3,115200) #定义串口3变量 uart.init(115200, bits=8, parity=None, stop=1) # init with given parameters #识别区域 roi1 = [(0, 17, 15, 25), # 左 x y w h (65,17,15,25),# 右 (30,0,20,15),#上 (0,0,80,60)]#停车 def outuart(x,a,flag): #x,a,两个标志变量flag global uart; f_x=0 f_a=0 if flag==0: #判断flag是否为0 if x<0: x=-x f_x=1 if a<0: a=-a f_a=1 if flag==1: #十字 x,a,f_x,f_a=(0,0,0,1) if flag==2: #上左 x,a,f_x,f_a=(0,0,1,0) if flag==3: #上右 x,a,f_x,f_a=(0,0,1,1) if flag==4: #stop x,a,f_x,f_a=(1,1,1,2) #frame=[0x2C,18,cx%0xff,int(cx/0xff),cy%0xff,int(cy/0xff),0x5B]; #data = bytearray(frame) data = ustruct.pack("<bbhhhhb", #格式为俩个字符俩个短整型(2字节) 0x2C, #帧头1 0x12, #帧头2 int(x), # up sample by 4 #数据1 int(a), # up sample by 4 #数据2 int(f_x), # up sample by 4 #数据1 int(f_a), # up sample by 4 #数据2 0x5B) if flag!=1: uart.write(data); #必须要传入一个字节数组 else: for x in range(50): uart.write(data); #必须要传入一个字节数组 time.sleep_ms(1) p9_flag=0 #p9需检测从低变高 not_stop=0 while(True): clock.tick() img = sensor.snapshot().binary([THRESHOLD]) line = img.get_regression([(100,100)], robust = True) left_flag,right_flag,up_flag=(0,0,0) for rec in roi1: img.draw_rectangle(rec, color=(255,0,0))#绘制出roi区域 p = pyb.Pin("P9", pyb.Pin.IN) print(p.value()) if p.value()==0: p9_flag=1 if p.value()==1 and p9_flag==1: not_stop=1 p9_flag=0 if (line): rho_err = abs(line.rho())-img.width()/2 #偏移误差 if line.theta()>90: theta_err = line.theta()-180 #角度误差 else: theta_err = line.theta() #直角坐标调整 img.draw_line(line.line(), color = 127) #画出直线 #print(rho_err,line.magnitude(),rho_err) if line.magnitude()>8: #if -40<b_err<40 and -30<t_err<30: #rho_pid直线左右偏移的距离,theta_err角度偏移 #rho_output = rho_pid.get_pid(rho_err,1) #theta_output = theta_pid.get_pid(theta_err,1) #output = rho_output+theta_output outdata=[rho_err,theta_err,0] print(outdata) outuart(rho_err,theta_err,0) if img.find_blobs([(96, 100, -13, 5, -11, 18)],roi=roi1[0]): #left #print('left') left_flag=1 if img.find_blobs([(96, 100, -13, 5, -11, 18)],roi=roi1[1]): #right #print('right') right_flag=1 if img.find_blobs([(96, 100, -13, 5, -11, 18)],roi=roi1[2]): #up #print('up') up_flag=1 #if not img.find_blobs([(96, 100, -13, 5, -11, 18)],roi=roi1[3]): #stop ##print('up') #stop_flag=1 if left_flag==1 and right_flag==1: outuart(0,0,1) #time.sleep_ms(5) print('shizi') continue if left_flag==1 and up_flag==1: outuart(0,0,2) print('up-left') continue if right_flag==1 and up_flag==1: outuart(0,0,3) print('up-right') continue #if stop_flag==1: #outuart(0,0,4) #print('stop') #continue #car.run(50+output, 50-output) else: #outuart(0,0,4) ##car.run(0,0) #print('stop') pass else: #car.run(50,-50) outuart(0,0,4) #if not_stop==1: #time.sleep_ms(1000) #not_stop=0 print('stop') #print(clock.fps()) ![0_1720663551383_9CBE1AB9-CCAA-4448-98B1-9223BD0C69AB.jpeg](正在上传 0%)
![0_1720663571317_image.jpg](正在上传 0%)![0_1720663607261_212D8C0D-7C66-4EDF-A6F3-B66EA91FE68D.jpeg](正在上传 0%)