求好心人提供最新版本固件源码,克隆GitHub上的断流了好多次
C
clgd
@clgd
0
声望
37
楼层
3274
资料浏览
2
粉丝
0
关注
clgd 发布的帖子
-
接了一个AMG8833的模块,使用官网的例程,没报错但是获取的数值都是0发布在 OpenMV Cam
# AMG8833 Overlay Demo
#
# This example shows off how to overlay a heatmap onto your OpenMV Cam's
# live video output from the main camera.

import sensor, image, time, fir

ALT_OVERLAY = False # Set to True to allocate a second ir image.

sensor.reset()
sensor.set_pixformat(sensor.RGB565)
sensor.set_framesize(sensor.QQVGA)
sensor.skip_frames(time = 2000)

# Initialize the thermal sensor
fir.init(type=fir.FIR_AMG8833)

# Allocate another frame buffer for smoother video.
extra_fb = sensor.alloc_extra_fb(sensor.width(), sensor.height(), sensor.RGB565)

# FPS clock
clock = time.clock()

while (True):
    clock.tick()

    # Capture an image
    img = sensor.snapshot()

    # Capture FIR data
    #   ta: Ambient temperature
    #   ir: Object temperatures (IR array)
    #   to_min: Minimum object temperature
    #   to_max: Maximum object temperature
    ta, ir, to_min, to_max = fir.read_ir()

    if not ALT_OVERLAY:
        # Scale the image and belnd it with the framebuffer
        fir.draw_ir(img, ir)
    else:
        # Create a secondary image and then blend into the frame buffer.
        extra_fb.clear()
        fir.draw_ir(extra_fb, ir, alpha=256)
        img.blend(extra_fb, alpha=128)

    # Draw ambient, min and max temperatures.
    img.draw_string(8, 0, "Ta: %0.2f C" % ta, color = (255, 0, 0), mono_space = False)
    img.draw_string(8, 8, "To min: %0.2f C" % to_min, color = (255, 0, 0), mono_space = False)
    img.draw_string(8, 16, "To max: %0.2f C"% to_max, color = (255, 0, 0), mono_space = False)

    # Force high quality streaming...
    img.compress(quality=90)

    # Print FPS.
    print(clock.fps())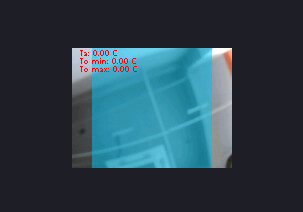
-
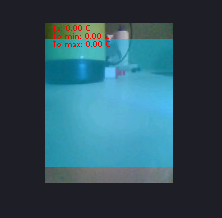
请问AMG8833拓展板如何与openmvm7硬件连接?发布在 OpenMV Cam
我将AMG8833的i2c口对接到OPENMV的P4,P5,
但是运行例程时AMG8833在IDE无数据,程序如下# AMG8833 Overlay Demo # # This example shows off how to overlay a heatmap onto your OpenMV Cam's # live video output from the main camera. import sensor, image, time, fir, lcd ALT_OVERLAY = False # Set to True to allocate a second ir image. sensor.reset() sensor.set_pixformat(sensor.RGB565) sensor.set_framesize(sensor.QQVGA2) sensor.skip_frames(time = 2000) # Initialize the thermal sensor fir.init(type=fir.FIR_AMG8833) # Init the lcd. lcd.init() # Allocate another frame buffer for smoother video. extra_fb = sensor.alloc_extra_fb(sensor.width(), sensor.height(), sensor.RGB565) # FPS clock clock = time.clock() while (True): clock.tick() # Capture an image img = sensor.snapshot() # Capture FIR data # ta: Ambient temperature # ir: Object temperatures (IR array) # to_min: Minimum object temperature # to_max: Maximum object temperature ta, ir, to_min, to_max = fir.read_ir() if not ALT_OVERLAY: # Scale the image and belnd it with the framebuffer fir.draw_ir(img, ir) else: # Create a secondary image and then blend into the frame buffer. extra_fb.clear() fir.draw_ir(extra_fb, ir, alpha=256) img.blend(extra_fb, alpha=128) # Draw ambient, min and max temperatures. img.draw_string(8, 0, "Ta: %0.2f C" % ta, color = (255, 0, 0), mono_space = False) img.draw_string(8, 8, "To min: %0.2f C" % to_min, color = (255, 0, 0), mono_space = False) img.draw_string(8, 16, "To max: %0.2f C"% to_max, color = (255, 0, 0), mono_space = False) lcd.display(img) # Force high quality streaming... img.compress(quality=90) # Print FPS. print(clock.fps())IDE显示如下图,无数据显示
-
用到一个定时器,一个pwm,出现报错发布在 OpenMV Cam
用到一个定时器,一个pwm,出现报错ValueError: Pin(D12) doesn't have an af for Timer(2)
import sensor, image, time from pyb import Pin, Timer,LED sensor.reset() # Reset and initialize the sensor. sensor.set_pixformat(sensor.RGB565) # Set pixel format to RGB565 (or GRAYSCALE) sensor.set_framesize(sensor.QVGA) # Set frame size to QVGA (320x240) sensor.skip_frames(time = 2000) # Wait for settings take effect. RUN = LED(4) STATUE = LED(1) tim = Timer(4, prescaler=83,period=370) #驱动蜂鸣器 def BeepOn(): tim.channel(1, Timer.PWM, pin=Pin("P7"), pulse_width=187) #关闭蜂鸣器 def BeepOff(): tim.channel(1,Timer.PWM, pin=Pin("P7"), pulse_width=0) def tick(timer): # we will receive the timer object when being called RUN.toggle() tim = Timer(2, freq=1) # create a timer object using timer 4 - trigger at 1Hz tim.callback(tick) # set the callback to our tick function BeepOn() while(True): img = sensor.snapshot() # Take a picture and return the image. # to the IDE. The FPS should increase once disconnected. -
定时器调用出现报错,IDE获取的画面停止,模块与电脑断开发布在 OpenMV Cam
之前发现这个问题,但是没得到解决
import sensor, image, time
from pyb import Pin, Timer

sensor.reset()                      # Reset and initialize the sensor.
sensor.set_pixformat(sensor.RGB565) # Set pixel format to RGB565 (or GRAYSCALE)
sensor.set_framesize(sensor.QVGA)   # Set frame size to QVGA (320x240)
sensor.skip_frames(time = 2000)     # Wait for settings take effect.

RUN = LED(4)
clock = time.clock()                # Create a clock object to track the FPS.
def tick(timer):            # we will receive the timer object when being called
    RUN.toggle()

tim = Timer(4, freq=1)      # create a timer object using timer 4 - trigger at 1Hz
tim.callback(tick)          # set the callback to our tick function


while(True):
    img = sensor.snapshot()         # Take a picture and return the image.
                                    # to the IDE. The FPS should increase once disconnected.
