导航

    • 登录
    • 搜索
    • 版块
    • 产品
    • 教程
    • 论坛
    • 淘宝
    1. 主页
    2. 5ewo
    3. 楼层
    5
    • 举报资料
    • 资料
    • 关注
    • 粉丝
    • 屏蔽
    • 帖子
    • 楼层
    • 最佳
    • 群组

    5ewo 发布的帖子

    • 在循环中,串口应如何关闭?

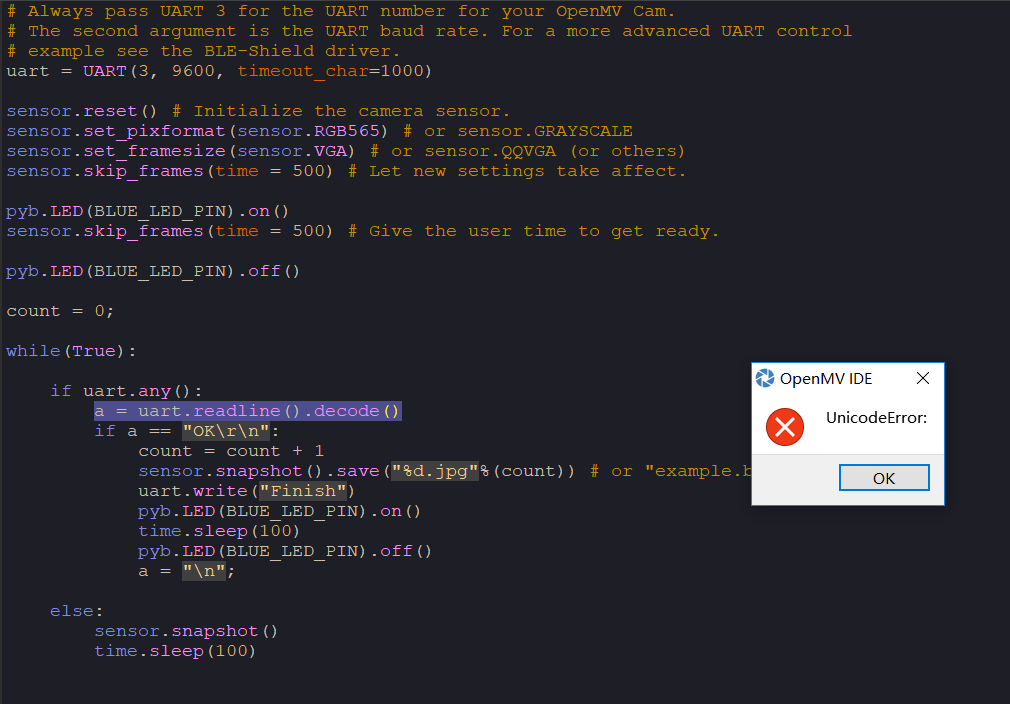
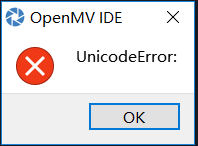
      我想用OPEN MV串口3接收外界发送的一个信号,判断此信号是否为“PIC”,然后是就通过串口发送一个字符串“Finish1”,不是就发送“Unfinish1”,用串口调试助手调试时发送一个“PIC”,返回一个“Finish1”,但接着返回了很多“Unfinish1”.我猜测是代码中循环时应该在第一个else里把串口关闭一次或者是我的判定有问题。代码如下:

      import sensor, image, pyb,time
      from pyb import UART
      RED_LED_PIN = 1
      BLUE_LED_PIN = 3
      uart = UART(3, 115200, timeout_char=1000)
      sensor.reset()
      sensor.set_pixformat(sensor.RGB565)
      sensor.set_framesize(sensor.VGA)
      sensor.skip_frames(time = 500)
      pyb.LED(RED_LED_PIN).off()
      pyb.LED(BLUE_LED_PIN).on()
      sensor.skip_frames(time = 500)
      print("You're on camera!")
      count = 0
      while(True):
          if uart.any():
              a = uart.readline().decode()
              if a == "PIC":
                  count = count + 1
                  sensor.snapshot().save("%d.jpg"%(count))
                  pyb.LED(1).on()
                  pyb.LED(3).off()
                  print("Done! Reset the camera to see the saved image.")
                  uart.write("Finish2")
                  print("Send Finish2.")
                  time.sleep(100)
                  pyb.LED(1).off()
                  pyb.LED(3).on()
                  a = "\n"
              else:
                  uart.write("Unfinish2")
                  print("Send Unfinish2.")
                  a = "\n"
          else:
              sensor.snapshot()
              time.sleep(100)
      
      发布在 OpenMV Cam
      5
      5ewo
    • 向OPENMV供电时,代码储存在SD卡中为何灯无显示?

      下面两份代码,为何前者一供电,蓝灯就亮,而后者不行,我分别把代码都放入SD卡中测试了,难道不是一供电,OPENMV就运行SD卡中的代码么?还是别的问题?

      # UART Control
      #
      # This example shows how to use the serial port on your OpenMV Cam. Attach pin
      # P4 to the serial input of a serial LCD screen to see "Hello World!" printed
      # on the serial LCD display.
      
      import sensor, image, pyb
      from pyb import UART
      
      RED_LED_PIN = 1
      BLUE_LED_PIN = 3
      
      sensor.reset() # Initialize the camera sensor.
      sensor.set_pixformat(sensor.RGB565) # or sensor.GRAYSCALE
      sensor.set_framesize(sensor.VGA) # or sensor.QQVGA (or others)
      
      
      pyb.LED(RED_LED_PIN).off()
      #pyb.LED(BLUE_LED_PIN).on()
      print("You're on camera!")
      
      # Always pass UART 3 for the UART number for your OpenMV Cam.
      # The second argument is the UART baud rate. For a more advanced UART control
      # example see the BLE-Shield driver.
      uart = UART(3, 9600, timeout_char=1000)
      
      while(True):
          pyb.LED(3).on()
          if uart.any():
              a = uart.readline().decode()
              print(a)
              if a == "OK\r\n":
                  sensor.snapshot().save("example1.jpg")
                  uart.write("F")
                  pyb.LED(BLUE_LED_PIN).off()
                  print("Done! Reset the camera to see the saved image.")
      
      # UART Control
      #
      # This example shows how to use the serial port on your OpenMV Cam. Attach pin
      # P4 to the serial input of a serial LCD screen to see "Hello World!" printed
      # on the serial LCD display.
      
      import sensor, image, pyb,time
      from pyb import UART
      
      RED_LED_PIN = 1
      BLUE_LED_PIN = 3
      
      # Always pass UART 3 for the UART number for your OpenMV Cam.
      # The second argument is the UART baud rate. For a more advanced UART control
      # example see the BLE-Shield driver.
      uart = UART(3, 9600, timeout_char=1000)
      
      sensor.reset() # Initialize the camera sensor.
      sensor.set_pixformat(sensor.RGB565) # or sensor.GRAYSCALE
      sensor.set_framesize(sensor.VGA) # or sensor.QQVGA (or others)
      sensor.skip_frames(time = 500) # Let new settings take affect.
      
      pyb.LED(RED_LED_PIN).off()
      sensor.skip_frames(time = 500) # Give the user time to get ready.
      
      print("You're on camera!")
      
      count = 0
      
      while(True):
          pyb.LED(3).on()
          if uart.any():
              a = uart.readline().decode()
              if a == "OK":
                  count = count + 1
                  sensor.snapshot().save("%d.jpg"%(count)) # or "example.bmp" (or others)
                  print("Done! Reset the camera to see the saved image.")
                  uart.write("Finish")
                  print("Send Finish.")
                  time.sleep(100)
                  pyb.LED(BLUE_LED_PIN).off()
                  a = "\n";
      
          else:
              sensor.snapshot()
              time.sleep(100)
      
      发布在 OpenMV Cam
      5
      5ewo
    • RE: 串口接收一字符再拍照,并输入一次拍一张?

      有大神帮忙解决一下么?万分感谢!

      发布在 OpenMV Cam
      5
      5ewo
    • 串口接收一字符再拍照,并输入一次拍一张?

      我想用arduino板子想OPENMV发送一字符让它拍照,且输入一次拍一张,如何实现?代码如下:

      # UART Control
      #
      # This example shows how to use the serial port on your OpenMV Cam. Attach pin
      # P4 to the serial input of a serial LCD screen to see "Hello World!" printed
      # on the serial LCD display.
      
      import sensor, image, pyb,time
      from pyb import UART
      
      BLUE_LED_PIN = 3
      
      # Always pass UART 3 for the UART number for your OpenMV Cam.
      # The second argument is the UART baud rate. For a more advanced UART control
      # example see the BLE-Shield driver.
      uart = UART(3, 9600, timeout_char=1000)
      
      sensor.reset() # Initialize the camera sensor.
      sensor.set_pixformat(sensor.RGB565) # or sensor.GRAYSCALE
      sensor.set_framesize(sensor.VGA) # or sensor.QQVGA (or others)
      sensor.skip_frames(time = 500) # Let new settings take affect.
      
      pyb.LED(BLUE_LED_PIN).on()
      sensor.skip_frames(time = 500) # Give the user time to get ready.
      
      pyb.LED(BLUE_LED_PIN).off()
      
      count = 0;
      
      while(True):
      
          if uart.any():
              a = uart.readline().decode()
              if a == "OK\r\n":
                  count = count + 1
                  sensor.snapshot().save("%d.jpg"%(count)) # or "example.bmp" (or others)
                  uart.write("Finish")
                  pyb.LED(BLUE_LED_PIN).on()
                  time.sleep(100)
                  pyb.LED(BLUE_LED_PIN).off()
                  a = "\n";
      
          else:
              sensor.snapshot()
              time.sleep(100)
      

      运行时,显示错误
      0_1546168207555_错误1.PNG

      发布在 OpenMV Cam
      5
      5ewo
    • 还是刚才的问题,为什么我拍照成功后,用32的板子的为openmv提供5v电源,结果就闪了一下白灯,按按键发送无法拍照?

      我把32板子和openmv都连在电脑上,串口也连接了,按按键可以发送OK,复位后也可以拍照,但是用32来为openmv供电却无法拍照。

      # UART Control
      #
      # This example shows how to use the serial port on your OpenMV Cam. Attach pin
      # P4 to the serial input of a serial LCD screen to see "Hello World!" printed
      # on the serial LCD display.
      
      import sensor, image, pyb
      from pyb import UART
      
      RED_LED_PIN = 1
      BLUE_LED_PIN = 3
      
      sensor.reset() # Initialize the camera sensor.
      sensor.set_pixformat(sensor.RGB565) # or sensor.GRAYSCALE
      sensor.set_framesize(sensor.QVGA) # or sensor.QQVGA (or others)
      
      
      pyb.LED(RED_LED_PIN).off()
      pyb.LED(BLUE_LED_PIN).on()
      print("You're on camera!")
      
      # Always pass UART 3 for the UART number for your OpenMV Cam.
      # The second argument is the UART baud rate. For a more advanced UART control
      # example see the BLE-Shield driver.
      uart = UART(3, 9600, timeout_char=1000)
      
      while(True):
          if uart.any():
              a = uart.readline().decode()
              print(a)
              if a == "OK\r\n":
                  img = sensor.snapshot()
                  img.morph(1, [+2, +1, +0,\
                                +1, +1, -1,\
                                +0, -1, -2]) # Emboss the image.
      
                  img.save("example.jpg") # or "example.bmp" (or others)
      
                  pyb.LED(BLUE_LED_PIN).off()
                  print("Done! Reset the camera to see the saved image.")
      

      想问一下为什么用32为openmv提供5v电源无法拍照并储存到SD卡,以及如何实现不复位按一下按键就拍一张照。

      发布在 OpenMV Cam
      5
      5ewo
    • RE: python中应该如何判断接收到的字符串是发送的字符串?

      行,我先看看,不懂再发,感谢你!

      发布在 OpenMV Cam
      5
      5ewo
    • RE: python中应该如何判断接收到的字符串是发送的字符串?
      # UART Control
      #
      # This example shows how to use the serial port on your OpenMV Cam. Attach pin
      # P4 to the serial input of a serial LCD screen to see "Hello World!" printed
      # on the serial LCD display.
      
      import sensor,image
      from pyb import UART
      
      # Always pass UART 3 for the UART number for your OpenMV Cam.
      # The second argument is the UART baud rate. For a more advanced UART control
      # example see the BLE-Shield driver.
      uart = UART(3, 9600, timeout_char=1000)
      
      while(True):
          if uart.any():
              a = uart.readline().decode()
              print(a)
              if a == "OK\r\n":
                  print("You're on camera!")
                  img = sensor.snapshot()
                  img.morph(1, [+2, +1, +0,\
                                +1, +1, -1,\
                                +0, -1, -2])
                  img.save("example.jpg")
                  print("Done! Reset the camera to see the saved image.")
      

      我不知道怎么缩进,我是对照例程改的。

      Traceback (most recent call last):
      File "", line 21, in
      RuntimeError: Sensor Timeout!!
      MicroPython v1.9.4-4510-g23e8457de on 2018-06-29; OPENMV3 with STM32F765
      Type "help()" for more information.

      现在又不行了。

      发布在 OpenMV Cam
      5
      5ewo
    • RE: python中应该如何判断接收到的字符串是发送的字符串?
      # UART Control
      #
      # This example shows how to use the serial port on your OpenMV Cam. Attach pin
      # P4 to the serial input of a serial LCD screen to see "Hello World!" printed
      # on the serial LCD display.
      
      import time
      from pyb import UART
      
      # Always pass UART 3 for the UART number for your OpenMV Cam.
      # The second argument is the UART baud rate. For a more advanced UART control
      # example see the BLE-Shield driver.
      uart = UART(3, 19200, timeout_char=1000)
      
      while(True):
          if uart.any():
              a = uart.readline().decode()
              print(a)
              if a == "OK\r\n":
                  sensor.snapshot().save("example1.jpg")
      

      0_1543926562881_错误.PNG

      Traceback (most recent call last):
      File "", line 17, in
      UnicodeError:
      MicroPython v1.9.4-4510-g23e8457de on 2018-06-29; OPENMV3 with STM32F765
      Type "help()" for more information.

      发布在 OpenMV Cam
      5
      5ewo
    • RE: python中应该如何判断接收到的字符串是发送的字符串?

      @5ewo 在 python中应该如何判断接收到的字符串是发送的字符串? 中说:

      额,我缩进了4个空格,可能粘贴上去就没了,冒号是没加。但是还是不行,我记得例程中说还要复位一下,是不是必须这样。

      发布在 OpenMV Cam
      5
      5ewo
    • python中应该如何判断接收到的字符串是发送的字符串?

      UART Control

      This example shows how to use the serial port on your OpenMV Cam. Attach pin

      P4 to the serial input of a serial LCD screen to see "Hello World!" printed

      on the serial LCD display.

      import time
      from pyb import UART

      Always pass UART 3 for the UART number for your OpenMV Cam.

      The second argument is the UART baud rate. For a more advanced UART control

      example see the BLE-Shield driver.

      uart = UART(3, 19200, timeout_char=1000)

      while(True):
      if uart.any():
      a = uart.readline()
      if a == "OK\r\n"
      sensor.snapshot().save("example1.jpg")
      我是要用32串口发送个字符串“OK\r\n”,在python中判断接收到的字符串,然后拍照储存到SD卡。

      发布在 OpenMV Cam
      5
      5ewo
    • RE: 外接STM32单片机通过串口控制OPENMV拍照并储存到SD卡?

      UART Control

      This example shows how to use the serial port on your OpenMV Cam. Attach pin

      P4 to the serial input of a serial LCD screen to see "Hello World!" printed

      on the serial LCD display.

      import time
      from pyb import UART

      Always pass UART 3 for the UART number for your OpenMV Cam.

      The second argument is the UART baud rate. For a more advanced UART control

      example see the BLE-Shield driver.

      uart = UART(3, 19200, timeout_char=1000)

      while(True):
      if uart.any():
      a = uart.readline()
      if a == "OK\r\n"
      sensor.snapshot().save("example1.jpg")
      查了一下好像不能直接判断,应该如何判断接收的字符串呢?

      发布在 OpenMV Cam
      5
      5ewo
    • RE: 外接STM32单片机通过串口控制OPENMV拍照并储存到SD卡?

      恩,笨死了,调出来了!
      if a = "OK\r\n"
      sensor.snapshot().save("example1.jpg")
      我又加了一句判断,但是显示语法错误。是不是不能这样判断呀。

      发布在 OpenMV Cam
      5
      5ewo
    • RE: 外接STM32单片机通过串口控制OPENMV拍照并储存到SD卡?

      @kidswong999
      我按你说的将两个都连到电脑了,为了检验其是否接受到32发送的字符串写了代码如下:
      import time
      from pyb import UART

      uart = UART(3, 9600, timeout_char=1000)

      while(True):
      if uart.any():
      a = uart.readline().decode()
      print(a)
      目的显示其接收到的字符串。单独测试单片机没有问题发送“OK”,但是IDE上不显示。
      接线:32使用USART2发送接收,TX2为PA2,RX2为PA3,OPENMV上串口RX为P0,TX为P1
      所以PA2接P0,PA3接P1,还有一根线共地。接线如图:0_1543923891445_接线图.png
      想问一下,问题出在哪里?与上面UART里的3有关么?

      发布在 OpenMV Cam
      5
      5ewo
    • RE: 外接STM32单片机通过串口控制OPENMV拍照并储存到SD卡?

      好的,我试试,谢谢你!有问题再问你!

      发布在 OpenMV Cam
      5
      5ewo
    • RE: 外接STM32单片机通过串口控制OPENMV拍照并储存到SD卡?

      意思是,在OPENMV IDE中编程完下载运行后,再断电接到32上电后,程序依然在执行是么?

      发布在 OpenMV Cam
      5
      5ewo
    • 外接STM32单片机通过串口控制OPENMV拍照并储存到SD卡?

      本人初学者,有C语言编程经验,想通过外接STM32单片机为OPENMV供电,通过串口发送指令控制OPENMV拍照并储存到SD卡中。因为外接单片机供电,所以不与电脑连接,也就用不到OPENMV IDE。
      所以,我应该发送什么指令控制其拍照并储存到SD卡中呢?此时,python应该无法使用了吧,我要用C语言编程,是否需要找源码中对应的代码?希望得到一个解决方案。感谢各位大佬!

      发布在 OpenMV Cam
      5
      5ewo