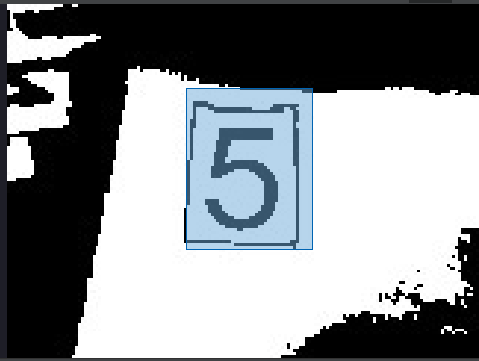
导航

    • 登录
    • 搜索
    • 版块
    • 产品
    • 教程
    • 论坛
    • 淘宝
    1. 主页
    2. 2iay
    • 举报资料
    • 资料
    • 关注
    • 粉丝
    • 屏蔽
    • 帖子
    • 楼层
    • 最佳
    • 群组

    2iay

    @2iay

    0
    声望
    6
    楼层
    388
    资料浏览
    0
    粉丝
    0
    关注
    注册时间 最后登录

    2iay 关注

    2iay 发布的帖子

    • 二值化处理,模板匹配识别不到数字

      颜色二值化滤波例子

      这个脚本展示了二值图像滤波。

      您可以传递二进制任意的阈值来分割图像。

      import sensor, image, time
      from image import SEARCH_EX, SEARCH_DS

      sensor.set_contrast(1)
      sensor.set_gainceiling(16)
      sensor.reset()
      sensor.set_framesize(sensor.QQVGA)
      sensor.set_pixformat(sensor.GRAYSCALE)

      #设置颜色阈值,如果是rgb图像,六个数字分别为(minL, maxL, minA, maxA, minB, maxB);
      #如果是灰度图,则只需设置(min, max)两个数字即可。
      red_threshold = (0,100, 0,127, 0,127) # L A B
      green_threshold = (0,100, -128,0, 0,127) # L A B
      blue_threshold = (0,100, -128,127, -128,0) # L A B
      gray=(0,130)
      sensor.skip_frames(time = 2000)
      clock = time.clock()

      template = image.Image("/5.0.pgm")
      #使用工具 - >机器视觉 - >阈值编辑器选择更好的阈值。
      while(True):

      clock.tick()
      img = sensor.snapshot().lens_corr(strength = 1.8, zoom = 1.0)
      img.binary([gray],invert = 1)
      
      r = img.find_template(template, 0.50, step=4, search=SEARCH_EX , roi=(55,25, 45, 60))     
      if r:
          img.draw_rectangle(r,rgb=(255,0,0))
      
      print(clock.fps())![0_1662905051472_screenshot_20220911_220156.png]
      

      0_1662905082662_screenshot_20220911_220156.png

      发布在 OpenMV Cam
      2iay
    • 特征点检测最开始识别不到特征
      # 利用特征点检测特定物体例程。
      # 向相机显示一个对象,然后运行该脚本。 一组关键点将被提取一次,然后
      # 在以下帧中进行跟踪。 如果您想要一组新的关键点,请重新运行该脚本。
      # 注意:请参阅文档以调整find_keypoints和match_keypoints。
      import sensor, time, image
      
      # Reset sensor
      sensor.reset()
      
      # Sensor settings
      sensor.set_contrast(1)
      sensor.set_gainceiling(16)
      sensor.set_framesize(sensor.VGA)
      sensor.set_windowing((320, 240))
      sensor.set_pixformat(sensor.GRAYSCALE)
      
      sensor.skip_frames(time = 2000)
      sensor.set_auto_gain(False, value=100)
      
      #画出特征点
      def draw_keypoints(img, kpts):
          if kpts:
              print(kpts)
              img.draw_keypoints(kpts)
              img = sensor.snapshot()
              time.sleep_ms(1000)
      
      kpts1 = None
      #kpts1保存目标物体的特征,可以从文件导入特征,但是不建议这么做。
      #kpts1 = image.load_descriptor("/desc.orb")
      #img = sensor.snapshot()
      #draw_keypoints(img, kpts1)
      
      clock = time.clock()
      
      while (True):
          clock.tick()
          img = sensor.snapshot()
          if (kpts1 == None):
              #如果是刚开始运行程序,提取最开始的图像作为目标物体特征,kpts1保存目标物体的特征
              #默认会匹配目标特征的多种比例大小,而不仅仅是保存目标特征时的大小,比模版匹配灵活。
              # NOTE: By default find_keypoints returns multi-scale keypoints extracted from an image pyramid.
              kpts1 = img.find_keypoints(max_keypoints=150, threshold=10, scale_factor=1.2)
              #image.find_keypoints(roi=Auto, threshold=20, normalized=False, scale_factor=1.5, max_keypoints=100, corner_detector=CORNER_AGAST)
              #roi表示识别的区域,是一个元组(x,y,w,h),默认与framsesize大小一致。
              #threshold是0~255的一个阈值,用来控制特征点检测的角点数量。用默认的AGAST特征点检测,这个阈值大概是20。用FAST特征点检测,这个阈值大概是60~80。阈值越低,获得的角点越多。
              #normalized是一个布尔数值,默认是False,可以匹配目标特征的多种大小(比ncc模版匹配效果灵活)。如果设置为True,关闭特征点检测的多比例结果,仅匹配目标特征的一种大小(类似于模版匹配),但是运算速度会更快一些。
              #scale_factor是一个大于1.0的浮点数。这个数值越高,检测速度越快,但是匹配准确率会下降。一般在1.35~1.5左右最佳。
              #max_keypoints是一个物体可提取的特征点的最大数量。如果一个物体的特征点太多导致RAM内存爆掉,减小这个数值。
              #corner_detector是特征点检测采取的算法,默认是AGAST算法。FAST算法会更快但是准确率会下降。
              draw_keypoints(img, kpts1)
              #画出此时的目标特征
          else:
              #当与最开始的目标特征进行匹配时,默认设置normalized=True,只匹配目标特征的一种大小。
              # NOTE: When extracting keypoints to match the first descriptor, we use normalized=True to extract
              # keypoints from the first scale only, which will match one of the scales in the first descriptor.
              kpts2 = img.find_keypoints(max_keypoints=150, threshold=10, normalized=True)
              #如果检测到特征物体
              if (kpts2):
                  #匹配当前找到的特征和最初的目标特征的相似度
                  match = image.match_descriptor(kpts1, kpts2, threshold=85)
                  #image.match_descriptor(descritor0, descriptor1, threshold=70, filter_outliers=False)。本函数返回kptmatch对象。
                  #threshold阈值设置匹配的准确度,用来过滤掉有歧义的匹配。这个值越小,准确度越高。阈值范围0~100,默认70
                  #filter_outliers默认关闭。
      
                  #match.count()是kpt1和kpt2的匹配的近似特征点数目。
                  #如果大于10,证明两个特征相似,匹配成功。
                  if (match.count()>10):
                      # If we have at least n "good matches"
                      # Draw bounding rectangle and cross.
                      #在匹配到的目标特征中心画十字和矩形框。
                      img.draw_rectangle(match.rect())
                      img.draw_cross(match.cx(), match.cy(), size=10)
      
                  #match.theta()是匹配到的特征物体相对目标物体的旋转角度。
                  print(kpts2, "matched:%d dt:%d"%(match.count(), match.theta()))
                  #不建议draw_keypoints画出特征角点。
                  # NOTE: uncomment if you want to draw the keypoints
                  #img.draw_keypoints(kpts2, size=KEYPOINTS_SIZE, matched=True)
      
          # Draw FPS
          #打印帧率。
          img.draw_string(0, 0, "FPS:%.2f"%(clock.fps()))


      用的直接是官方的历程
      前十秒识别不到或者识别很少很少的特征

      发布在 OpenMV Cam
      2iay
    • 为什么识别蓝色返回的blob.code()为4?为什么不为3?
      # Untitled - By: ASUS - 周二 9月 6 2022
      
      import sensor, image, time, pyb, math
      import json, ustruct
      from pyb import UART ,LED
      
      #*********************************************************************
      def find_max(blobs):
          max_size=0
          global max_blob
      
          for blob in blobs:
              if blob[2]*blob[3] > max_size and 50<blob.cy()<150:
                  max_blob=blob
                  max_size = blob[2]*blob[3]
          return max_blob
      #*********************************
      def detect(max_blob):
          global mark
          #judge=0
          #nothing=0
          row_data=[-1,-1]
          print(max_blob.density())
          #mark=([-1,-1],[-1,-1]) #1 yellow 2 green 3 blue 4 red ;1 rect 2 circle 3 rt
          #shape=0 #1是圆 2是矩形 圆形和矩形直接用函数识别,剩下的判断是不是三角形 3是三角形
          #colour=0
      
          if  max_blob.density()>0.82:
              row_data[0]=max_blob.code()
              img.draw_rectangle(max_blob.rect())
              row_data[1]=1
      
          elif max_blob.density()>0.6:
              img.draw_circle((max_blob.cx(), max_blob.cy(),int((max_blob.w()+max_blob.h())/4)))
              row_data[0]=max_blob.code()
              row_data[1]=2
          elif max_blob.density()>0.4:
                  img.draw_cross(max_blob.cx(), max_blob.cy())
                  row_data[0]=max_blob.code()
                  row_data[1]=3
          return row_data
      #*********************************
      def sending_data(a,b):
          global uart;
          #frame=[0x2C,18,cx%0xff,int(cx/0xff),cy%0xff,int(cy/0xff),0x5B];
          #data = bytearray(frame)
          data_end = ustruct.pack("<bbhhb",      #格式为俩个字符俩个短整型(2字节)
                         0x2C,                      #帧头1
                         0x12,                      #帧头2
                         int(a), # up sample by 4   #数据1
                         int(b), # up sample by 4    #数据2
                         0x5B)
          uart.write(data_end);   #必须要传入一个字节数组
      #********************************************************************
      red=(8, 55, 73, 10, -71, 57)
      green=(63, 22, -83, -4, 50, -23)
      blue=(52, 7, 40, -73, -15, -117)
      
      sensor.reset()
      sensor.set_pixformat(sensor.RGB565)
      sensor.set_framesize(sensor.QVGA)
      sensor.skip_frames(time = 2000)
      
      uart = UART(3, 115200)
      uart.init(115200, bits=8, parity=None, stop=1) # init with given parameters
      
      clock = time.clock()
      #********************************************************************
      while(True):
          clock.tick()
          img = sensor.snapshot().lens_corr(strength = 1.8, zoom = 1.0)#畸变矫正
          blobs = img.find_blobs([red,green,blue],area_threshold=100
          )
          data=detect(find_max(blobs))
          print(data)
          sending_data(data[0],data[1])
          #uart.write(jsonstr)
          #break
          #print(clock.fps())
      
      
      发布在 OpenMV Cam
      2iay
    • 识别蓝色方块时如果方块旋转一定角度就识别成圆 而且有时候不在镜头正中间或者镜头倾斜一定角度就识别不到或者识别错误?
      # Untitled - By: ASUS - 周二 9月 6 2022
      
      import sensor, image, time, pyb, math
      import json, ustruct
      from pyb import UART ,LED
      
      #*********************************************************************
      def find_max(blobs):
          max_size=0
          global max_blob
      
          for blob in blobs:
              if blob[2]*blob[3] > max_size and 50<blob.cy()<150:
                  max_blob=blob
                  max_size = blob[2]*blob[3]
          return max_blob
      #*********************************
      def detect(max_blob):
          global mark
          #judge=0
          #nothing=0
          row_data=[-1,-1]
          print(max_blob.density())
          #mark=([-1,-1],[-1,-1]) #1 yellow 2 green 3 blue 4 red ;1 rect 2 circle 3 rt
          #shape=0 #1是圆 2是矩形 圆形和矩形直接用函数识别,剩下的判断是不是三角形 3是三角形
          #colour=0
      
          if  max_blob.density()>0.82:
              row_data[0]=max_blob.code()
              img.draw_rectangle(max_blob.rect())
              row_data[1]=1
      
          elif max_blob.density()>0.6:
              img.draw_circle((max_blob.cx(), max_blob.cy(),int((max_blob.w()+max_blob.h())/4)))
              row_data[0]=max_blob.code()
              row_data[1]=2
          elif max_blob.density()>0.4:
                  img.draw_cross(max_blob.cx(), max_blob.cy())
                  row_data[0]=max_blob.code()
                  row_data[1]=3
          return row_data
      #*********************************
      def sending_data(a,b):
          global uart;
          #frame=[0x2C,18,cx%0xff,int(cx/0xff),cy%0xff,int(cy/0xff),0x5B];
          #data = bytearray(frame)
          data_end = ustruct.pack("<bbhhb",      #格式为俩个字符俩个短整型(2字节)
                         0x2C,                      #帧头1
                         0x12,                      #帧头2
                         int(a), # up sample by 4   #数据1
                         int(b), # up sample by 4    #数据2
                         0x5B)
          uart.write(data_end);   #必须要传入一个字节数组
      #********************************************************************
      red=(8, 55, 73, 10, -71, 57)
      green=(63, 22, -83, -4, 50, -23)
      blue=(52, 7, 40, -73, -15, -117)
      
      sensor.reset()
      sensor.set_pixformat(sensor.RGB565)
      sensor.set_framesize(sensor.QVGA)
      sensor.skip_frames(time = 2000)
      
      uart = UART(3, 115200)
      uart.init(115200, bits=8, parity=None, stop=1) # init with given parameters
      
      clock = time.clock()
      #********************************************************************
      while(True):
          clock.tick()
          img = sensor.snapshot().lens_corr(strength = 1.8, zoom = 1.0)#畸变矫正
          blobs = img.find_blobs([red,green,blue],area_threshold=100
          )
          data=detect(find_max(blobs))
          print(data)
          sending_data(data[0],data[1])
          #uart.write(jsonstr)
          #break
          #print(clock.fps())
      
      
      发布在 OpenMV Cam
      2iay