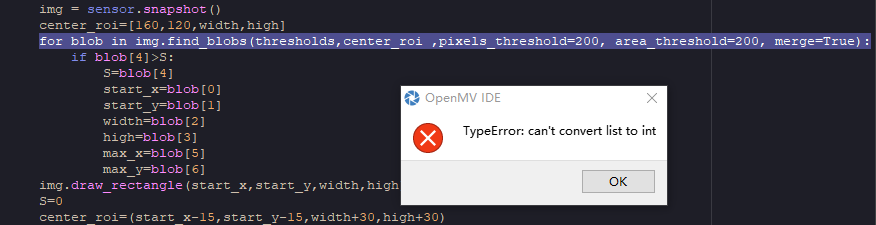
can't convert list to int
-
# UART Control
#
# This example shows how to use the serial port on your OpenMV Cam. Attach pin
# P4 to the serial input of a serial LCD screen to see "Hello World!" printed
# on the serial LCD display.


from pyb import UART
import sensor, image, time, math


# Color Tracking Thresholds (L Min, L Max, A Min, A Max, B Min, B Max)
# The below thresholds track in general red/green/blue things. You may wish to tune them...


sensor.reset()
sensor.set_pixformat(sensor.RGB565)
sensor.set_framesize(sensor.QVGA)
sensor.skip_frames(time = 2000)
sensor.set_auto_gain(False) # must be turned off for color tracking
sensor.set_auto_whitebal(False) # must be turned off for color tracking
clock = time.clock()
# Always pass UART 3 for the UART number for your OpenMV Cam.
# The second argument is the UART baud rate. For a more advanced UART control
# example see the BLE-Shield driver.
uart = UART(3, 115200)
width=10
high=10
lab_l_min=100
lab_l_max=0
lab_a_min=128
lab_a_max=-127
lab_b_min=128
lab_b_max=-127
while(True):
    clock = time.clock()
    img = sensor.snapshot()
    img.draw_rectangle(160-(width//2),120-(high//2),width,high,color = (0, 0, 255), thickness = 2,size = 10 )
    a=0
    b=0
    if uart.any():
        a= uart.readline().decode()
        print(a)
        b=int(a)
    if b==1:
        print(12345)
        width=width+10
    if b==2:
       high=high+10
    if b==3:
        while(True):
            for i in range(width):
                for j in range(high):
                    if(i==0 and j==0):
                        lab_l_min=100
                        lab_l_max=0
                        lab_a_min=128
                        lab_a_max=-127
                        lab_b_min=128
                        lab_b_max=-127
                        print(lab_l_min)
                    (r,g,b)=img.get_pixel(120-width//2,160-high//2)
                    (lab_l,lab_a,lab_b)=image.rgb_to_lab(r,g,b)
                    if lab_l<lab_l_min:
                        lab_l_min=int (lab_l)
                    if lab_l>lab_l_max:
                        lab_l_max=int (lab_l)
                    if lab_a<lab_a_min:
                        lab_a_min=int (lab_a)
                    if lab_a>lab_a_max:
                        lab_a_max=int (lab_a)
                    if lab_b>lab_b_max:
                        lab_b_max=int (lab_b)
                    if lab_b<lab_b_min:
                        lab_b_min=int (lab_b)
            print(lab_l_min,lab_l_max,lab_a_min,lab_a_max,lab_b_min,lab_b_max)
            thresholds = [(lab_l_min,lab_l_max,lab_a_min,lab_a_max,lab_b_min,lab_b_max)] # 色块追踪选择阈值
            max_x=0
            max_y=0
            high=0
            width=0
            S=0
            while(True):
                clock.tick()
                img = sensor.snapshot()
                center_roi=[160,120,width,high]
                for blob in img.find_blobs(thresholds,center_roi ,pixels_threshold=200, area_threshold=200, merge=True):
                    if blob[4]>S:
                        S=blob[4]
                        start_x=blob[0]
                        start_y=blob[1]
                        width=blob[2]
                        high=blob[3]
                        max_x=blob[5]
                        max_y=blob[6]
                img.draw_rectangle(start_x,start_y,width,high)
                S=0
                center_roi=(start_x-15,start_y-15,width+30,high+30)
                print(width,S,high,max_x,max_y)
                print(clock.fps())
-
-
此外,它有的时候会显示lab_l_min isn't define
-
你的代码,需要串口输入数据才能运行。请提供具体的步骤。
或者去除串口相关的代码,否则我复现不了错误。
-
@kidswong999 谢谢我已经自己找到问题了,中间漏了一个invert的参数